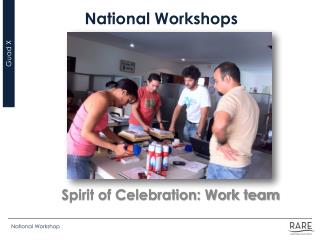
Environmental workshops
Explore the picturesque post-glacial landscape at the Center for Environmental Education in Lipie. Engage in soil and water analyses, forest trips, and more youth activities.

Environmental workshops
E N D
Presentation Transcript
Environmentalworkshops Center for environmentaleducation
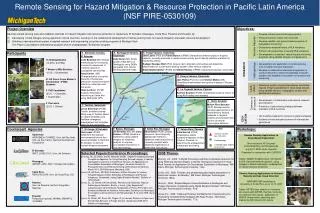
The center for environmental education was founded in 2004 financed by the NFOŚiGW, WFOŚiGW, fund Phare. It is located in a village Lipie in area of Pojezierze Zachodniopomorskie on the morainic plateau, close to the Mogilica river. This area is the most picturesque region in the part of the Pojezierze Zachodniopomorskie. Over several kilometers can be observed all the characteristic forms of the landscape of post-glacial landscape. Is accompanied by a richness of nature, both animate (the old trees, manorial parks, the location of rare or protected plants, ring-shaped plant communities) and inanimate (turning the rivers through works glacial boulders). Thebriefhistory
Thecoordinates of the center for environmentaleducationin Lipie:N 53o49’54.47’’ E 15o56’26.08’’
Yes! There we are! Center for environmentaleducation
Searching of environmental threat, collecting material for diagnostic tests. 1. Thetrip to theforest and thesurroundingarea.
Aftercollectingmaterial for theresearch, theyouthenthusiasticallyjoinedthestudy.
Chemical Analysis of Water
Water hardness analisys. • Pipette 5ml of water into a clean flask. Then add the reagent, blend it with water after adding each drop. The initially red solution changes to green.
Carbon concentration analisys • Pipette 5ml of water into a clean flask. Then add the reagent, blend it with water after adding each drop. The initially blue solution changes to yellow or from yellow to orange.
pH value analisys • Pipette 5ml of water into a clean flask. Then add 4 drops of the reagent, blend it with water, leave it for 3 minutes. Compare the final colour with the colour chart and read the proper pH value.
NH4 analisys • Pipette 5ml of water into 2 clean flasks.Add into one of the flasks as it follows:a) 4 drops of the reagent 1, blend it wellb) 4 drops of the reagent 2, blend it wellc) 5 drops of the reagent 3, blend it wellThen place the flask with the reagents added in the comparator block (on its soft end), and the other flask, without the reagents, on the 'cut' comparator block end.
NO2 analisys • We need two clean flasks. Pipette 5ml of water into them.Add 5 drops of the reagent 1 into one of the flasks, then add the reagent 2, blend it well. Wait 3 minutes till a colour will appear.
PO4analisys • We need two clean flasks. Pipette 10ml of water into them.Add the reagent into one of the flasks, as it follows:a. 1 teaspoon of the reagent 1, wait 10 minutesb. 10 drops of the reagent 2, blend it, wait 10 minutes.Then we place the flask with the reagents added in the comparator block (on its soft end), and the other flask, without the reagents, on the 'cut' comparator block end.
Pipette distilled water into the flask with the final solution if the final solution becomes too dark (comparing to the colour chart). • In order to calculate the desired mass of solute you will need to know the amount of the tested water and the amount of the desitlled water. • Calculate as follow: • 5 ml of the tested water and 5 ml of the destilled water, multiply the result with 2. • 2 ml of the tested water and 8 ml of the destilled water, multiply the result with 5. • 1 ml of the tested water and 9 ml of the destilled water, multiply the result with 10.
Fe analisys • We need two clean flasks. Pipette 5ml of water into them.Add 5ml of Fe reagent to one of the flasks, blend it, wait 5 minutes.Then we place the flask with the reagents added in the comparator block (on its soft end), and the other flask, without the reagents, on the 'cut' comparator block end.
Instruction for the soil test: • Find the slope of the valley and the bottom (for example, near troughs) unveiling of the site where the soil is visible • Clean the unveiling of detritus behind, so that you can see the different layers of soil • Examine the properties of the soil, and write proposals: Soil test.
Take a sample of soil from the level of caries, add a little water and place on a sheet of paper. Visually evaluate the color and specify the humus content by using the informations in table. 1. Examination of humus content
Take a bit of soil in your hand and observe how it changes under the influence of crushing, formation, humidification and trituration. The result of the observation compare with the table 2. Examination of soil moisture
Take a sample of soil to a flat container. Pour dilute hydrochloric acid and observe the reactions. The result of the observation compare with a table and determine the calcium content in the soil. 3. Examination of calciumcontent
Pour 10g of driedsoil to a wide-neckedbottle (250ml) and pour 25ml of soilextract. • Closethebottle and shakethecontents for about one minute • Leavethegrounduntillsettling to thebottom of thebottle. • Carefullypourthesolution to theamontindicated by a lineinthe test tube „ph”- black • Add 3 drops of reagent, close and shakethecontents • Comparecolor of thesamplewiththeattached diagram. To do this , removethe cap , putthe test tube on a circularwhite field inside a givencolour, and lookingfromabove to comparethetwocolors 4. Examination of soilreaction (ph)
Pour 10g of driedsoil to a wide-neckedbottle (250ml) and pour 25ml of soilextract. • Closethebottle and shakethecontents for about 5 minute • Filterthesampleusing : rack, funnel, filter paper and a set of eco – lab. • Scratch a wide-neckedbottle (100ml) into a funnel. • Filtration to allowthefiltrate to thelevelmarked on thetwo test - tubes (10ml i 5ml). 5. Examination of ammonium and nitratecontantinthesoil
Students following the above instructions carefully and eagerly engaged in the study of both water and soil
Environmental workshops at the Centre for environmental education in Lipie taught us signify the purity of water using the method of bio-indicators and the methods of physico-chemical and determine the status of air quality using a scale of lichens. In addition , we learned how to make wet preparations of plants. Conclutions