TS4120 SCANHEAD CALIBRATION
Next Screen, Page Down. TS4120 SCANHEAD CALIBRATION

TS4120 SCANHEAD CALIBRATION
E N D
Presentation Transcript
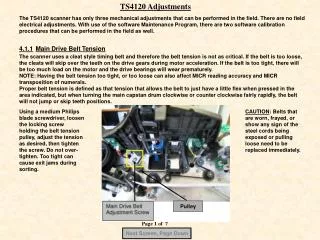
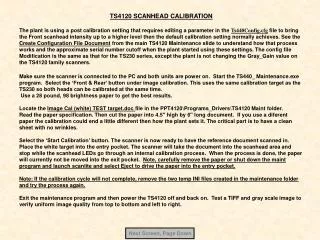
Next Screen, Page Down TS4120 SCANHEAD CALIBRATION The plant is using a post calibration setting that requires editing a parameter in the Ts440Config.cfg file to bring the Front scanhead intensity up to a higher level then the default calibration setting normally achieves. See the Create Configuration File Documentfrom the main TS4120 Maintenance slide to understand how that process works and the approximate serial number cutoff when the plant started using these settings. The config file Modification is the same as that for the TS230 series, except the plant is not changing the Gray_Gain value on the TS4120 family scanners. Make sure the scanner is connected to the PC and both units are power on. Start the TS440_ Maintenance.exe program. Select the ‘Front & Rear’ button under image calibration. This uses the same calibration target as the TS230 so both heads can be calibrated at the same time. Use a 28 pound, 98 brightness paper to get the best results. Locate the Image Cal (white) TEST target.doc file in the PPT4120\Programs_Drivers\TS4120 Maint folder. Read the paper specification. Then cut the paper into 4.5" high by 6" long document. If you use a diferent paper the calibration could end a little different then how the plant sets it. The critical part is to have a clean sheet with no wrinkles. Select the ‘Start Calibration’ button. The scanner is now ready to have the reference document scanned in. Place the white target into the entry pocket. The scanner will take the document into the scanhead area and stop while the scanhead LEDs go through an internal calibration process. When the process is done, the paper will currently not be moved into the exit pocket. Note, carefully remove the paper or shut down the maint program and launch scanlite and select Eject to drive the paper into the entry pocket. Note: If the calibration cycle will not complete, remove the two temp INI files created in the maintenance folder and try the process again. Exit the maintenance program and then power the TS4120 off and back on. Test a TIFF and gray scale image to verify uniform image quality from top to bottom and left to right.