Download
1 / 33
330 likes | 344 Vues
Learn how to create a requisition in MyClark, the initial purchase request that starts the purchasing process and is eventually turned into a purchase order.

E N D
Creating a Requisition in MyClark Sabra Sand, Director of Business
Requisition Basics • Requisitionsare the initial purchase request that college users create to begin the purchasing process • A Requisition’s final goal is to be turned into a Purchase Order.
Requisition Basics • Those who created requisitions in Procure+ will have access to create requisitions in MyCLark. • Requisitions are entered in the Finance Pillar of MyClark • The Purchasing Office takes that requisition information and then turns it into a PO, assigning it a vendor and ordering the goods or services.
Requisition life cycle N Create a Requisition Submit for Approval Budget Pre-check Pass Y N Purchasing Ofiice Sources Req to PO N Budget Check Approved Pass Y Y Goods or services ordered
Requisition life cycle N Create a Requisition Submit for Approval Budget Pre-check Pass Y N N Budget Check Approved Pass Source Req to PO Y Y Downstream Process
Create a Requisition First go to Navigation (Nav Bar) on the upper right corner, click on it and it will give you a drop down menu of your options..
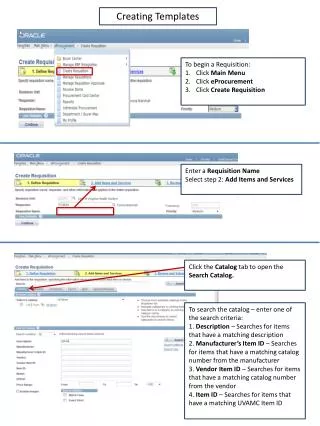
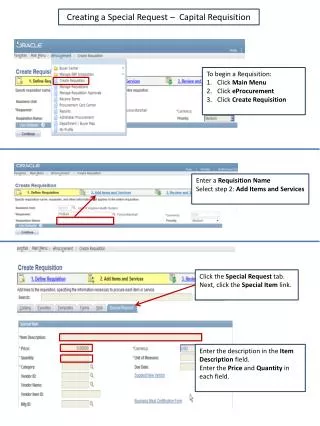
CREATE A REQUISITION In the Finance pillar, Navigate to Purchasing > Requisition > Add/Update Requisition Click on Add button.
CREATE A REQUISITION The top section of the Maintain Requisition page includes a free form field for Requisition Name. This field should be used for a department specific numbering scheme. Below that section is two main parts, Header and Line data. Header Line
CREATE A REQUISITION Requisition Header items that have asterisks are required fields. Requester The person making the request Requisiton Date The date the request was made Currency Code Will always be US Dollars (USD) Your User Preference Settings can be defined so these fields can be defaulted for you.
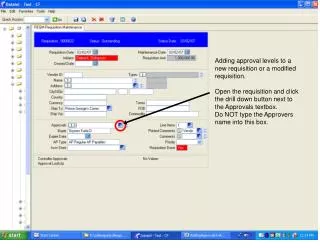
CREATE A REQUISITION Add Comments link is used to record both text comments and attachments.
CREATE A REQUISITION On the Requisition Line, select an Item (optional) and Description (can be overwritten) will be defaulted based on the Item. Specify Quantity and identify its corresponding Unit of Measure. Category is used to classify what is being purchased. This is also tied to the Item you’ve selected. Price is the unit price of the goods/services purchased. Supplier Item ID can be found under Item Information tab
CREATE A REQUISITION The first level of detail below the Requisition Line is the Requisition Schedule. Click on the red and white icon. Schedule gives you the ability to move to the section where you will enter the accounting detail. The next level of detail below the Schedule is the Requisition Distributiondetail (or accounting information). You can get to the Distribution detail screen by clicking on the icon that looks like a piece of paper with three arrows:
CREATE A REQUISITION The Requisition Distribution details shows the funding source(s) being allocated for that Line/Schedule. Funding sources can be split by Percentage, Amount or Item Quantity as many times as needed.
PEOPLESOFT DISTRIBUTION BASICS A PeopleSoft distribution line is made up of blocks called Chartfields. Many Chartfield values are derived from the Legacy accounting structure, but some will be new. Examples include:
CREATE A REQUISITION When a Requisition is saved, it is assigned a Requisition ID number. This will be the next available sequence number from PeopleSoft. If a Requisition Name was not specified, it defaults to the Requisition ID; this can be overwritten with a new name if needed. Also, new Requisitions are created with an “Open” status, which it keeps after being saved. This status won’t change until the Requisition is submitted for approval.
Requisition life cycle N Create a Requisition Submit for Approval Budget Pre-check Pass Y N N Budget Check Approved Pass Source Req to PO Y Y Downstream Process
BUDGET PRE-CHECK You initiate a Budget Pre-Check from the Maintain Requisitions front page by clicking on the rightmost icon to the right of the Requisition’s Budget Status indicator: A successful Budget Pre-Check will return a Budget Status of Prov Valid (for “provisionally valid”) meaning that budget was available for the provided amounts and sources:
Requisition life cycle N Create a Requisition Submit for Approval Budget Pre-check Pass Y N N Budget Check Approved Pass Source Req to PO Y Y Downstream Process
REQ APPROVAL WORKFLOW • Requisition approval in PeopleSoft is governed by the Approval Workflow Engine, or AWE. These process definitions are also commonly called Workflow processes. The Workflow defines each level of approval needed for a requisition. • Approved Requisitions can be further processed, while denied requisitions are sent back to the requestor who can make necessary changes and resubmit for approval.
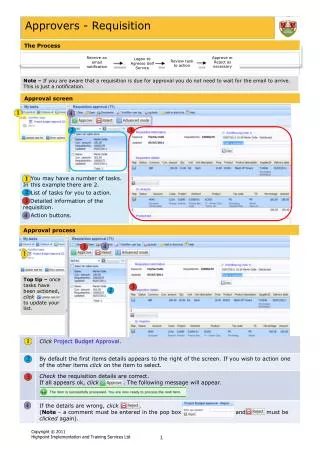
SUBMIT FOR APPROVAL Another task you can perform before submitting your Requisition for approval is to do an Approval Preview. At the bottom of the Maintain Requisitions front page, below the Line detail section, is a View Approvals link: Clicking this link will bring up a list of the people who will be involved in approving your Requisition. This link can also be used to track where your Requisition is in its approval process after it’s been submitted.
SUBMIT FOR APPROVAL When you are ready to submit your Requisition for approval, click on the check box near the top of the front Maintain Requisitions page: Requisition status will change from “Open” to “Pending” for pending approval.
APPROVAL OF A REQUISITION To approve a Requisition, Navigate to Worklist > Worklist The Worklist provides a line item overview as well as links that will take you to a review screen showing details on the approval actions taken or needed for each line item.
APPROVAL OF A REQUISITION Requisition Approvals Enter Comments pertinent to your approval action.
Requisition life cycle N Create a Requisition Submit for Approval Budget Pre-check Pass Y N N Budget Check Approved Pass Source Req to PO Y Y Downstream Process
BUDGET CHECK Budget Checking will perform the same validation as the Budget Pre-Check, but this time it will create Commitment Control entries. Specifically, Budget Checking a Requisition will result in a Pre-Encumbrance entry. This will act as a reservation of budgeted funds needed to process the requested items to payment. Requisition Budget Checking can be done individually, on the Requisition page, or in batch via a PeopleSoft application engine process. Budget status: N (Not checked) – Not budget checked E (Error) – Failed budget check V (Valid) – Passed budget check
BUDGET CHECK You need special permissions to be able to run Budget Checking from the Requisition page. Clicking the appropriate icon in the upper-right corner of the front Maintain Requisitions page will initiate a budget check: Requisitions that pass Budget Checking will get a “Valid” Budget Status when the process completes.
BUDGET CHECK In addition to the Valid budget status, the Maintain Requisitions page will also indicate the Pre-Encumbrance Balance in the Header’s summary section: Only Approved Requisitions with a Valid Budget Status are eligible to be turned into a Purchase Order.
Modifying a REQUISITION There are a few modification scenarios with Requisition, each with their own set of options and outcomes:
Requisition life cycle N Create a Requisition Submit for Approval Budget Pre-check Pass Y N Purchasing Office Sources Req to PO N Budget Check Approved Pass Y Y Goods and services ordered
Purchase Order Basics • Purchase Orders are designed to contain the final information that will be used to place an order with a Supplier. Purchase Orders are more complex than Requisitions, and are created by Purchasing Office staff, based on requisitions submitted.