Download
1 / 40
400 likes | 519 Vues
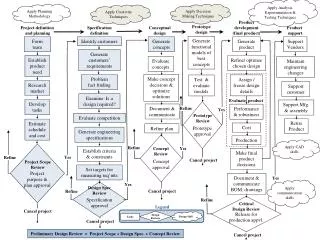
This guide outlines the process of costing Finished Goods Purchase Orders (FGPOs) within the RLM system. It details how Jordache places FGPOs with factories, and how costs are approved by related and non-related vendors. The guide emphasizes the importance of having an approved cost sheet to print labels or ship products. Additionally, it covers essential training terms, RLM system icons for navigation, and steps for entering and approving cost sheets, ensuring efficient and accurate processing of purchase orders.

E N D
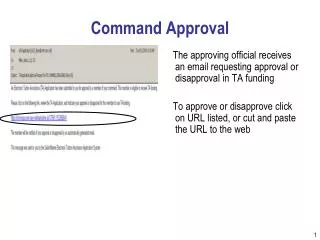
Cost Approval RLM System
Costing of Finished Goods Purchase Orders • Finished Goods Purchase Orders (FGPOs) are the orders Jordache places to the factories that produce the garments • Costing of FGPOs to Related Factories is done in the factory by the Costing Department • Costing of FGPOs to Non-Related Factories is done by the Related Vendor (MG, JIL, etc.) • Completed (Finalized) Cost Sheets are sent to NY for Approval • Related Factories cannot print labels or ship out of the RLM system without an Approved Cost Sheet • NOTE: Some of the following slides will have different screen colors (browns and blues), but the screens you will see will all have the blue colors. (Skip to Main Menu)
Glossary of Training Terms • The following terms will be used throughout this training program: • Field: A box on the screen into which you enter information • Value: The information (data) being entered in the field. Example: Division number, FGPO number • Icon: An image you may click to perform a function such as select, submit or exit • (Single-)Click: Also “Select.” Hitting the left mouse button once. This will activate an icon or select a row in a list of values • Double-click: Hitting the left mouse button twice o the same part of the screen. Used only to select and return a value from a list.
Using the RLM System • These are the primary RLM icons you will use: • Search: Located next to entry fields. Clicking this icon brings up a pop-up window with a list of all possible values for the field (for example, the next to the Division field will show a list of all divisions) (Shift-F9 keys or F21 key) • Select: Located on the Search pop-up windows. You may click on a line and click Select to return its value to the main screen • OK (Submit): Located in the bottom right corner of each screen. Processes the information on screen and brings you to the next screen • Return (Back): Located at the top of each screen. Click this icon to go back one screen (F2 key) • Exit: Located at the top of each screen. Click this icon to return to the menu or close a pop-up (F3 key)
Sign On Enter your User ID and Password here Note: User ID and Password are initially assigned by MIS. You will be prompted to change it the first time you login. The password field IS case-sensitive. Click OK
Welcome Click the check (or hit the Enter key) to proceed Click OK
Select Application Enter your Company Number in the Company field (JL=1, DS=4) Click the New York Inter Company Costing button in the menu If you don’t enter a Company or enter the wrong number, you will receive this error: Click OK
Cost Entry Enter the contractor (factory) number (recommended – see next slide) Or enter a User PO # (optional) Or just click “Display Orders for All Contractors” (F10 key) to view your entire list Note: Security by Division is used to limit your list only to those divisions with which you work. Contact MIS to set up your security. Otherwise, you will load POs from every division, which may take a few minutes.
Search for Contractor To Select a Contractor (Factory) click the icon You may use the Name, Type or Country search boxes to jump down the list. Type in the field and press enter Double-click a Factory to select it, or single-click and hit the button Click OK when finished
Display Costs Requiring Approval A list of all POs (from that factory, if selected) requiring cost approval appears. POs that have not been finalized by the factory/vendor or were rejected are not visible Click “Display All Orders” (F9 key) to view the list including unfinalized and rejected costs
Display Costs Requiring Approval You may click on the animated Excel icon to export the list to MS Excel for further filtering. This may take a few seconds Note: You must close all open MS Excel windows BEFORE clicking the export icon.
Display Costs Requiring Approval Right-click on the line of the PO you want to check A menu appears. Select “Update Cost”
The Cost Sheet: Production Functions • The cost sheet has already been filled out by the Factory or Related Vendor • The Production Coordinator’s responsibility is to check the costs for each section and match them to expected or “standard” costs as determined by the Head of Production • In addition, the Production Coordinator may enter or adjust the below the line costs that Jordache incurs after the Factory Cost • These costs include but are not limited to Freight, Duty and Commission.
Cost Sheet Entry: The Cost Sheet Make sure the header information is correct – including the style (left side) You may not change any information on the factory’s entries. If anything is wrong, you must reject the cost Scroll down to continue checking the cost
Cost Sheet Approval: Fabric Description You must check the fabric description for the Vendor (consigned) Fabric Enter “F” in the last column of the Allowance line and hit the Enter key
Check Fabric Description The description appears here Click OK to return to the cost sheet
Cost Sheet Entry: The Cost Sheet To see the cost sheet by section with column headings, click “Alternate Entry Mode”
Cost Sheet: View Headings Hit the Back button (F2) to return to the original entry mode At any time you may click this icon to refresh the calculations
Cost Sheet: Vendor Fabric If the Vendor is supplying the fabric, trim and/or pocketing, the cost/yard and utilization per piece will be on this screen Note: All fabric values are in cost per square yard ($/yd2)
Cost Sheet Approval Continue checking each section using the Page Down key or the scroll bars.
Cost Sheet: Total FOB Section TOTAL COST is the Factory Cost including Vendor Mark Up
Cost Approval: Enter Duty If there is Duty, the percentage and HTS # will appear here. F12 to recalculate Note: Hanger Duty only calculates if there is an entry in “Hanger Imported” above If there is Hanger Duty enter the percentage here Click this icon to refresh the calculations
Cost Approval: Commission (not used) If there is Commission, enter the percentage here Note: As of 2006 Jordache no longer has commission. Directions Studio may still have commission for non-related agents.
Cost Approval: Freight The default freight charge appears. Click into the field to change it
Cost Approval: Miscellaneous Miscellaneous below-line costs may be entered here
Cost Approval: Quota (non-Duty) Non-duty quota may be entered here
Cost Approval: LDP Cost Below the line totals appear here. LDP Cost is the final total cost to the purchasing company Click this icon to refresh the calculations
Cost Approval: LDP Cost Click “Final” to approve the cost sheet. Continue with the next slide To save your changes without approving, click the Exit button (F3 key)
Cost Sheet: Approve and Print You may also want to check “Print OPA reports” and “Print cost sheet” Check “Approve Cost” Click OK to submit
Cost Sheet: Print OPAs and Contract(s) You may change the number of copies of each document that will print Type over the Outqueue name to change it Click the printer to submit After Approving, you will be returned to the list of cost sheets pending approval.
After Finalize: Cost Sheet Listing After Finalizing, you will be returned to the list of cost sheets to be entered. The Cost Sheet you finalized will not be on this list.
Checking the OPAs and Contracts • The OPA (Order Placement Advice) shows the agent/seller’s order to the factory, including the cost and order breakdown • The OPA should have a header with the Vendor’s address • If you do not see a header, please refer to the following slides
Rejecting a Cost Sheet • If any part of the Factory/Vendor side of the cost sheet is incorrect, the cost sheet must be Rejected • Rejecting a cost sheet sends it back to the Factory or Vendor for revision, and deletes any below the line entries you may have made • Before Rejecting, be sure to add comments to the cost sheet describing the specific cost problems to the Factory or Vendor.
Select PO for Rejection Right-click on the line of the PO to be rejected Select “Update Cost”
Enter Comments on Cost Sheet Click here to enter comments and instructions to the Factory or Vendor Coster
Add Comments to Cost Sheet Comments should be instructions for editing the cost to the Factory or Vendor Coster Click Return to go back to the Cost Sheet Add your comments or questions by clicking on an empty line and typing Click OK to update the comments
Exit Cost Sheet Click Return to exit the cost sheet
Reject the Cost Sheet Note: A red PO # means that comments have been entered Right-click on the line of the PO you want to reject COSTED A menu appears. Select “Reject Cost” The PO line disappears from the list. It will reappear with the Status “Cost Revsd.” once the factory or vendor re-submit the cost for approval
What Happens Next • If Approved, Related Factory can print labels and ship the goods; Non-Related Vendors (e.g., MG can ship and bill the units) • If Rejected, the cost sheet will disappear from your Orders List with the status “Cost Rejected” – all below the line costs will be deleted. When the Factory/Vendor re-submits the cost sheet, you must redo any below the line changes • If you did not Approve the cost sheet, it will remain in your list of orders with the status “Costed” until you go back to it and Approve it.