Gaggle: Enhancing Classroom Communication & Collaboration
Discover how Gaggle empowers educators to foster innovation, creativity, and new instructional ideas in the classroom using digital tools like student email, drop boxes, blogs, and message boards. Start your paradigm shift today!

Gaggle: Enhancing Classroom Communication & Collaboration
E N D
Presentation Transcript
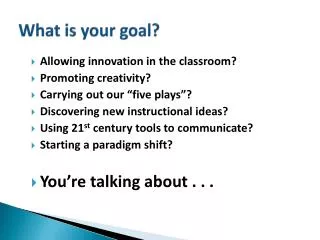
What is your goal? • Allowing innovation in the classroom? • Promoting creativity? • Carrying out our “five plays”? • Discovering new instructional ideas? • Using 21st century tools to communicate? • Starting a paradigm shift? • You’re talking about . . .
Gaggle! • Student Email • Drop Boxes • Blogs • Digital Lockers • Message Boards
Your User Name: Firstname.Lastname@gpisd.gaggle.net Your Password: GPISD2009 (all uppercase letters)
All email tools are located above your inbox. Once you have logged on you will see your email screen. This is similar to your Outlook mailbox.
1. Click on Contacts to create a list of classes to email. 2. Right click on My Groups and select Add New Group. Name it 1st Period. Create a folder for each class.
With Groups named, you may now add students to classes. To enter students, first double-click on a class. When you right click on the My Folders Icon you get a new folder. Type the name of the new folder and left click in the white area and the folder will be created
You must enter the student’s First Name, Last Name, and Email address.
Once you have entered the First Name, Last Name, and Email address click Save.
1. Click on Add Contact for each member of your class. 2. You will now see your new entry in your list. You will also see information on the user at the right hand side of your list.
To add your user groups click on Student Admin and then User List.
1. Once you have opened your user list you will want to narrow down the number of students you can view. To narrow the field click on View, then Graduation Year, then select the year your class will graduate.
1. Click on the New Group tab. 2. In this area you will see User Groups that you have created. You should not have anything in this area now.
As you select New Group you will see a folder with the words New Group. Enter the name for this group. I am naming mine 2nd Period. Now click some place in the white area and your group will be created.
To populate your group folder you can drag and drop students into the folder one at a time or you can hold down the Ctrl key and highlight the students you want to move.
Once you have selected several students move your mouse over the folder. As you can see I am about to drop 3 students into my 2nd period folder.
When I click on the “+” sign by the folder I see there are three students in my folder. Continue the process until you have a folder for each class and all your students are in the correct folder.
1. Enter the name of your drop box and use the pull down menu to find your name. 2. Make sure next to Access you select Specified Users. 3. Then click Save.
1. After you click Save you will see your Drop Box. 2. Now you are going to select the classes you want to view this Drop Box.
1. Once you have selected the group you want to add... … click Add Selected Groups.
1. Now that your Drop Box is named and your groups are assigned you can add assignments. 2. Use the Jump To Menu to select Homework Drop Boxes.
Now you can add an assignment. Click on New Assignment Folder.
1. Enter your subject or name of your assignment. 2. Now you can enter the assignment in the space that follows.
1. You have all the tools you need to edit your text. 2. You can attach articles for students to read. 3. Once you have entered all your assignment instructions click Submit.
1. With the assignment created, you can reply to student comments or add additional comments. 2. You can reply to comments by clicking Reply.
2. Click Submit when you have finished your comment. 1. Enter your comment here.
Once you have submitted your reply you can see it on the screen. Just double click on it to open.
Each student and teacher has a digital locker. To access the digital locker click on the Jump To Menu and select Digital Locker.
To add a document to your folder click on Add Folder. You can store files and documents in your digital locker.
Select the folder or document you want to add to your digital locker. I have a folder called Assignments.
a Now click on Document Name and click Open.
Once Open is clicked the file is added to the digital locker.
To create a message board go to the Jump To Menu > Message Boards > Student Admin > Edit Msg Boards.
To create your message board select Message Board Name. Select Specified Users. Select Save New Board.
After selecting Save New Board you will see this notice. Click OK.