Chapter 7: Dimensioning
Learn AutoCAD dimensioning terminology, types, commands, and best practices to create accurate technical drawings efficiently.


Chapter 7: Dimensioning
E N D
Presentation Transcript
After completing this Chapter, you will be able to use the followingfeatures: • Dimension Terminology • Associative/Non-Associative Dimensioning • Linear Dimensioning • Aligned Dimensioning • Ordinate Dimensioning • Radius and Diameter Dimensioning • Arc Length Dimensioning • Angular Dimensioning • Baseline and Continue Dimensioning • Dimension Break • Quick Dimensioning • Leaders with annotation and geometric tolerance • Center Marks • Oblique Dimensioning • Editing dimension text • Dimension styles • Inspecting Dimensions • Updating Dimensions • Inspective Dimensions
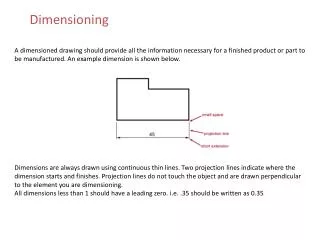
Dimensioning Terminology Parts that make up dimensions in AutoCAD.
Associative/Non-Associative Dimensioning Dimensions in AutoCAD can be drawn as associative, non-associative, or exploded, depending on the setting of the DIMASSOC dimensioning system variable. The setting for associative dimensions is 2, non-associative is 1, and exploded dimensions is 0.Associative dimension becomes associated with an object by selecting points on the object (using an Object Snap mode) when prompted to do so during a dimensioning command. If the object is subsequently modified in a manner that changes the location(s) of one or both of the selected points, the associated dimension is automatically updated to correctly indicate the new distance or angle.
Non-associative dimensions are drawn while the DIMASSOC dimensioning system variable is set to 1. The separate parts of the non-associative dimension are, like those of the associative dimensions, considered members of a single object when any of them are selected for modifying. However, if the object that was dimensioned is selected for modifying without selecting the dimension, the dimension itself will remain unchanged.Exploded dimensions are drawn while the DIMASSOC dimensioning system variable is set to 0, and the members are drawn as separate objects. If one of the components of the dimension is selected for modifying, it will be the only one modified.
DIMDISASSOCIATE command removes associativity from selected associative dimensions.DIMREASSOCIATE command associates selected dimensions to geometric objects. When prompted, select dimension(s) to be reassociated to object(s) and then step through the point selection process (using Object Snap mode) when each extension line point is marked with an X. If the X is in a box, then that point is already associated with a point on an object. You may skip this point by pressing ENTER .DIMREGEN command updates the locations of all associative dimensions. This is sometimes necessary after panning or zooming, after opening a drawing that was modified in an earlier version of AutoCAD.
Linear Dimensioning Creates linear dimensions.
Aligned Dimensioning Creates an aligned linear dimensions.
Ordinate Dimensioning Ordinate dimensions measure the perpendicular distance from an origin point called the datum to a dimensioned feature, such as a hole in a part.Ordinate dimensions consist of an X or Y value with a leader line. X-datum ordinate dimensions measure the distance of a feature from the datum along the X axis. Y-datum ordinate dimensions measure the distance along the Y axis. If you specify a point, AutoCAD automatically determines whether it is an X- or Y-datum ordinate dimension. If the distance is greater for the Y value, the dimension measures the X value. Otherwise, it measures the Y value.
Radius Dimensioning Radius dimensions measure the radii of arcs and circles with optional centerlines or a center mark. If Text Placement is set to Over the Dimension Line, with a leader, the dimension is applied with a leader line.
Diameter Dimensioning Diameter dimensions measure the diameters of arcs and circles with optional centerlines or a center mark. If Text Placement is set to Over the Dimension Line, with a leader, the dimension is applied with a leader line.
Arc Length Dimensioning Arc Length allows you to create length dimensions (see Figure 7–23) for an arc.
Angular Dimensioning ANGULAR DIMENSION command allows to draw angular dimensions using three points (vertex, point, point), between two nonparallel lines, on an arc (between the two endpoints of the arc, with the center as the vertex), and on a circle (between two points on the circle, with the center as the vertex).
Baseline Dimensioning Baseline dimensioning is used to draw dimensions to multiple points from a single datum baseline. The first extension line origin of the initial dimension (it can be a linear, angular, or ordinate dimension) establishes the base from which the baseline dimensions are drawn. AutoCAD automatically draws a dimension line/arc beyond the initial (or previous baseline) dimension line/arc.
Dimension Space The DIMSPACE command allows you to specify the space between the dimension lines of parallel linear or concentric arc dimensions.
Dimension Break The DIMBREAK commnad allows you to create a break in a dimension extension line where it crosses another line.
Continue Dimensioning Continue dimensioning is used for drawing a string of dimensions, each of whose second extension line origin coincides with the next dimension’s first extension line origin.
Quick Dimensioning Quick Dimensioning is used to draw a string of dimensions between all of the end and center points of the selected object(s).
Multileader MLEADER Command is used to to connect annotation to objects or other features in the drawing. Options include Leader Type, Leader Landing, Content Type, Maxpoints, First Angle, and Second Angle.
Add Leader Command is used to add leader line and arrow combinations to an existing multileader.
Mutlileader Style Command is used to create or modify multileader style. With a multileader style, you can specify formatting for landing lines, leader lines, arrowheads, and content.
Tolerances AutoCAD provides a special set of subcommands for the two major methods of specifying tolerances: Lateral Tolerance and Geometric Tolerance.Lateral tolerance draws the traditional symbols and text for Limit, Plus or Minus (unilateral and bilateral), Single Limit, and Angular tolerance dimensioning. Lateral tolerance is the range from the smallest to the greatest that a dimension is allowed to deviate and still be acceptable. Lateral tolerance and its related settings are set in the Dimension Style Manager dialog box (Tolerances tab).
Dimension Style Manager dialog box (Tolerance tab selection)
Geometric tolerance draws a Feature Control Frame for use in describing standard tolerances according to the geometric tolerance conventions. Geometric tolerancing is applied to forms, profiles, orientations, locations, and runouts. Forms include squares, polygons, planes, cylinders, and cones.
Center Marks DIMCENTER command creates the center mark or the centerlines of circles and arcs.
Oblique Dimensioning OBLIQUE command allows to slant the extension lines of a linear dimension to a specified angle. The dimension line will follow the extension lines, retaining its original direction. This is useful for having the dimension stay clear of other dimensions or objects in your drawing. It is also a conventional method of dimensioning isometric drawings.
Editing Dimension Text AutoCAD allows to edit dimensions with MODIFY commands and grip editing modes. Also, AutoCAD provides two additional MODIFY commands specifically designed to work on dimension text objects: • Dimedit • Dimtedit
Dimedit DIMEDIT command allows to replace the dimension text with new text, rotate the existing text, move the text to a new location, and if necessary, restore the text back to its home position, which is the position defined by the current style. In addition, you also change the angle of the extension lines (normally perpendicular) relative to the direction of the dimension line.
Available options include:Home selection returns the dimension text to its default position.New selection change the original dimension text to the new text.Rotate selection change the angle of the dimension text.Oblique selection adjusts the obliquing angle of the extension lines for linear dimensions.
Dimtedit DIMTEDIT command is used to change the location of dimension text (with the Left/Right/Home options) along the dimension line and its angle (with the Rotate option).
Available options include: Left selection cause the text to be drawn toward the left extension line.Right selection cause the text to be drawn toward the right extension line.Home selection returns the dimension text to its default position.Angle selection changes the angle of the dimension text.
Dimension Styles Dimension style Manager allows to create new styles, sets the current style, modifies styles, sets overrides on the current style, and compares styles. Each time a dimension is drawn it conforms to the settings of the Dimensioning System Variables in effect at the time. The entire set of Dimensioning System Variable settings can be saved in their respective states as a Dimension Style.
Various examples with Dimension and Extension Lines settings
Modify Dimension Style dialog box – Symbols and Arrows selection
Dimensioning Text with various Text placement (horizontal) selection
Dimensioning examples with various Fit options Dimensioning example with various Text placement options
Dimensioning example with various dimensioning unit formats Dimensioning example with prefix, suffix, and alternate units
Modify Dimension Style dialog box – Alternate Units selection