WORKSHOP 13 CREATING CUSTOM MENU BUTTONS
400 likes | 583 Vues
WORKSHOP 13 CREATING CUSTOM MENU BUTTONS. WORKSHOP 13 - CREATING CUSTOM MENU BUTTONS. Problem statement

WORKSHOP 13 CREATING CUSTOM MENU BUTTONS
E N D
Presentation Transcript
WORKSHOP 13 CREATING CUSTOM MENU BUTTONS
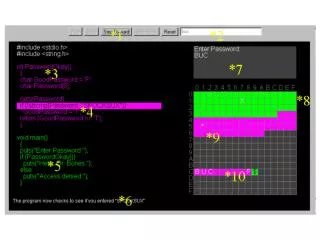
WORKSHOP 13 - CREATING CUSTOM MENU BUTTONS • Problem statement • In this workshop you will learn how to create new menu buttons on the main menu bar, as well as on your own menu bar. You will become familiar with the ADAMS/View command language for creating these interface (GUI) objects and will become comfortable with using the Menu Builder.
WORKSHOP 13 - CREATING CUSTOM MENU BUTTONS • Getting started To get started: • Start ADAMS/View from the directory, mod_13_menus, and then select Create a new model. • Adding new menu buttons to the main menu bar • You can add your own menus and push buttons onto the main menu. How you do this will depend on the extent of the changes you want to make. Sometimes, if you are making several menu modifications, you're better off creating your own interface window and a separate menu structure on that window. That's how the Arc Toolkit from Workshop 12 – Macros and Parameter Syntax was done, for example. • If you're just making a few minor changes to a menu, the easiest way to do that is with the Menu Editor. In other instances, you may prefer to write the command language in a command file that you can import.
WORKSHOP 13 - CREATING CUSTOM MENU BUTTONS • Modifying the main menu using the Menu Builder • If creating a marker using the Main Toolbox doesn't give you all the versatility you want, you can access the Command Navigator and use the Marker Create and Marker Modify dialog boxes instead. Let's make those features more convenient by creating a Marker New and Marker Modify push button on the Build Menu as shown next:
WORKSHOP 13 - CREATING CUSTOM MENU BUTTONS • To modify the main menu: • From the Tools menu, point to Menu, and then select Modify. The Menu Builder appears. Move it aside slightly so it will be visible even if it were to go behind the main window. • Scroll about half-way down to where you see this portion of the menu text outline.
WORKSHOP 13 - CREATING CUSTOM MENU BUTTONS • Place your cursor at the end of the last line of the highlighted text shown. Place your cursor here
WORKSHOP 13 - CREATING CUSTOM MENU BUTTONS • Press Enter, and then type in the following text outline: MENU2 Mar&ker NAME=marker BUTTON3 &New... CMD=int com com="marker create" HELP=Create a marker by using a dialog box BUTTON3 &Modify...::Ctrl+M NAME=modify_button CMD=int dia dis dia=.gui.mar_mod HELP=Modify an existing marker
WORKSHOP 13 - CREATING CUSTOM MENU BUTTONS Your window should look as shown next: Tip: Placing an & in the label identifies that the next character will be used as the mnemonic (for example, enter &New to have the resulting menu command be New.)
WORKSHOP 13 - CREATING CUSTOM MENU BUTTONS • To execute the changes to the menu, from the Menu Builder window, select the Menu Bar menu, and then select Apply. • In your ADAMS/View window, look in the Build menu to verify that your new buttons are in the Build menu. Test them out. Notice that the status bar displays the help text that you entered for each push button.
WORKSHOP 13 - CREATING CUSTOM MENU BUTTONS • Saving the changes to a menu To save changes: • Display the Menu Builder again. • From the Menu Bar menu, select Export Text. • Save the file as main.mnu. The menu text outline has been saved to your local directory. • In the Menu Builder, from the Menu Bar menu, select Exit.
WORKSHOP 13 - CREATING CUSTOM MENU BUTTONS • Restoring the customized menu To restore the menu: • Open a new database (without saving changes), and create a new model. • Select the Build menu and look at the menu buttons. • Are your customizations there? ____ Yes ____No
WORKSHOP 13 - CREATING CUSTOM MENU BUTTONS • To load your customized menu into the database, from the Tools menu, point to Menu, and then select Read local Main Menu. Note: The Read local Main Menu command works only if the file is named main.mnu. Also, the file must be located in the local directory (the directory where you started ADAMS/View, or the current directory as set by File - Select Directory). If you want to load a menu file that has a different name, from the Tools menu, point to Menu, and then select Read. • Check the Build menu again, this time you will see the custom buttons. Tip: Try executing the marker modify with the keyboard accelerator shortcut, Ctrl-M.
WORKSHOP 13 - CREATING CUSTOM MENU BUTTONS • Other features of the menu builder • Experiment with the Menu Builder features to get a feel for what they do. Then, complete the quiz below. • Quiz: • Draw lines to match items in the left column with choices in the right column: Load Apply Reload Import Text Export Text Exit Repopulates the text Menu Builder with the state of the current menu. Writes the text outline for the menu to a text file. Imports text from a file into the current position of the cursor. Takes the text outline and applies it, thus modifying the menu structure Exits the Menu Builder Takes a menu existing in the database and loads it into the Menu Builder.
WORKSHOP 13 - CREATING CUSTOM MENU BUTTONS • Modifying the main menu bar by writing command language • In Workshop 6 – Performing a Design Study, you used a custom menu button (and macro) to sweep the value of a design variable. You would probably agree that using a button on the menu is often simpler than traversing through the multitude of commands available in the Command Navigator. Here you will learn how to create a menu button by writing the command language directly. This alternate approach is helpful because it gives you an organized way to reconstruct a customized menu structure.
WORKSHOP 13 - CREATING CUSTOM MENU BUTTONS • To modify the main menu bar: • Start a new database and import the file, load_the_sweep_macro.cmd. ADAMS/View loads the sweep macro into the database where it will be stored with the name, .var_swe. Notice that ADAMS/View does not have a model in the database, as indicated by the title text in the upper left corner of the view window. Since you will be modifying the interface, it is not necessary to have a model open. • What is the command prefix for this macro? __________________ Tip: Look in the User-Entered Command text box in the macro editor. ADAMS/View can auto generate a dialog box for this macro when you supply it with the command prefix you wrote above.
WORKSHOP 13 - CREATING CUSTOM MENU BUTTONS • Execute the following command from the Command Window and it will auto generate and display the dialog box for the sweep macro. interface command_builder command_prefix = "variable sweep" This is the command you should put behind the button, to display the dialog box when you click the button. • Now compare the following commands: interface command_builder command_prefix = "variable sweep" interface dialog_box display dialog_box_name = .gui.var_swe
WORKSHOP 13 - CREATING CUSTOM MENU BUTTONS • We had you type the first command instead of the second one for a reason. See if you can identify the best reason from the choices below: (check one) ____ They are equivalent and you need to learn all the different ways of displaying a dialog box. ____ The first command has fewer parameters and would be easier to type. ____ The dialog box .gui.var_swe doesn't yet exist. You can't ask the code to display a dialog box if it hasn't been created first. ____ They have the same number of characters so the reason for choosing one command over the other is irrelevant. • Close the Variable Sweep dialog box.
WORKSHOP 13 - CREATING CUSTOM MENU BUTTONS • Reviewing the menu hierarchy • Here you’ll create a button named Sweep under the Build menu. Let's see the hierarchy of that menu so we know where to place the new button. • To review menu hierarchy: • Use the Database Navigator to see the structure of the menu hierarchy. • Open the Database Navigator. • At the bottom, to the right of the Filter text box, choose All from the option menu. This will allow interface objects, like menus, to be shown. The interface objects are normally filtered out. • Expand the gui library and navigate as shown next.
WORKSHOP 13 - CREATING CUSTOM MENU BUTTONS Note: You may have to widen the Database Navigator to see the object type.
WORKSHOP 13 - CREATING CUSTOM MENU BUTTONS • Select Design_Variable_select. • Select Apply. • In the Information window, ADAMS/View displays information about that interface object, .gui.main.mbar.build.Design_Variable.Design_Variable_select.
WORKSHOP 13 - CREATING CUSTOM MENU BUTTONS • Review the text in the window and circle the best answer, True or False: T F The object is a menu. T F The parent of the object is a Graphic_Interface_Menu. T F A menu button cannot execute more than one command with a single click. T F The parent of the object has two children. (Hint: use the Parent and Children buttons in the info_window). T F You will soon create a Graphic_Interface_Push_Button that will be a sibling of Design_Variable_New and Design_Variable_select.
WORKSHOP 13 - CREATING CUSTOM MENU BUTTONS • Creating your own button • To create your own Sweep button: • Open the file load_the_sweep_macro.cmd in a text editor. • Scroll down to the section of comments shown here: !!!!!!!!!!!!!!!!!!!!!!!!!!!!!!!!!!!!!!!!!!!!!!!!!!!!!! ! INSERT YOUR COMMANDS FOR CREATING PUSH BUTTON BELOW ! !!!!!!!!!!!!!!!!!!!!!!!!!!!!!!!!!!!!!!!!!!!!!!!!!!!!!!
WORKSHOP 13 - CREATING CUSTOM MENU BUTTONS • Modify the file so it can create the menu push button by entering the following command language in the space provided. Here, the backslash is used as an escape character, allowing the quotation mark characters to be seen as literal characters, instead of as the closing quotation mark of the interface command. • Save the file as load_the_sweep_macro_and_button.cmd. Now you're ready to test the command file to see if it loads the macro and creates the menu push button. • interface push create & • push_button_name=.gui.main.mbar.build.design_variable.Design_Variable_Sweep & • label = "Sweep..." & • help_text = "Sweeps the value of a design variable through its absolute range" & • command = "interface command_builder command_prefix = \"variable sweep\" "
WORKSHOP 13 - CREATING CUSTOM MENU BUTTONS • Import the command file you just created. • Import the parameterized version of the hood model, hood_start.cmd. • Find the new menu button and select Sweep. The Variable Sweep dialog box opens. • Sweep the D1 variable. You have learned the two different ways of creating customized menu buttons. For more practice, if time permits, complete the following section.
WORKSHOP 13 - CREATING CUSTOM MENU BUTTONS • Understanding the structure of a menu bar on a customized window • In Workshop 12 – Macros and Parameter Syntax, you used the Arc Tools custom menu. Let's briefly review how it was created.
WORKSHOP 13 - CREATING CUSTOM MENU BUTTONS • To examine the structure of a menu bar: • Open the file, custom_window.cmd. Briefly note the following items listed in sequential order: a The tk_tools environment variable is set to the appropriate path to the macro files. b A custom library named my_cust is created. c Several macros are imported and stored in the .my_cust library. d An interface window named arc_toolkit is created in the .my_cust library. e A menubar, menus, and push buttons are created. The push buttons issue the macro commands for the macros that were imported. f An icon is created on the standard toolbar.
WORKSHOP 13 - CREATING CUSTOM MENU BUTTONS • Adding a push button to a custom window menu • You need to add one new button to the Arc Tools menu, renamed Simple Arc. • To add a push button: • Start a new ADAMS/View session and import the file custom_window.cmd. • Display the standard toolbar: • From the View menu, point to Toolbox and Toolbars, and then select Standard Toolbar. • Close the Tool Settings dialog box. • Select the Arc Toolkit tool The Arc Toolkit window opens:
WORKSHOP 13 - CREATING CUSTOM MENU BUTTONS • Select the Create Arc menu, and notice that there are four push buttons listed. You need to add another one named Simple Arc. • Use the Menu Editor to add the following button to the top of the Create Arc menu. The procedure is similar to the one you used to modify the main menu in the section: Modifying the main menu using the Menu Builder. Tip: Use Load and Browse for the menu in the library, .my_cust. BUTTON2 S&imple ArcNAME=Simple_Arc CMD=interface window undisplay window_name =.my_cust.arc_toolkit CMD=interface command_builder command_prefix = "geometry create curve arc“ CMD=interface window display window_name = .my_cust.arc_toolkit
WORKSHOP 13 - CREATING CUSTOM MENU BUTTONS • Test your button. Is the proper dialog box displayed? • Save the menu as arc_toolkit.mnu. Consider the repercussions of using both the menu file and the custom_window.cmd file that built the Arc Toolkit. Perhaps the command file to build the Arc Toolkit could be rewritten so it just imports the .mnu file. Do you think it's possible to write a command like that? • See if you can find a command that would do that, and write it here: _____________________________________________________
WORKSHOP 13 - CREATING CUSTOM MENU BUTTONS • Changing the hierarchy of an existing menu • The Menu Builder lets you insert menus and buttons anywhere you like within the hierarchy. Conversely, when you make changes to a menu using command language, instead of the Menu Builder, there is a small downside: your changes will always be added to the bottom of an existing menu. This is because the order of creation dictates the placement on the menu. That explains why the Design Variable Sweep button was listed under New and Modify, whereas the Marker custom menu did not end up at the bottom of the Build menu. • Therefore, if you're making small changes in hierarchy using command language, your strategy might be to delete (or modify) a menu and to replace it with another, which will of course appear at the bottom of the given menu.
WORKSHOP 13 - CREATING CUSTOM MENU BUTTONS • Removing a push button • In this section, you will remove a push button and replace it with a menu and two push buttons. As you recall from Workshop 8 - Optimization, optimizations will create verbose output in the Command Window and in the file, aview.log. Eventually you may want to clear out the log file so it's not so big.
WORKSHOP 13 - CREATING CUSTOM MENU BUTTONS • In this section, you will create a new menu entry that will clear the contents of the file, aview.log. This will replace the Log File menu button with a new hierarchy:
WORKSHOP 13 - CREATING CUSTOM MENU BUTTONS • To remove a push button: • Using a text editor, open the file, test_menu_button_start.cmd. • Review the commands for: • Deleting a push button • Creating a separator line • Creating a new menu entry • Creating two new push buttons Notice how the last push button just imports a command file named testit. This trick is a clever way of changing the commands of a push button without manipulating the menu editor, as you are debugging the logic in the underlying code. In this case, the testit command file merely issues a message to the screen that the button is working. • Import the file, test_menu_button_start.cmd.
WORKSHOP 13 - CREATING CUSTOM MENU BUTTONS • Test the menu structure for the log file by selecting the new menu push buttons. When you clear the log file, you’ll get the following message: • Rename the file testit.cmd to testit_0.cmd. • From the Tools menu, select Log File, and then select Clear Log File. • Did you get the error shown below? ____ Yes ___ No ERROR: ADAMS/View could not open Command file 'testit.cmd' for reading. When you attempt to clear the log file, it’s trying to read a command file that's no longer there. • Create a new file named testit.cmd and copy in to it the contents of the file named testit_clear.cmd.
WORKSHOP 13 - CREATING CUSTOM MENU BUTTONS • From the Tools menu, point to Log File, and then select Clear Log File. The button works, and displays the following window: • Select one of the buttons. • Exit ADAMS/View. Given this scenario of using a button to import a command file that you are debugging, you would eventually need to put the commands behind the button. You would need to change the button command from file command read... to the true set of commands. You can find the completed button syntax for the above example in the file, clr_log_file_menu.cmd in the subdirectory, from_kb/clr_log_file_menu.
WORKSHOP 13 - CREATING CUSTOM MENU BUTTONS • Optional tasks • Learn some of the other interface commands by importing the file misc/ other_interface_menu_commands.cmd. • As you develop design objectives and design constraints (prior to running an optimization) you often want to evaluate them for a given analysis. Use the customized buttons in kb7917 to create the following new menu buttons:
WORKSHOP 13 - CREATING CUSTOM MENU BUTTONS • Create a menu push button named Preview Parts at the bottom of the View menu. Use any method you want to create the push button, but make it use the commands contained in the file misc/preview_parts.cmd. • Using the Read Command File button on the Tools menu as a guide, create a menu button, called Run Parameterless Macro on the Tools menu, which can be executed with a keyboard accelerator (F12 key). Tip: To learn more about accelerator key syntax review the online help about menus. BUTTON2 Run Parameterless Macro::F12 NAME=run_paramless_macro CMD=! Note: F12 shortcut uses this CMD=var set var=$_self.tmp_mac object=(eval(SELECT_OBJECT(DB_DEFAULT(.System_Defaults, "model").parent, "*" , "Macro" ))) CMD=var set var=$_self.tmp_str string=(eval(EXECUTE_VIEW_COMMAND(STR_DELETE( (my_macro.object_value),1,1)))) CMD=var del var=$_self.*
WORKSHOP 13 - CREATING CUSTOM MENU BUTTONS Test the button by running a recorded macro as well as the parameterless macro, constraint_DOF_wiggler.cmd. For more information on parameterless macros, see Writing a parameterless macro. • Create a menu button that will revolve a model about the screen's y-axis in 100 increments, 3.6 degrees each. Use the file, revolve_the_model.cmd in the directory, misc/revolve as the source for your commands.