Instrumentation
CHAPTER. Instrumentation. 12. Instructor Name: (Your Name ). Learning Objectives. List the various types of electromechanical gauges and explain the operation of each type Describe the four types of magnetic gauges Explain the purpose of a bucking coil in a three coil gauge

Instrumentation
E N D
Presentation Transcript
CHAPTER Instrumentation 12 Instructor Name:(Your Name)
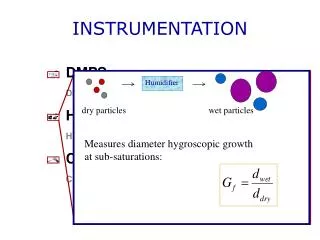
Learning Objectives • List the various types of electromechanical gauges and explain the operation of each type • Describe the four types of magnetic gauges • Explain the purpose of a bucking coil in a three coil gauge • Modify the vehicle speed pulses-per-mile setting • Troubleshoot a problem with conventional instrumentation
Learning Objectives (continued) • Explain the concept of multiplexed instrumentation using J1587/J1708 and J1939 • Describe the operation of a stepper motor used in an instrument panel cluster • Diagnose multiplexed instrumentation using OEM information
Conventional Instrumentation • IPC – Instrument panel cluster • Conventional Instrumentation – Non-multiplexed IPC hardwired to input device • Mechanical Gauges – Gauges that are physically influenced by the input device • Electromechanical Gauges – Gaugesthat use a sensor to convert physical quantity into a variable resistance • Bimetallic Gauges – Usesa heater coil and bimetal strip to move the gauge needle
Bimetallic Strip Made of Brass and Steel Figure 12-2 Bimetallic strip made of brass and steel.
Bimetallic Fuel Gauge Figure 12-3 Bimetallic gauge.
Fuel Level Sensor Circuit Figure 12-4 Fuel level sensor circuit.
Fuel Level Sensor or Sending Unit Figure 12-5 Fuel level sensor or sending unit.
Magnetic Gauges • Coils directly connected to sensors or voltage being measured • Modern magnetic gauges may be controlled by the IPC • There are four main styles of magnetic gauges in use; D’Arsonval, Three Coil, Two Coil, and Air Coil.
D’Arsonval Gauge Movement Figure 12-7 D’Arsonval gauge movement.
Three Coil Gauge Figure 12-9 Three-coil gauge.
Three Coil Gauge with Low Resistance Indicating Low Fuel Figure 12-10 Sending unit resistance is low, indicating an empty fuel tank.
Three Coil Gauge with High Resistance Indicating Full Tank Figure 12-11 Sending unit resistance is high, indicating a full fuel tank.
Two Coil Temperature Gauge Figure 12-12 Two-coil temperature gauge.
Two Coil Fuel Level Gauge Figure 12-14 Two-coil fuel level gauge.
Air Core Fuel Gauge Figure 12-15 Air core fuel gauge.
Electronically Controlled Gauges • Usually controlled by an electronic module or electronics in the gauge assembly • Sensor or sending unit acts as input to the electronic module, not the gauge • The electronic module supplies voltage to the gauge’s magnetic coil
Tachometer Sensor and Ring Gear Figure 12-16 Tachometer sensor and ring gear installation.
Electronically Controlled Magnetic Gauge Figure 12-18 Electronically controlled magnetic gauge.
DIP Switches Used to Program Speedometers and Tachometers Figure 12-21 DIP switches used to program speedometer and tachometer on older trucks.
DIP Switch Setting Example for Tachometer Figure 12-22 DIP switch settings example for tachometer.
Light Emitting Diodes (LEDs) • Light emitting diodes (LEDs) • Numbers 0 to 9 can be displayed through a seven line segment • Electronic modules cause certain segments to illuminate and display digits • LEDs can be shaped like bars in a circular arc to mimic a mechanical gauge • Dot matrix LED displays light specific LEDs in the matrix to display numbers
Seven Segment LED Figure 12-23 Seven-segment LED.
Truck Instrument Panel Using LEDs Figure 12-24 Truck instrument panel using LEDs to display information.
Dot Matrix LED Figure 12-25 Dot matrix LED.
Oil Pressure Sending Unit with Warning Light Figure 12-26 Oil pressure sending unit used with a low oil pressure warning lamp.
Temperature Sending Unit with Warning Light Figure 12-27 Temperature-sending unit for a coolant temperature warning lamp.
Brake Warning Systems • Air brake systems are required to have low air warning light • Air brake low air visual indicator should come on if system air pressure drops to 60 psi • Hydraulic brakes often use a normally closed power steering fluid flow switch to indicate power steering pressure is lost • Hydraulic brakes also use a pressure differential switch to indicate a pressure difference in the two hydraulic brake circuits
Low Air Pressure Warning Lamp and Alarm Circuit Figure 12-28 Low air pressure warning lamp and alarm circuit.
Hydraulic Brake Differential Pressure Switch Figure 12-29 Hydraulic brake differential pressure switch.
Tech Tip The OEM’s troubleshooting information should be consulted when troubleshooting instrumentation. Indiscriminate shorts to ground of instrument circuits or other random test procedures can cause damage to the gauges and electronics.
J1587/J1708 Multiplexed Instrumentation • Conventional gauges require a connection to each sensor or sender • Modern diesel engines need all engine data, temperature, oil pressure, engine speed, etc. • IPC electronic modules only require a connection to the J1587/J1708 data link • IPC will talk to engine to obtain information needed for dash gauges
Instrument Panel Using Data Link Figure 12-30 Instrument panel cluster using data link information to drive engine-related gauges and warning lamps.
J1939 Multiplexed Information • J1939 has increased bandwidth for faster transmission • Electronic modules throughout the truck such as engine ECM, automatic transmission ECU, ABS ECU, and body control module broadcast on the data link • Modern IPCs are connected to the J1939 data link
Stepper Motor Driven Gauges • Can be driven to precise position and held there • An electric motor with no brushes or commutator • All windings are typically located on the stator • The rotor is typically a permanent magnet type rotor • The rotor may have six pie shaped magnets alternating north and south polarity
Stepped Motor With Coil 1 Energized Figure 12-32 Stepper motor.
Stepped Motor With Coil 2 Energized Figure 12-33 Stepper motor rotating clockwise.
Tech Tip By knowing the source of information for each multiplexed gauge and warning lamp, you may be able to narrow the instrumentation problem to a specific module or a specific electrical connector based on which gauges or warning lamps are functional and which are not functional.
Sensor Breakout T Used to Measure Sensor Voltage Figure 12-34 Sensor breakout T used to measure sensor voltage with a DMM voltmeter.
Breakout Box with DMM Voltmeter Figure 12-35 Breakout box used with a DMM voltmeter.
Summary • Instrumentation refers to the gauges, indicator lamps, and audible alarms used to inform the truck operator of the status of the truck’s various systems. • A sensing device called a gauge sender or sending unit is used to transform pressure, temperature, level or other physical value into a corresponding valve of resistance. The varying resistance causes the current flow through a coil or a heating element in a conventional gauge to increase or decrease, resulting in the gauge needle moving to the corresponding location.
Summary (continued) • The two main categories of electromechanical gauges are bimetallic and magnetic. Bimetallic gauges operate on the principle that current flow through a heating element causes a bimetallic strip to deflect. Magnetic gauges contain coils (inductors) and operate on the principles of electromagnetism. • An instrument voltage regulator is often used with bimetallic gauges to maintain a constant voltage supply for the gauge heating element.
Summary (continued) • The four main types of metallic gauges are D’Arsonval, three coil, two coil, and air core. • Electronically controlled gauges use an electronic module to control current flow through the magnetic type gauge coils. The sending unit or sensor is an input to the electronic control module. The electronic module controls the current supplied to the gauge accordingly.
Summary (continued) • Electronically controlled speedometers and tachometers typically must be programmed to correspond to the vehicle if changes such as rear axle ratios are made. This programming is performed on some trucks through a series of DIP switches in the IPC or through the modification of a programmable parameter in the engine ECM or other control module.
Summary (continued) • Trucks may have a variety of warning indicator lamps. Each lamp is controlled by a switching device that typically provides a path to ground to illuminate the indicator lamp. • Multiplexed instrumentation describes instrumentation that receives information from a serial communication network, commonly know as a data link. The various electronic module on the vehicle, broadcast information on the data link. The IPC “listens” for this information on the data link and drives the appropriate gauge or warning lamp.
Summary (continued) • The term stepper motor describes a type of motor that can driven to a specific position and held in that position. Many modern trucks IPCs make use of stepper driven motor gauges.