Download
1 / 120
1.2k likes | 1.38k Vues
Chapter 3: Creating Web Pages with Links, Images, and Embedded Style Sheets. Jason C. H. Chen, Ph.D. Professor of MIS School of Business Administration Gonzaga University Spokane, WA 99258 chen@jepson.gonzaga.edu. Chapter Objectives. Describe linking terms and definitions

E N D
Chapter 3:Creating Web Pages with Links, Images, and Embedded Style Sheets Jason C. H. Chen, Ph.D. Professor of MIS School of Business Administration Gonzaga University Spokane, WA 99258 chen@jepson.gonzaga.edu
Chapter Objectives • Describe linking terms and definitions • Create a home page and enhance a Web page using images • Change body and heading format using embedded style sheets • Align and add color to text using embedded and inline styles • Use an inline style to insert an image for bullets in an unordered list • Add a text link to a Web page in the same Web site • Add an e-maillink and “Subject” option
Chapter Objectives • Add a text link to a Web page on another Web site • Useabsolute and relative paths • Save, validate, and view an HTML file and test the links • Use style classes to add an image with wrapped text • Add links to targets within a Web page • Copy and paste HTML code • Add animagelink to a Web page in the same Web site
Plan Ahead • Plan the Web site • Analyze the need • Design the Web site • Choose the content for the Web pages • Determine the types of Cascading Style Sheets (CSS) that you will use • Determine how the pages will link to one another • Establish what other links are necessary • Develop the Web page(s) and insert all links • Test all Web pages within the Web site
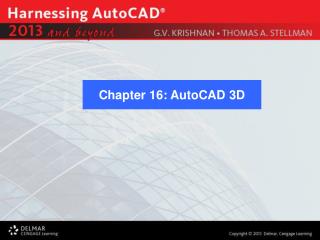
images [images folder] html03 [folder for HTML#3] images[images folder] images [folder] For html03 fooddrive.html fooddrivelogo.gif Relative Paths for html03How can gettinggreener.html access mailbox.gif and wall.gif image files from the “images” folder under public_html (which is your personal web page? book.gif, events.gif gcan.gif, wall.gif mailbox.gif, worm.gif H: [root directory] | public_html [web folder] hw (new folder) html02 [folder for HTML#2] exercise (new folder) index.html myself.pptx myresume.docx images [folder] gettinggreener.html greenhome.html beautifulyards.html car.jpg and other jpg files largewaterfall.jpg smallwaterfall.jpg pond.jpg files
Type the following URLs • http://barney.gonzaga.edu/~chenta/html03/exercise/greenhome.html • http://barney.gonzaga.edu/~chenta/html03/exercise/greenhome.html • http://barney.gonzaga.edu/~chenta/html03/exercise/gettinggreener.html (the driver) • http://barney.gonzaga.edu/~chenta/html03/exercise/gettinggreener.html
Two Extra URLs (with relative path) • What is the difference between the three pages below: • http://barney.gonzaga.edu/~chenta/html03/exercise/gettinggreener.html • http://barney.gonzaga.edu/~chenta/html03/exercise/gettinggreener_relative_path.html • and the next one: • http://barney.gonzaga.edu/~chenta/html03/exercise/gettinggreener_relative_path_wr.html • http://barney.gonzaga.edu/~chenta/html03/exercise/gettinggreener_relative_path.html (a newdriver) • http://barney.gonzaga.edu/~chenta/html03/exercise/gettinggreener_relative_path_wr.html (wrong relative path for mailbox)
Two Tasks You Need to Complete • There are two major tasks (html projects) you need to complete in this chapter: • 1. Chapter exercise: Green Home project • Two html files should be created (details see text and assignment) • a.) driver: gettinggreen.html • b.) linked page: greenhome.htm. • 2. html03hw (create from the scratch) • beautifulbackyards.html We will study how to do the chapter exercise first. You then employ all the skills in the exercise to do the html hw. The files’ organizationfor handling two tasks are different from previous chapters and will be used for the rest of chapters.
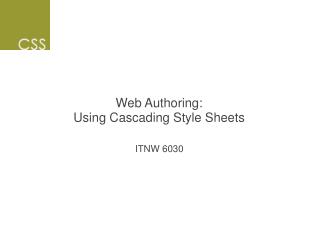
gettinggreener.html gettinggreener_relative_path.html
greenhome project (exercise) • Two new topics are introduced in this chapter (and you need complete the exercise of greenhome project before working the html03 assignment) • 1) links with absolute and relative paths • All what you learned/implemented is “absolute” path • 2) CSS style sheets • “embedded” style sheet
<!-- File name: gettinggreener.html Author: Your_Name_here Date: 5/25/2012 BMIS235-01, Row No.: 2 Text page 123 --> <!DOCTYPE html PUBLIC "-//W3C//DTD XHTML 1.0 Transitional//EN" "http://www.w3.org/TR/xhtml1/DTD/xhtml1-transitional.dtd"> <html xmlns="http://www.w3.org/1999/xhtml" xml:lang="en" lang="en"> <head> <meta http-equiv="Content-Type" content="text/html; charset=utf-8" /> <title>Getting Greener</title> <style type="text/css"> <!— body {font-family: Arial, Verdana, Garamond; font-size: 11pt} h1, h2 {color: #00934a} a {color: black} a:hover {background: #00934a; color: white} --> </style> </head> <body> <div style="text-align: center"> <imgsrc="images/earthlogo.jpg" width="735" height="190" alt="Green logo" /> </div> We will study this part in the second part
This is required for all HTML HW • <p><span style="color: #00934a; font-weight: bold">Getting Greener</span> is an environmental consulting company that specializes in helping to make your home and life greener. We have trained consultants who can give your home a green audit. We will make suggestions for ways that you can lessen your footprint on the earth. Help your family act in an environmentally responsible way by creating a home environment that is safe, less costly, and green.</p> • <h2>Company Information:</h2> • <ul style="list-style-image: url(images/earthbullet.jpg)"> • <li>Started by environmental engineer Dr. Dean A. McDevitt in 2000</li> • <li>Store locations all over the greater Seattle area, including branch offices in all public utility buildings</li> • <li>Fifteen consultants with a variety of specialties; all fully trained, bonded, and insured</li> • </ul> • <p>Browse our Web site to learn more about our services. See a sample of a <a href="greenhome.html">green home</a> environment or read more about climate control at the <a href="http://www.wmo.int/">World Meteorological Organization (WMO)</a>. Have a question or comment? Call us at (999) 555-GREEN or e-mail us at • <a href="mailto:gettinggreener@isp.com ?subject=green home&body=How can I get a green audit" <imgsrc="../../images/mailbox.gif“height="36" width="36" alt="Mailbox logo"/> gettinggreener@isp.com</a>.</p> • <br/> <i>This document was last updated on: • <script type="text/javascript"> document.write(document.lastModified); • </script> </i> • </body> • </html>
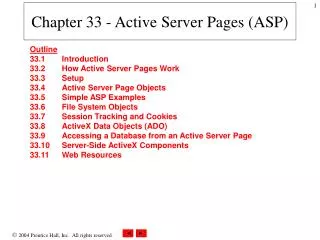
HW- HTML#3 HTML#3 assigned HW http://barney.gonzaga.edu/~chenta/html03/hw/beautifulbackyards.html http://barney.gonzaga.edu/~chenta/html03/hw/beautifulbackyards.html
Starting Notepad++ • Click the Start button on the Windows taskbar to display the Start menu • Click All Programs at the bottom of the left pane on the Start menu to display the All Programs list • Click Notepad++ in the All Programs list • Click Notepad++ in the list to display the Notepad++ window. If there are files already open in Notepad from previous projects, close them all now by clicking the Close button on each open file • If the Notepad++ window is not maximized, click the Maximize button on the Notepad++ title bar to maximize it • Click View on the menu bar • If the Word wrap command does not have a check mark next to it, click Word wrap
Entering HTML Tags to Define the Web Page Structure • Enter the HTML code shown in Table 3–1. Press ENTER at the end of each line. If you make an error as you are typing, use the BACKSPACE key to delete all the characters back to and including the incorrect characters, then continue typing • Position the insertion point on the blank line between the <body> and </body> tags (line 12) and press the ENTER key • Compare what you typed to Figure 3–10. If you notice errors, use your mouse pointer or arrow keys to move the insertion point to the right of each error and use the BACKSPACE key to correct the error
Saving an HTML File Please note that the following steps is a just a sample guide for you. You need to find out the exact configuration in the PC. • With a USB flash drive connected to one of the computer’s USB ports, click File on the Notepad++ menu bar and then click Save • Type gettinggreener.html in the File name text box (do not press ENTER) • Click Computer in the left pane of the Windows Explorer window to display a list of available drives • If necessary, scroll until UDISK 2.0 (G:) or the name of your storage device is displayed in the list of available drives • Open the Chapter03\ChapterFiles folder • Click the Save button in the Save As dialog box to save the file on the USB flash drive in the Chapter03\ChapterFiles folder with the name gettinggreener.html
Adding a Center-Aligned Banner Image Using an Inline Style • With the insertion point on line 13, enter the HTML code shown in Table 3–2, pressing ENTER at the end of each line. • Make sure to indent the second line of code by using the TAB key. This separates the start and end <div> tags (for defining ‘block-level’ structure or ‘logical’ division) from the <img> tag, highlighting the image insertion. Press the ENTER key twice at the end of line 15 to position the insertion point on line 17
Adding Paragraphs of Text • With the insertion point on line 17, enter the HTML code shown in Table 3–3. Press ENTER twice after the </p> tag on line 17 and once after the </p> tag on line 19. After entering the two paragraphs, the insertion point is on line 20
Creating Unordered (Bulleted) Lists Using Images as Bullets • Click the blank line 18 and press the ENTER key • Enter the HTML code shown in Table 3–4 • After the </ul> in line 25, press the ENTER key to insert a blank line on line 26
Adding a Text Link to Another Web Page within the Same Web Site • Click immediately to the left of the g in the word green on line 27 • Type <a href=”greenhome.html”> to start the link, setting the Web page greenhome.html as the linked Web page • Click immediately to the right of the e in home on line 27. Type </a> to close the link • See Table 3-5
Using Style Sheets • CSS supports three types of style sheets: • inline, (chapter 2) • embedded, (chapter 3) • an external (or linked) (chapter 4) • We will study more in chapters 3 and 4. Inline Styles <div style="text-align: center"> <imgsrc="images/earthlogo.jpg" width="735" height="190" alt="Green logo" /> </div>
Adding a Text Link to Another Web Page within the Same Web Site
Adding an E-Mail Link • Click immediately to the left of the g in the beginning of gettinggreener@isp.com on line 27. Type <ahref=”mailto:gettinggreener@isp.com”> as the start of the e-mail link. This will link to the e-mail address gettinggreener@isp.com when the link is clicked • Click immediately after the m in isp.com and before the period in the e-mail address text on line 27 • Type </a> to end the e-mail link
Adding a Subject Together with Body Message Text to an E-Mail Link • Type <a href= "mailto:gettinggreener@isp.com?subject=green home&body=How can I get a green audit?">gettinggreener@isp.com</a>as the tag
Adding an Image (from existing resources [folder]) to an E-Mail Link • Type <a href= "mailto:gettinggreener@isp.com?subject=green home&body=How can I get a green audit?">gettinggreener@isp.com</a>as the tag Please note that you need to figure out how to add “mailbox.gif” in this exercise with “relative path” (see the following slides) How to make it work?
Linking to Documents in Other Folders: Absolute and Relative Paths • To create a link to a file located in a different folder than the current document, you must specify the file’s location, or path, so that browsers can find it • HTML supports two kinds of paths: relative and absolute • An absolutepath specifies a file’s precise location within a computer’s entire folder structure
Relative Paths • A relativepath specifies a file’s location in relation to the location of the current document • If you want to go one level up the folder tree, you start the relative path with a double period (/../) then provide the name of the file. • Q: • A: • To specify a different folder on the same level, known as a siblingfolder, you move up the folder tree using the double period (..) and then down the tree using the name of the siblingfolder • You should almost always use relative paths in your links how to move “two” levels” up? a two double periods ( /../../ )
images [images folder] html03 [folder for HTML#3] images[images folder] images [folder] For html03 fooddrive.html fooddrivelogo.gif Relative Paths (cont.)How can gettinggreener.html access mailbox.gif and wall.gif image files from the “images” folder under public_html (which is your personal web page? book.gif, events.gif gcan.gif, wall.gif mailbox.gif, worm.gif H: [root directory] | public_html [web folder] hw (new folder) html02 [folder for HTML#2] exercise (new folder) index.html myself.pptx myresume.docx images [folder] gettinggreener.html greenhome.html beautifulyards.html car.jpg and other jpg files largewaterfall.jpg smallwaterfall.jpg pond.jpg files <body text="black" link="red" vlink="blue" alink="aqua" background="../../images/wall.gif">
Adding a Subject to an E-Mail Link using “image” and “Relative Path” • Type <a href= "mailto:gettinggreener@isp.com?subject=green home&body=How can I get a green audit?"> <imgsrc="../../images/mailbox.gif“height="36" width="36" alt="Mailbox logo"/> gettinggreener@isp.com </a> as the tag Please note that you need to figure out how to add “mailbox.gif” in this exercise with “relative path”.
images [images folder] html03 [folder for HTML#3] images [folder] For html03 Relative Paths (cont.)How can gettinggreener.html access mailbox.gif and wall.gif image files from the “images” folder under public_html (which is your personal web page? book.gif, events.gif gcan.gif, wall.gif mailbox.gif, worm.gif H: [root directory] | public_html [web folder] hw (new folder) exercise (new folder) index.html myself.pptx myresume.docx gettinggreener.html greenhome.html images [folder] beautifulyards.html car.jpg and other jpg files largewaterfall.jpg smallwaterfall.jpg pond.jpg files
Relative Path: Linking to Documents in Other Folders (cont.) In gettinggreener_relative_path_wr (wrong version) <body text="black" link="red" vlink="blue" alink="aqua" background="images/wall.gif"> <a href=" mailto:gettinggreener@isp.com?subject=green home&body=How can I get a green audit?"> <img src=“images/mailbox.gif" height="36" width="36" alt="Mailbox logo "/>gettinggreener@isp.com </a>.</p> In gettinggreener_relative_path(correct version) <body text="black" link="red" vlink="blue" alink="aqua" background=“../../images/wall.gif"> <a href="mailto:gettinggreener@isp.com?subject=green home&body=How can I get a green audit?"> "><img src=“../../images/mailbox.gif" height="36" width="36" alt="Mailbox logo "/>gettinggreener@isp.com </a>.</p> What is the difference between these two versions?
images [images folder] html03 [folder for HTML#3] images [folder] For html03 Relative Paths (cont.)How can gettinggreener.html access mailbox.gif and wall.gif image files from the “images” folder under public_html (which is your personal web page? book.gif, events.gif gcan.gif, wall.gif mailbox.gif, worm.gif H: [root directory] | public_html [web folder] hw (new folder) exercise (new folder) index.html myself.pptx myresume.docx gettinggreener.html greenhome.html images [folder] beautifulyards.html car.jpg and other jpg files largewaterfall.jpg smallwaterfall.jpg pond.jpg files <body text="black" link="red" vlink="blue" alink="aqua" background="../../images/wall.gif">
images [images folder] html03 [folder for HTML#3] images [folder] For html03 Relative Paths (cont.)How can gettinggreener.html access mailbox.gif and wall.gif image files from the “images” folder under public_html (which is your personal web page? book.gif, events.gif gcan.gif, wall.gif mailbox.gif, worm.gif H: [root directory] | public_html [web folder] hw (new folder) exercise (new folder) index.html myself.pptx myresume.docx gettinggreener.html greenhome.html images [folder] beautifulyards.html car.jpg and other jpg files largewaterfall.jpg smallwaterfall.jpg pond.jpg files <a href="mailto:gettinggreener@isp.com"><img src="../../images/mailbox.gif" height="36" width="36" alt="Mailbox logo"/>gettinggreener@isp.com </a>.</p>
What are the ‘updates’ in the following two pages? Use of ‘relative path’
Anything New? a:link Background image. What else?
Adding a Text Link to a Web Page in Another Web Site • Click immediately to the left of the W in World on line 27 and type <a href=”http://www.wmo.int/”> to add the text link that will connect to the external Web site when clicked • Click immediately to the right of the ) in (WMO) on line 27 and type </a> to end the tag
Next … CSS • We will study another important topic of CSS using “imbedded” style sheet
Using Style Sheets • CSS supports three types of style sheets: • inline, (chapter 2) • embedded, (chapter 3) • an external (or linked) (chapter 4) Inline Styles <div style="text-align: center"> <imgsrc="images/earthlogo.jpg" width="735" height="190" alt="Green logo" /> </div>
Adding Embedded Style Sheet Statements <style type="text/css"> body {font-family: Arial, Verdana, Garamond; font-size: 11pt} h1, h2 {color: #00934a} a {color: black} a:link {color: red} a:hover {background: #00934a; color: white} </style> {color: green} change h1,h2 heading to green { declaration } selector (or anchor) change all links to “black” in all states a:link a:visited a:active hover: define the style of a link when the mouse pointer points to. Change link hover to green background and white text a:link {color: red} was included in ..relative_pathversion
Defining Foreground and Background Colors • Foreground color definition: • color: color coloris either the color value or the color name • Background color definition: • background-color: color • You can apply foreground and background colors to any page element • If there is no color specified in the <body> tag, the default colors of the Web browser is used • You are, however, strongly recommended to use the following background style • Syntax: • <body style=“background-color: color_name or color_code” text=“ …’ link=“..” vlink=“..” alink=“..” background=“color image”> • <body style="background-color:lightgreen" text="black" link="red" vlink="blue" alink="aqua" background="images/wall.gif">