AUDIO SIGNAL PROCESSING
AUDIO SIGNAL PROCESSING. Health Informatics Week 4 Supplementary Material for Lab. INTRODUCTION. The purpose of this lab class is to: Outline, using practical examples, the challenges in recording acoustic sounds within real-word ‘noisy’ environments.


AUDIO SIGNAL PROCESSING
E N D
Presentation Transcript
AUDIO SIGNAL PROCESSING Health InformaticsWeek 4Supplementary Material for Lab
INTRODUCTION • The purpose of this lab class is to: • Outline, using practical examples, the challenges in recording acoustic sounds within real-word ‘noisy’ environments. • Use software tools to process and remove noise from acoustic signals. • Case Study: Stethoscope • The lab class with be split into 2 parts: • Some self directed reading of theory material contained within these slides. • Practical session using audio signal processing techniques.
OVERVIEW • In this tutorial we will introduce and apply some basic concepts in signal processing. • The tutorial will focus on ‘audio signal processing’. • Throughout the tutorial we will be using a piece of specialised signal processing software. • GoldWave is a professional digital audio editor that plays, records, edits, processes, and converts audio on your computer. • The purpose of this tutorial are to introduce some basic concepts and apply these concepts to four tasks: • Examine how filtering techniques effect speech. • Resample CD quality recordings. • Remove unwanted background noise from a speech recording. • Remove unwanted speech from a Stethoscope recordings
INTRODUCTION • Signal processing is the investigation, interpretation and modification of signals such as audio and image. • Typically applied to classify a pattern based on its characteristics, identify particular patterns from a given signal, or to remove redundant information (noise) from a signal. • Clean up a radio broadcast. • Extract a public speaker’s speech from an audio sample which contains audience applause. • The extraction of useful information from a particular signal has several applications within the healthcare domain, for example: • Identifying patterns in an Electrocardiogram. • Extracting heartbeat or lung sounds in the presence of mechanical instruments during surgery i.e. saw, drill. • Identify a sequence of daily living activities through the separation of various sounds, for example, brushing teeth versus washing. • Typical processing techniques include: • Filtering, compression, spectral analysis, digitisation and reconstruction.
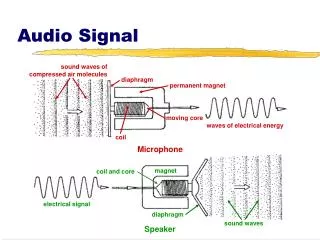
AUDIO SIGNAL PROCESSING • Audio signal processing is the term used to describe the modification of auditory signals or sounds. • As audio signals may be electronically represented in either digital or analog format. • Analog processors operate directly on the electrical signal, while digital processors operate mathematically on the binary representation of that signal. • An analog representation is usually electrical; a voltage level represents the air pressure-waveform of the sound. • A digital representation expresses the pressure wave-form as a sequence of binary numbers. • This permits signal processing using digital circuits such as microprocessors and computers. • This conversion is prone to some loss of quality.
AUDIO SIGNAL PROCESSING CONT. • In order to convert the continuous-time analog signals to a discrete-time digital signals, it must be sampled and quantized. • Sampling is the division of the signal into discrete intervals at which analog voltage readings will be taken. • Quantization is the conversion of analog voltages into a binary representation; this is performed by an analog-to-digital converter. • The length of the sampling interval determines the maximum frequency that can be encoded. The Nyquisty-Shannon sampling theorem states that a signal can be exactly reconstructed from its samples if the sampling frequency is greater than twice the highest frequency of the signal. • For example, the human hearing extends from approximately 20 Hz to 20000Hz (20kHz). • To reproduce a ‘good’ recording of a person’s speech the sampling rate has to be above 40 KHz - commercial CDs are recorded at 44.1 KHz!
SAMPLES • Digital audio is composed of thousands of numbers (samples). • Each sample holds the state, or amplitude (loudness) of a sound at a given instant in time. For digital audio, all the samples combine to make a waveform of the sound. • When playing audio, each sample specifies the position of the output speaker at a certain time. • Small numbers moves the speaker in • Large numbers moves the speaker out. • This movement occurs thousands of times per second, causing vibration, which we hear as sound.
SAMPLE RATE • The sampling rate is the number of times, per second, that the amplitude level (or state) is captured. It is measured in Hertz (Hz). • high sampling rate results in high quality digital sound in the same way that high resolution video shows better picture quality. • CDs, for example, use a sampling rate of 44100Hz, whereas telephone systems use a rate of only 8000Hz. • Higher sampling rates capture a wider range of frequencies and maintain a smoother waveform. • The figure below shows a real world waveform in red and the digital waveform in black at different sampling rates. • You can see that increasing the sampling rate makes each step of the digital waveform narrower. The shape more closely follows the real world. • In simple terms, the sampling rate controls the width of each step. • The rate to use depends upon the type of sound and the amount of storage space available. • Higher rates consume a lot of space. • the CD requires over 5 times the amount of storage as the telephone system for the same digital sound. Certain types of sounds can be recorded at lower rates without loss of quality.
THE SINE WAVE • To the human ear, a sound is made up of a number of sine waves. • This wave pattern occurs often in nature, including ocean waves, sound waves, and light waves • You can prove this using Matlab!! • Sine waves can be used as simple building blocks to 'make up' and describe nearly any periodic waveform including squares waves (digital representation of audio) or even the irregular sound waves made by human speech.
SIMPLE BUILDING BLOCKS sin(x) + sin(3x)/3 = sin(x) + sin(3x)/3
SIMPLE BUILDING BLOCKS sin(x) + sin(3x)/3 + Sin(5x)/5 = sin(x) + sin(3x)/3 + sin(5x)/5
TOWARDS A SQUARE WAVE 7 sine waves 14 sine waves 50 sine waves
HUMAN AUDIO RANGES • The human ear can hear frequencies from 20 Hz to 20,000 Hz • Human voice or speech ranges from 300 Hz to 3,400 Hz Amplitude 20,000 20 300 3,400 Frequency (Hertz)
FILTERS • Filters are used to remove a range of frequencies from a sound and can produce a variety of effects. • At a basic level there are 4 types of filters. • Lowpass. • Highpass. • Bandpass • Notch Amplitude Notch Low Pass High Pass Band Pass Frequency (Hertz)
FILTERS - EXAMPLE • Lowpass filters block high pitched frequencies but allow low pitched frequencies to pass. They can be used to reduce high end hiss noise or remove unwanted sounds above the given cutoff frequency. • If you were to apply a lowpass filter with a cutoff frequency of 1000Hz on speech, it would make it sound mumbled and deep. • Highpass filters block low pitch frequencies, but allow high pitched frequencies to pass. They can remove deep rumbling hum or remove unwanted sounds below the given cutoff frequency. • If you were to apply a highpass filter with a cutoff frequency of 1000Hz on speech, it would make it sound thin and hollow. • Bandpass filters block all frequencies outside a specified range, keeping only frequencies within the range. • Notch filter remove all frequencies inside specified range, keeping only frequencies outside the range. Typical a notch filter can be used to remove noise at a particular frequency such a 50Hz main supply in electrical systems.
PRACTICAL OVERVIEW • Download GoldWave • Test Headset including microphone (sharing may be necessary) • Show a real life example of filtering (Example) • Before • After • Run some example filters (Task 1) • See effects on speech • Low pass filter • High pass filter • Record CD quality audio @ 44,100Hz (Task 2) • Resample to 15,000 Hz to simulate radio. • Resample to 8,000 Hz to simulate telephone line. • Remove an unwanted high pitched signal from a speech recording (Task 3) • Remove some unwanted speech sounds from a audio recording of a patient breathing (Task 4)
DOWNLOAD GOLDWAVE & AUDIO FILES • Check if goldwave installed!! • If not, download Goldwave. • Goldwave is a software suite that allows some signal processing capabilities such filtering audio signals. • http://www.goldwave.com • Click on download on left hand side • Self-Installing GoldWave v5.25 • Download all the audio files required for this tutorial. • Task3.wav (speech containing high pitched noise) • Task4.wav (breathing sounds with 2 types of noise)
TESTING YOUR MICROPHONE • If you do not have a microphone then you may download a sample speech file from the web. • Otherwise: • Step 1: File > New; • Select DVD Quality Reset. • Press OK. • Step 2: Press the record icon and speak into the microphone. • Step 3: Press the play icon to verify the recording.
TASK 1 • Record a short sample of your own speech – or use sample file. • Save audio file as Task1.wav • 5 – 10 seconds for example count to 10. • Apply Low Pass Filter @ 1,850 Hz 300 3,400 Low Pass @ 1,850 Hz 300 1,850 3,400
TASK 1 • Applying a Low/High Pass filter • Select the ‘Low/Highpass’ icon from the menu • The following dialog box should appear Frequency cutoff selector Low/Highpass Selector Used to select the steepness of the cutoff. The higher the number the steeper the cutoff.
TASK 1 • Apply High Pass Filter @ 1,850 Hz High Pass @ 1,850 Hz 300 1,850 3,400 • Apply Low Pass Filter @ 800 Hz Low Pass @ 800 Hz 300 800 3,400
TASK 1 • Apply High Pass Filter @ 2900 Hz High Pass @ 1,850 Hz 300 2900 3,400 • Apply Low Pass Filter @ 300 Hz Low Pass @ 800 Hz 300 3,400
TASK 2 • Record a short sample of your own speech. • CD quality sample rate of 44,100 Hz • Resample the audio stream at 15,000 Hz • Radio • Resample the audio stream at 8,000 Hz • Public Switched Telephone Network
TASK 2 • Resampling an audio file • Select the ‘Resample’ icon from the menu • The following dialog box should appear
TASK 3 • Load the file called Task3.wav into GoldWave • Remove a high pitched noise from a speech recording • Apply the appropriate filter type and select the correct cut off frequency to remove the high pitched noise. • Apply Low Pass Filter @ 2,000Hz Low Pass @ 2,000 Hz 20 2,000 20,000
TASK 4 - OVERVIEW • In this task you will be given the opportunity to extract breathing sounds from a recording containing background noise in the form of people talking. • The recording was taken using a stethoscope. • In particular, an electronic stethoscope was used. • This is an example of an emerging technology which is assisting clinicians to improve disease detection. • What follows is a brief introduction into the use of stethoscopes.
CASE STUDY: STETHOSCOPE • Since 1816, the stethoscope has been an invaluable diagnostic tool in respiratory and cardiovascular evaluation. • Detected abnormalities indicate pathological conditions of the airways or lungs. • for example, respiratory sounds recorded over chest wall with abnormally high frequencies (600-1000Hz) can indicate diseases with airway obstruction - asthma and chronic bronchitis. • Nonetheless, can be limited. Information obtained is subjective and dependent on expertise of the examiner. • Does not result in permanent objective records that can be documented! • Further disadvantage is the fact that physical readings can only rely on the auditory capability of the user. • Modern technology can now be used to great advantage for the capture, storage, analysis and communication of sounds normally heard through the stethoscope. • Digitization of respiratory sounds using an electronic stethoscope is easily achievable, resulting in a high-quality permanent representation that can be documented, duplicated and analysed using digital signal processing techniques. • Coupled with automated computer-based decision making techniques, signal processing methods can be applied in order to advance the practices and procedures used in modern-day respiratory monitoring.
ELECTRONIC STETHOSCOPE • Modern day electronic stethoscopes to not rely on mechanical components such as diaphragms. • Instead a transducer is used as the sensor and converts the sounds (mechanical vibrations) to an electronic signal. • These signals are then played through a headset or can be channelled to recording apparatus for storage and future processing. • The main advantage of this approach over the analogue counterpart is that intelligence can be added to the device. • This allows filtering and enhancement of the signals, something not possible to do with the analogue version.
TASK 4 • Load the file called Task4.wav into GoldWave. • Using the skills you have gained attempt to remove the background noise (speaker’s voice) from the recording.
![[Advanced] Speech & Audio Signal Processing](https://cdn2.slideserve.com/3915760/advanced-speech-audio-signal-processing-dt.jpg)