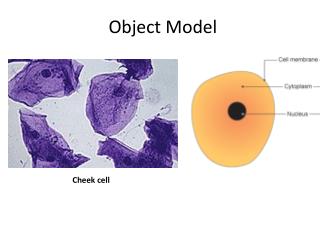
Cheek Cell DNA Extraction
Cheek Cell DNA Extraction. DNA Isolation. Procedure: Swish your mouth with Gatorade for one minute. Chew lightly on your cheeks. Be careful not to swallow the solution. Spit the solution back into the cup. DNA Isolation. Procedure:

Cheek Cell DNA Extraction
E N D
Presentation Transcript
DNA Isolation Procedure: • Swish your mouth with Gatorade for one minute. Chew lightly on your cheeks. Be careful not to swallow the solution. • Spit the solution back into the cup.
DNA Isolation Procedure: 3. Carefully pour the spit solution into the 15-mL plastic test-tube provided and screw on the cap 4. With a centrifuge, ask your teacher to spin the down your cheek cells for 30 seconds until it forms into a nice pellet at the bottom of the tube.
DNA Isolation Procedure: 5. Use your pipette to carefully draw off most of the liquid on top, without disturbing the cell pellet in the bottom. Leave about 2 mL of liquid.
DNA Isolation Procedure: 6. Using a different pipette, add 2mL of lysis buffer to your test-tube. The total amount of liquid in your tube should be 4mL. 7. Screw the cap back on and gently tilt the test-tube back and forth to mix the solution.
DNA Isolation Procedure: 8. Using a different pipette, hold your 15mL test tube at a 45⁰ angle, and drip the cold alcohol down the side of the test tube, so that it forms a layer on top of your solution without splashing. Do NOT mix.
DNA Isolation Procedure: 9. Let the tube stand upright and undisturbed. You should begin to see clear strands of DNA clumping together in the alcohol layer.
DNA Isolation Procedure: 10. With your pipette, carefully transfer the precipitated DNA along with about 1 ml of the alcohol solution into the small test tube that you will have for your necklace.