Troubleshooting
Troubleshooting. Leading Causes of Belt Failure. Improper Tensioning Misalignment Improper Equipment (damaged pulleys) Abrasive Conditions Unusual Loading Cycles Operating Temperature. Belt Failure Modes. Rapid V-Belt Wear. V-Belt Drive Troubleshooting Guide.


Troubleshooting
E N D
Presentation Transcript
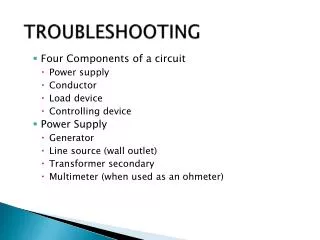
Leading Causes of Belt Failure • Improper Tensioning • Misalignment • Improper Equipment (damaged pulleys) • Abrasive Conditions • Unusual Loading Cycles • Operating Temperature
Belt Failure Modes Rapid V-Belt Wear
V-Belt Drive Troubleshooting Guide Symptom 1: Rapid V-Belt Wear PROBABLE CAUSE ACTION Rubbing belt guard. Sheave misalignment. Worn or damaged sheave grooves. Wrong belt cross section or type. Sheave diameter too small. Improper V-belt installation. Overloaded drive. Belts improperly stored. Mismatched belts. Replacing one belt. V-belt slipping. Check guard clearance. Correct sheave alignment. Check, replace sheaves. Check dimensions, replace belt. Use larger diameter sheave. Replace belts (do not pry belts). Reduce load. Use new set of V-Belts. Replace with matched set. Replace complete set. Increase tension.
Belt Failure Modes Side Wall Damage
V-Belt Drive Troubleshooting Guide Symptom 2: V-Belts Turned Over in Sheave Groove PROBABLE CAUSE ACTION Broken cords in V-belts,belts pried over sheaves. Overloaded drive. Defective cord construction in V-belt. Impulse loads. Determine how belt was installed (Replace belts, do not pry belts over sheaves). Reduce loads. Check for narrow spot in belt,replace belts. Use banded V-belts orspring-loaded idlers.
Belt Failure Modes Glazed or burnt sidewall
V-Belt Drive Troubleshooting Guide Symptom 3: V-Belt Slippage PROBABLE CAUSE ACTION Lack of tension. Overloaded drive. Sheave worn, belt bottomingin groove (Shiny sheavegroove bottom). Sheave grooves too wide,belts bottoming in grooves. Oily drive conditions. Increase tension. Reduce loads. Replace sheave. Use belt with larger cross sectionor replace sheave. Correct the unnecessary oil orgrease condition.
V-Belt Drive Troubleshooting Guide Symptom 4: V-Belt Squeal PROBABLE CAUSE ACTION Lack of tension. Overloaded drive. Insufficient arc of contact. Increase tension. Reduce loads. Increase center distancebetween sheaves.
Belt Failure Modes Cracked Belt
V-Belt Drive Troubleshooting Guide Symptom 5: Cracked V-Belts PROBABLE CAUSE ACTION Belt slippage. Excessive heat. Increase belt tension. Provide adequate ventilation and check belt tension.
V-Belt Drive Troubleshooting Guide Symptom 6: Repeated V-Belt Fracture PROBABLE CAUSE ACTION Shock loads. Heavy starting loads. Improper V-belt installation,belts pried over sheaves. Increase V-belt tension.Heavier drive may be required. Increase V-belt tension.Heavier drive may be required Determine how belt was installed.(Replace belts, do not pry beltsover sheaves.)
Troubleshooting Guide Symptom 7: Flat Belt Drive Operating Improperly PROBABLE CAUSE ACTION Belt slippage. Pulley with excessive crown. Center Distance too long. Slippage on flat pulleys. Excessive shock loads. Increase belt tension. Remove excessive crown. Use shorter center distance. Use V-Belts. Use V-Belts.
Synchronous Troubleshooting Guide Symptom 8: Synchronous Belt Noise or Vibration PROBABLE CAUSE ACTION Misaligned drive. Incorrect belt tension. Belt speed too high. Incorrect belt profile for sprocket. Sprocket diameter too small. Overloaded drive. Correct drive alignment. Adjust tension to recommended value. Redesign drive.. Use proper belt/sprocket combination. Redesign drive using larger diameter sprockets. Reduce the load. Heavier drive may be required.
Synchronous Troubleshooting Guide Symptom 9: Synchronous Belt Edge Wear PROBABLE CAUSE ACTION Sprocket flange damaged. Belt too wide. Belt tension too low. Improper tracking. Belt rubbing drive guard. Replace the sprocket. Use proper width belt or sprocket. Adjust belt tension to recommended values. Correct drive alignment. Check guard clearance.
Synchronous Troubleshooting Guide Symptom 10: Synchronous Belt Tensile Break PROBABLE CAUSE ACTION Shock loads. Improper belt handling or storage. Forcing belt onto drive during installation. Debris or foreign object in drive. Redesign drive. Store in original package. Do not crimp. Do not pry belt over sprockets. Remove debris and check guard.
Troubleshooting Synchronous Drives Normal Failure Mode The end of the useful life of a synchronous belt is most often characterized by even tooth fabric wear and eventually, tooth separation. Any other type of belt failure could be an indication that there are other problems present within the drive.
Troubleshooting Synchronous Drives Noise Noise can be an issue with synchronous belt drives. The noise created by a drive increases with the belt speed. To minimize noise make sure the drive is aligned and tensioned properly.
Troubleshooting Synchronous Drives Sprocket Wear Sprocket wear can have a great impact on belt wear. When unusual belt wear occurs, the first step is to inspect the sprockets. Excessive tooth wear is obvious with visual inspection. Use a pi tape to evaluate sprocket wear. The best sprocket material for minimizing wear is gray cast or ductile iron. A softer material may wear more quickly. Abrasive environments, drive misalignment, and improper tensioning can lead to rapid belt and sprocket wear.
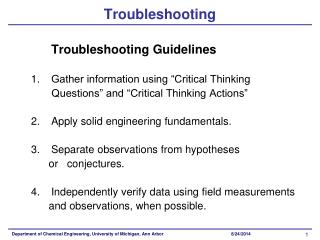
Troubleshooting Synchronous Drives Sprocket Misalignment The leading symptoms of belt misalignment are excessive edge wear (exposing or fraying the tensile cord), running off the flange, snub breaking (in a stair step pattern) and excessive drive noise. If sprockets are verified to be in alignment and problems persist, frame and bearing supports should be checked for rigidity. The frame may be flexing during operation, causing drive misalignment. Proper Parallel Horizontal Vertical (Off-Set) Angular Angular (Pigeon-Toed)
Troubleshooting Synchronous Drives Excessive Tension Excessive tension of a synchronous drive will cause premature belt failure due to wear and high tooth stress. The noise level of a synchronous belt drive will increase considerably if the belt is over-tensioned. Excessive tension produces fabric wear between the belt teeth exposing the tensile cord and wearing of the sprocket teeth. If tooth shear, snub break, or tooth jump occurs under correct tension, the drive may be under-designed.
Troubleshooting Synchronous Drives Under-Tensioning Under-tensioning is the most common cause of belt failure. It can cause premature belt wear, tooth jump and belt failure. Belt wear is characterized by fabric wear on the tooth flank which can accumulate material between the teeth. Jumping can cause tooth shear and tensile cord breakage. Tooth jump or ratcheting occurs when the belt teeth climb up and out of the sprocket grooves. The most obvious indication of tooth jump is a machine gun like sound. Although there may be no visible evidence of damage, the capabilities of the belt are likely destroyed after tooth jump.
Troubleshooting Synchronous Drives Non-Rigid Frame A less common cause of belt failure is a non-rigid frame which allows the center distance to vary when a load is applied. The supporting structure should be checked for rigidity to make sure the shafts are not deflecting during periods of peak loading and causing tooth jump.
Troubleshooting Synchronous Drives Overloaded Drive Severe overload conditions can cause fabric and sprocket wear on the pressure surfaces, belt tooth shear, snub break, tooth jump and a resulting increase in noise level. These conditions generally force a drive re-design to provide additional capacity. A wider belt will sometimes accomplish this.
Troubleshooting Synchronous Drives Excessive Shock Loads / Start-Up Loads • Some applications are not conducive to synchronous belt drives • Use special consideration on drives with excessive or extreme shock loads or start-up loads - Some drives may require soft start • Positive drive engagement and the high modulus cord (low-stretch) make synchronous belts less tolerant of severe shock loads than v-belts which allow slippage • If you require the characteristics of synchronous belts in a shock load application, an RPP Panther synchronous belt is your best choice in these situations
Troubleshooting Environmental Problems Belt Deterioration The synchronous belt can deteriorate when operated in caustic or acidic atmospheres, environments saturated with vapors from hydrocarbon solvents, and ambient temperatures above 185°F or less than -30°F. Specially constructed belts may provide satisfactory service in a number of applications not suitable for stock belts.
Troubleshooting Environmental Problems Excessive Heat Carlisle standard rubber construction synchronous belts are compounded for moderate resistance to heat and should give adequate service life under normal conditions. The operating limits of a standard construction synchronous belt range from a minimum of -32°F to 200°F ambient temperature (230°F intermittently). Polyurethane synchronous belts are only capable of +185°F.
Troubleshooting Environmental Problems Environments with Excessive Debris • Synchronous belts should not be used in environments where excessive debris is present • Debris can be more damaging to a synchronous belt drive than to a v-belt drive, which has a tendency to eject debris from the sheave grooves as the drive operates • Large debris trapped between a synchronous belt and pulley will destroy belt tensile cords or drive hardware • Small debris will become compacted in the pulley groove, forcing the belt to ride out away from the pulley and lead to belt failure by destroying the tensile member
Troubleshooting Environmental Problems Environments with Excessive Debris (cont.) • Exposure of synchronous belts to oil and other lubricants should be minimized • Oil and petroleum distillates may alter the belt polymers and adhesion systems • Care must be taken to provide adequate shielding on drives where debris or contaminants are likely • Completely enclosing a synchronous belt drive may be acceptable. Synchronous belts generate less heat than v-belts. Air circulation around the drive is not a critical consideration except in extremely high temperature environments.
Synchronous Belt Storage The quality of a Carlisle Belt is not considered to change significantly within eight years, when stored properly under normal conditions. Normal conditions can be defined as temperature below 85°F and relative humidity of 70% or less with no exposure to direct sunlight. Beyond eight years, assuming normal storage, a decrease in service life of approximately 10% per year can be expected. For belts not stored under “normal” conditions, the actual reduction in shelf life is difficult to measure due to lack of precise data and an infinite number of variables involved. When belts are stored under abnormal conditions, conservatism is recommended in estimating shelf life. Improper or prolonged storage can reduce service life considerably.
Synchronous Belt Storage Like V-belts, synchronous belts may be stored on pins or saddles with precautions taken to avoid distortion. However, belts of this type up to approximately 120 inches are normally shipped in a “nested” configuration and it is recommended that the belts be stored in this manner as well. Nests are formed by laying a belt on its side on a flat surface and placing as many belts inside the first belt as possible without undue force. When the nests are tight and are stacked with each rotated 180° from the one below, they may be stacked without damage. Belts of this type over approximately 120 inches may be “rolled up” and tied for shipment. These rolls may be stacked for easy storage. Care should be taken to avoid small bend radii which could damage the belts.
www.CarlisleBelts.com from www.c-rproducts.com sales@c-rproducts.com Tel: +44 1327 701030 Fax: +44 1327 701031