swim spas
660 likes | 742 Vues
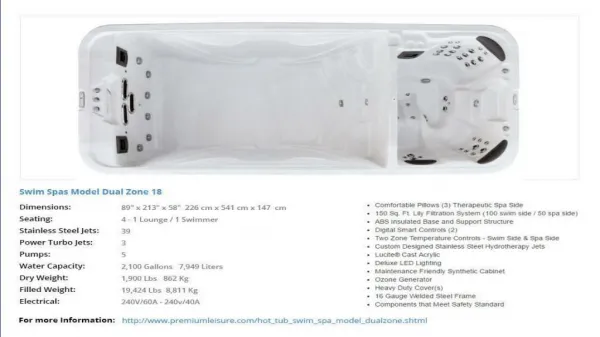
Your choice of a Premium Leisure™ brand swim spa from Premium Leisure LLC indicates that you are devoted to excellence. The management and staff appreciate your patronage and takes pride in the tradition of quality swim spas<br>that our company represents. To properly acquaint yourself with your swim spa, we suggest that you take time to read through this manual before hook up and operation. Doing so will<br>familiarize you with important operating and safety procedures, thereby ensuring an enjoyable experience right from the start. Visit US : http://www.premiumleisure.com/swim-spas.shtml

swim spas
E N D
Presentation Transcript
SWIM SPAS OWNER’S MANUAL MODELS: SWIMMER’S EDGE 18, DUAL ZONE 18, SWIMMER 18, SWIMMER 14 Premium Leisure, LLC 6101 45th St. N. St. Petersburg, FL 33714 727.573.9611 www.PremiumLeisure.com Part Number 7068 Revised 02/2013
Owner’s Information Dealer: Date Purchased: Company: Address: Telephone: __________________________ __________________________ __________________________ __________________________ Installer: Date Installed: Company: Address: Telephone: __________________________ __________________________ __________________________ __________________________ Swim Spa: Date Delivered: __________________________ __________________________ __________________________ __________________________ Model: Color: Serial Number: Your unique swim spa serial number is located on a data plate outside the cabinet at ground level. When calling for service, please have your serial number in hand.
™ ™ S S S w M Ma a an n nu u ua a alll P P Pr r re e em m miiiu u um m m L L L e e eiiis s s u u ur r re e e™ O O Ow w w n n ne e er r r’’’s s s M T T Ta a ab b bllle e e o o of f f C C Co o on n nt t te e en n nt t ts s s w w iiim m m S S S p p pa a as s s Introduction ............................................................................................ 2 Important Safety Information .................................................................. 3 Site Selection and Installation (Electrical Connections).......................... 7 Startup .................................................................................................. 23 Water Balancing ................................................................................... 30 Topside Controls and Operation .......................................................... 31 Stereo System ...................................................................................... 41 Cover .................................................................................................... 42 Frequently Asked Questions ................................................................ 43 Troubleshooting ................................................................................... 45 Maintenance and Care ......................................................................... 48 Specifications ....................................................................................... 52 Certificate of Verification ...................................................................... 60 Important: Premium Leisure is dedicated to offering you the best in customer satisfaction and service. Be sure to read, complete, sign, and send in the limited warranty card within 30 days of purchase or register online at http://premiumleisure.com/owners.shtml to ensure you understand what you are entitled to in terms of service. If you have any questions, you can call our customer care center at 727.573.9611. Printed in the U.S.A. Version 1.3 Revised 02/2013 Part # 7068 Copyright © 2010, Premium Leisure LLC. All rights reserved. No portion of this manual may be reproduced in any manner without express written permission of Premium Leisure LLC. Premium Leisure™ Swim spas and Thermazone™ are trademarks of Premium Leisure LLC. All other brands, product names, company names, trade names, trademarks, and service marks used are the property of their respective owners. Premium Leisure LLC may make product modifications and enhancements. Specifications may change without notice. International products may be configured differently to meet local electrical requirements. Dimensions are approximate. Patents pending. Page 1 For HELP, call 727.573.9611
I n t r o d u c t i o n Your choice of a Premium Leisure™ brand swim spa from Premium Leisure LLC indicates that you are devoted to excellence. The management and staff appreciate your patronage and takes pride in the tradition of quality swim spas that our company represents. To properly acquaint yourself with your swim spa, we suggest that you take time to read through this manual before hook up and operation. Doing so will familiarize you with important operating and safety procedures, thereby ensuring an enjoyable experience right from the start. If you need any more information than this manual provides, feel free to visit our Web site at www.PremiumLeisure.com or call our customer care center, at 727.573.9611. WARNING: This manual was written to ensure the proper use and installation of your swim spa. Any modifications to the procedures outlined in this manual may result in voiding your warranty. This manual and its contents are subject to change without notice. Although we have prepared this manual as accurate as possible, we are not liable for errors or omissions; loss, injury, or damages caused by improper installation; or use of swim spa (improper or otherwise). You new swim spa is made with quality synthetic cabinet materials. Synthetic materials won’t fade and are nearly invulnerable to mold and mildew. Where wood splits, cracks, and stains, synthetic materials stand in timeless perfection. Figure 1 – Swimmer in the Dual Zone 18 Page 2 For HELP, call 727.573.9611
I m p o r t a n t S a f e t y I n f o r m a t i o n IMPORTANT SAFETY INSTRUCTIONS SAVE THESE INSTRUCTIONS Your physiological response to hot water depends on subjective factors such as age, health, pregnant women, temperature sensitivities, chemical sensitivities, and medical history. Always consult a physician before using a swim spa to understand your particular tolerance and limitations. READ AND FOLLOW ALL INSTRUCTIONS WARNING – To reduce the risk of injury, do not permit children to use this product unless they are closely supervised at all times. A wire connector is provided on this unit to connect a minimum 8 American Wire Gauge (AWG) (8.4mm2) solid copper conductor between this unit and any metal equipment, metal enclosures of electrical equipment, metal water pipe, or conduit within 5 feet (1.5 m) of the unit. * For cord connected / convertible units: Replace damaged cord, immediately. Do not bury cord. Connect to a grounded, grounding type receptacle only. Danger – Risk of injury. ** For units with GFCI: fault circuit interrupter located in the main panel. The GFCI must be tested before each spa use. Warning – This product is provided with a ground- Dangers RISK OF ACCIDENTAL DROWNING: Extreme caution must be exercised to prevent unauthorized access by children. To avoid accidents, ensure that children cannot use this spa unless they are supervised at all times. Always cover the swim spa and use safety locks when it is not in use. RISK OF INJURY: The suction fittings in this spa are sized to match the specific water flow created by the pump. Should the need arise to replace the suction fittings or the pump, be sure that the flow rates are compatible. Never operate the spa if the suction fittings are broken or missing. Never replace a suction fitting with one rated less than the flow rate marked on the original suction fitting. RISK OF ELECTRIC SHOCK: Install at least 5 feet (1.5 m) from all metal surfaces. As an alternative, a spa may be installed within 5 feet of metal surfaces if each metal surface is permanently connected by a minimum 8 AWG (8.4 mm2) solid copper conductor to the wire connector on the terminal box that is provided for this purpose. RISK OF ELECTRIC SHOCK: Do not permit any electric appliance, such as a light, telephone, radio or television, within 5 feet (1.5 m) of a spa. Do not operate such an appliance from either inside the swim spa or when you are wet, unless such appliances are built-in by the manufacturer. Page 3 For HELP, call 727.573.9611
Warnings TO REDUCE THE RISK OF INJURY: The water in a spa should never exceed 40˚C (104˚F). Water temperatures between 38˚C (100˚F) and 40˚C (104˚F) are considered safe for a healthy adult. Lower water temperatures are recommended for young children and when spa use exceeds 10 minutes. Since excessive water temperatures have a high potential for causing fetal damage during the early months of pregnancy, pregnant or possible pregnant women should limit spa water temperatures to 38˚C (100˚F). Before entering a spa/swim spa, the user should measure the water temperature since the tolerance of water temperature regulating devices varies. The use of alcohol, drugs or medication before or during spa/swim spa use may lead to unconsciousness with the possibility of drowning. Obese persons and persons with a history of heart disease, low or high blood pressure, circulatory system problems, or diabetes should consult a physician before using a spa. Persons using medication should consult a physician before using a spa/swim spa since some medication may include drowsiness while other medication may affect heart rate, blood pressure and circulation. Do not connect auxiliary components (such as headphones, cables, and additional speakers) to the stereo (if equipped). Do not use a swim spa immediately following strenuous exercise. Do not use your swim spa alone. Lock the cover on your swim spa when not in use. Persons with infectious diseases should not use a swim spa. Replace audio components only with identical components. Do not leave the CD/Stereo/MP3 access door open on the stereo (if equipped). Some types of hair dye can react with the sanitizers in your swim spa water causing your hair to change color. Use at your own risk. Water normally splashes out of a swim spa during typical use. Install an adequate perimeter that provides sound footing. Do not turn your swim spa on/off from a wall switch, ground fault circuit interrupter, circuit breaker, fuse, or by plugging/unplugging it. Remove all jewelry, metal, and watches from your person before entering your swim spa. Keep all breakables away from the swim spa area. Maintain water balance in accordance with instructions. Page 4 For HELP, call 727.573.9611
Warning Sign Warning Sign Must Be Posted – The red WARNING sign like the one shown is packed with your new swim spa. This sign must be posted in a prominent place in close proximity to the swim spa installation site immediately upon completion of swim spa installation. Important: It is extremely important that this sign be permanently placed in clear view of persons using the swim spa. Occasional swim spa users may not be aware of some of the dangers hot water poses to pregnant women, small children, seniors, and people under the influence of alcohol. If you did not receive a warning sign or your sign has become damaged, please call your local dealer for a replacement. Hyperthermia To reduce the risk of injury, the water temperature in a swim spa should never exceed 104˚F (40˚C). Water temperatures between 100˚F (38˚C) and 104˚F (40˚C) are considered safe for a healthy adult. Lower water temperatures are recommended for young children, senior citizens, persons with sensitivities, and when swim spa use exceeds 10 minutes. WATER TEMPERATURE IN EXCESS OF 100˚F (38˚C) MAY BE INJURIOUS TO YOUR HEALTH. Hyperthermia occurs when the internal temperature of the body reaches a level several degrees above the normal body temperature of 98.6˚F (37˚C). The symptoms of hyperthermia include drowsiness, lethargy, and an increase in the internal temperature of the body. The effects of hyperthermia include: Unawareness of impending hazard Failure to perceive heat Failure to recognize the need to exit swim spa Physical inability to exit swim spa Fetal damage in pregnant women Unconsciousness and danger of drowning If you sense any of the symptoms of hyperthermia, safely exit the swim spa immediately. SAVE THESE INSTRUCTIONS Page 5 For HELP, call 727.573.9611
Basic Safety Guidelines Your swim spa is meant to be enjoyable, healthful, and relaxing. Below are some basic safety guidelines to follow every time you use your swim spa. Always check the temperature of your swim spa before entering. High water temperatures can be hazardous to your health. Persons suffering from heart disease, diabetes, high or low blood pressure, and pregnant women should consult a doctor before using your swim spa. Persons under the influence of medication, drugs, or alcohol should not be allowed into your swim spa. Remove all jewelry, metal, and watches from your person before entering your swim spa. Do not allow children to use your swim spa without continuous supervision of an adult. Do not use your swim spa alone. Test the ground fault circuit interrupter (GFCI) breaker prior to using your swim spa each time to ensure it operates properly. Any electrical devices near your swim spa must be GFCI protected and out of reach from inside the swim spa. Keep all breakables away from the swim spa area. Lock the cover on your swim spa when not in use. Enter and exit the swim spa slowly. Wet surfaces can be slippery. Prolonged immersion can be hazardous to your health. Maintain water chemistry in accordance with manufacturer’s instructions. For Swim spas Equipped with Audio Components Audio components are optional and not available on all models. WARNING: Prevent Electrocution: Do not connect any auxiliary components – for example, cable, additional speakers, headphones, etc., – to the system. Caution: Risk of Electric Shock: Do not leave audio compartment door open. Replace audio components only with identical components. Figure 2 – Stereo Controls Page 6 For HELP, call 727.573.9611
S i t e S e l e c t i o n a n d I n s t a l l a t i o n Proper planning is an important consideration when installing your new swim spa. Site selection is a critical step and requires serious thought. Planning ahead makes the installation process easier. The following information is provided to assist you in site preparations. 1) Always comply with local building codes and obtain any necessary permits. You may also need to consult with an engineer to address your specific design needs. 2) Contact an electrician to assess your electrical needs, install wiring, and assure a safe operation. 3) Position your swim spa with proper access to water, drainage, and electricity. 4) For external installations, place your swim spa on a uniform solid, flat surface designed to properly support its weight. For external installations, a level concrete pad or properly constructed deck capable of supporting 200 lbs/ft2 (925 kg/m2) should be installed. For best results, we suggest the installation of a level concrete pad. Dig out and level the ground 8-12 inches (20-30 cm) below your desired base level. Install 4-6 inches (10-15 cm) of crushed stone. Next, install 4-6 inches (10-15 cm) of poured concrete and level it with a broom-type finish. Decks constructed flush to the swim spa should slope away for proper run off. In regions where freeze/thaw occurs, or where there will be custom decking abutting the swim spa, we recommend the installation of poured concrete footings extending below the frost line beneath the pad to prevent the possibility of future shifting. 5) For internal installations, check the load carrying capabilities of the floor on which the swim spa will reside. The ceiling should be more than 10 feet high (for safe entry and use), the floor should have a drain for splash over and the room should have a window or exhaust fan with humidistat for ventilation. If this is not possible, indoor/outdoor carpeting and the use of a dehumidifier while the cover is off should be adequate. 6) For partial in-ground installations (not recommended), follow these tips: In non-freezing climates it is sufficient to ensure that the base of the hole or cavity created for the swim spa simply has a stable, compacted base. Where the climate permits, should you choose to backfill directly against the swim spa, a clear sand backfill is suggested. Never fill using raw earth and never cover electrical components or plumbing connections. • In climates where freeze/thaw occurs, it is necessary that a proper poured concrete base, complete with concrete footings. • In areas with a high ground water table, the concrete base, as well as a concrete or wood retaining wall to hold back the earth, is suggested. This forms a box or “crib/vault” where the swim spa is placed. After excavating the installation site for your Premium Leisure swim spa, ensure that the soil underlying the foundation is capable of supporting a minimum of 1,000 lbs/ ft2 or 12,206 kg/m2 • ALWAYS ensure that there is good drainage, via a properly designed (gravel) drain system and/or a sump pump, to prevent ground water flooding damage to the Page 7 For HELP, call 727.573.9611
support equipment or structure. Install protective waterproof conduit to house light, or topside control cables that must be buried. Access for future service must be considered at the time of design and installation. Difficult access can result in supplemental service labor charges not covered by the factory warranty. Consider easily removable deck materials. 7) Assure that your swim spa will fit into the space you have chosen and the delivery route will accommodate its large size. In most cases, a crane will be necessary for the delivery. 8) Provide adequate ventilation for the humidity created by your swim spa. In most cases, a Swim spa Hard Cover is sufficient. 9) Protect the pumps (and/or turbine) and all equipment from the weather by ensuring the cabinet panels are secure at all times. 10) Allow 36 inches (1 meter) of unobstructed access to all sides of your swim spa for normal servicing. 11) Contact your local building code department to determine if a building permit is necessary and for information on applicable bylaws (distance from property lines, buildings, fencing requirements, etc). In most cases, the shallow depth of the unit could result in it being classified as a portable swim spa by building regulations (as opposed to a permanent pool). 12) Consider positioning your swim spa out of or adequately protecting it from the wind. Just as people can get cold on cool/windy days, so can your swim spa. Windy environments can significantly increase operating costs. Figure 3 – A Crane is a Common Delivery Arrangement for Swim Spas Page 8 For HELP, call 727.573.9611
Electrical Specifications Important – Qualified and licensed electricians must perform all electrical hookups. The following specifications must be followed in order to ensure proper performance and safety. WARNING: Starting an incorrectly wired swim spa could cause severe damage to the mechanical equipment or even bodily harm. Have your licensed electrician verify GFCI (or RCD) wiring with the diagrams on pages 10-17 prior to starting the swim spa or call the technical support line at 727.573.9611. Caution: Failure to abide by specifications listed may result in damage to the equipment and will void the warranty. All swim spas must be wired with the appropriately sized wiring. Failure to do so will cause equipment damage and will not be covered under your warranty. All swim spas must be over current protected with a built-in GFCI (or RCD) in the service panel. Model Spa side Swim side Volts/Freq. Amps GFCI/ RCD Wire size Controller / Panel All N/A 240/120/60 32 40 3 Wire #8+Grd VS500Z/ MVP260 All N/A DZ18 Swim14 Swim 18 240/120/60 48 60 3 Wire #6+Grd PEL2KM3 ML700 DualZone 18 Swimmer 14 Swimmer 18 N/A SE 18 240/120/60 40 50 3 Wire #6+Grd Power unit 1244/Rem ote panel Swimmer’s Edge 18 All N/A 220-240/50 1x32, 2x16 IEE WIRE REG 3x4mm² 5x1.5 mm2 GS510SZ/ VL600S All (Export) DZ18 Swim14 Swim 18 1x32, 2x16, 3x16 IEE WIRE REG 3x4mm² 5x1.5 mm2 DualZone 18 Swimmer 14 Swimmer 18 (Export) HSEX2000 / ML700 N/A 220-240/50 N/A SE 18 220-240/50 1x32 IEE WIRE REG 3x4mm² Power unit 1245/Rem ote panel Swimmer’s Edge 18 (Export) Table 1 – Domestic/Export (in Gray) Electrical Specification Chart NOTE: The swim side and the spa side will need to be wired independently. Page 9 For HELP, call 727.573.9611
WARNING: Disconnect electrical power before servicing. Before obtaining access to terminals, all supply circuits must be disconnected. WARNING: Test the GFCI (or RCD) before each use. Our swim spas are certified by Intertek Testing, SNAa Ltd. Ontario, Canada to CSA-C22.2 No. 218.1-M89 and ANSI/UL 1563 standards. Parts with extra low voltage not exceeding 12v must be inaccessible to a person in the swim spa. Earthed appliances must be permanently connected to fixed wiring. Parts incorporating electrical components, except remote control devices, must be located or fixed so that they cannot fall into the swim spa. Means for disconnection must be used in fixed wiring in accordance with wiring rules. Important – To allow the 240V GFCI to function properly, connect the white Neutral wire from the swim spa to the Neutral terminal on the GFCI breaker, not the Neutral bus in the GFCI breaker box. An improperly connected Neutral causes the GFCI breaker to trip. Wiring Diagrams Figure 4 – 240V GFCI Wiring Page 10 For HELP, call 727.573.9611
Figure 11A – Electrical Service for model Swimmer’s Edge 18. Page 11 For HELP, call 727.573.9611
Figure 11B – Electrical Service for model Swimmer’s Edge 18. Page 12 For HELP, call 727.573.9611
Figure 5 – Electrical Service for models (Dual Zone 18, Swimmer 18 and Swimmer 14). Single-phase 240V domestic version See wire size chart on page 9. Page 13 For HELP, call 727.573.9611
Figure 6 – Electrical Service for models (Dual Zone 18, Swimmer 18 and Swimmer 14).Single Service, 1x32A, export version All wiring is 3x4 mm2, solid copper See wire size chart on page 9. Note: DIP switch A2 MUST BE OFF. Page 14 For HELP, call 727.573.9611
Figure 7 – Electrical Service (Dual Service, 2x16A) for Dual Zone 18, Swimmer 18 and Swimmer 14 export models All wiring is 5x1.5 mm2, solid copper See wire size chart on page 9. Note: DIP switch A2 MUST BE ON. Page 15 For HELP, call 727.573.9611
Figure 8 – Electrical Service (Three Phase, 3x16A) for Dual Zone 18, Swimmer 18 and Swimmer 14 export models All wiring is 5x1.5 mm2, solid copper See wire size chart on page 9. Note: DIP switch A2 MUST BE ON. Page 16 For HELP, call 727.573.9611
U.S./Can. Wiring (Dual Zone 18, Swimmers 14/18 – Swim Side) Figure 9 – Wiring Diagram for Dual Zone 18, Swimmer 18 and Swimmer 14 models with PEL2KM3 Control Pack (Swim Side). Page 17 For HELP, call 727.573.9611
Page 18 For HELP, call 727.573.9611
Export Wiring (Dual Zone 18, Swimmer 14 & 18 – Swim Side) See switch positions on P. 21 Figure 10 – Wiring Diagram for Dual Zone 18, Swimmer 18 and Swimmer 14 models with HSEX2000 Control Pack (Swim Side). See wire size chart on page 9. Page 19 For HELP, call 727.573.9611
Figure 11 –Board Diagram for Dual Zone 18, Swimmer 18 and Swimmer 14 models. Export (220-240V) version with HSEX2000 Control Pack. Page 20 For HELP, call 727.573.9611
U.S. and Canada Wiring (All Models – Spa Side) Figure 12 – Domestic Wiring Diagram for all models Single-phase 240V for VS500Z Control Pack. Page 21 For HELP, call 727.573.9611
Figure 13 –Board Diagram for all models Single-phase 240V Domestic version Page 22 For HELP, call 727.573.9611
Export Wiring (Dual Zone 18, Swimmer 14 & 18 – Spa Side) Figure 14 – Export Wiring Diagram for Dual Zone 18, Swimmer 18 and Swimmer 14 for GS510SZ Control Pack (See wire size chart on Pg. 9) Page 23 For HELP, call 727.573.9611
Figure 15 –Board Diagram for all models Export version for GS510SZ Control Pack. Figure 16 –Panel Button Positions for Dual Zone 18, Swimmer 18 and Swimmer 14 Models Export version Page 24 For HELP, call 727.573.9611
S t a r t u p Important – Read these step-by-step startup procedures before starting your swim spa. Failure to follow any of these steps listed may result in damage to the equipment and may void your warranty. Note: If you are unsure of any of the above startup procedures, please call our customer care center at 727.573.9611. For best results, read each step in its entirety before proceeding. Caution: Running the swim spa pump dry (without water running through it) can cause IMMEDIATE damage and will void the warranty! Be sure that the swim spa is installed properly in accordance with the instructions in this manual. Refer to the following picture for an explanation of your swim spa’s controls, components, and technical terms. Note that not all models have all features and components. See also pages 52-59 for more information. Figure 17 – Swim spa Callouts (Swimmer 18 Shown) Page 25 For HELP, call 727.573.9611
Before Adding Water Before adding water, go through these simple steps now to prevent common issues when setting up your swim spa for the first time. Verify that the following have all been rechecked. 1. Turn off all power to the swim spa at the main breaker panel. 2. Open the side panels to access the internal components. 3. Check that all slide valves are opened (T- handles pulled out) to the heater and all pumps. 4. Check that there are no obvious signs of loose wires or broken pipes. Figure 18 - Valve Open/Closed 5. Check that the two heater unions are hand tight. Caution: Do not use a wrench. Over- tightening may cause damage to unions and gaskets, which will not be covered under warranty. Figure 19 - Unions Tight 6. Check that the unions on all pumps are tight. 7. Clean out any foreign debris from within the service access area or inside of the swim spa itself. 8. With the drain open and filters removed, thoroughly rinse out the swim spa with warm water until the drained water runs clear. Run water through the filtration canister and jet lines to remove any incidental dust, dirt, and debris that may have accumulated during shipment or installation. Drain all water completely. 9. Make sure that the swim spa drain valve is closed and the cap is on tight (see page 49). 10. Install the filter(s) in the filtration canister. 11. Check that all of the swim spa jets are open (turned full counter-clockwise). 12. Now is the best time to clean and polish the surfaces of your swim spa (see page 44). Page 26 For HELP, call 727.573.9611
Filling Your Swim spa Now it's time to fill your swim spa with water. Do not turn on the electricity yet until the swim spa is completely filled. To properly fill your swim spa: 1. Make sure that the filters (in the filtration canister) are gently screwed into place. Turn them clockwise until they stop being careful not to over-tighten them (this avoids cracking the filter). 2. Connect a standard garden hose to a faucet with regular cold tap water (not softened water or hot water). Figure 20 – Filtration Canister Caution: The water from your hot water tank should not be used to fill the swim spa. 3. Put the pre-filter (if equipped*) on the other end of the hose, point the pre- filter into a suitable drain, turn on the water, and allow any sediment to be flushed down the drain. Once the water stream runs clear, turn off the hose. 4. Put the pre-filter (if equipped) into the filtration canister and turn on the hose. 5. Fill slowly. If too much water pressure is used, foaming water can force air into the pipes and cause startup problems. Important: To assure that the pump is properly primed, fill the swim spa through the filter area only. 6. Fill the swim spa until the water level is about 1” above all jets (or about ½” below the pillow). Do not over fill. Note: Every person entering a swim spa displaces a given volume of water, so adjust water level to the number of people regularly using the swim spa. Turn off the hose and check again for any small leaks. Operational Checks: Swimmer’s Edge 18 (Hydraulic System) Starting the Hydraulic System Caution: Turn off all power to the swim spa at the main breaker panel. 1. Check the sight glass located on the side of the tank. A small amount of fluid is shipped in the tank from the factory and should be visible in the sight glass. 2. Remove the fill cap lid located on the top of the tank. Pour fluid in the tank until the sight glass is completely filled. (NOTE: USE ONLY THE FLUID PROVIDED BY PREMIUM LEISURE). Fluid will be blue. Once full, tighten the fill cap. * Pre-filters are available by calling 877.530.PARTS Page 27 For HELP, call 727.573.9611
3. Turn the power on at the main breaker. The LED display will show two red lights. Using the handheld remote control (see page 40), press the ON/OFF button. The system will come on and the LED readout will automatically go to 50. Let the system run for 2-3 minutes to pressurize itself. (NOTE: If the system does not turn on, check the LED readout to see if it reads “LOW OIL.” If so, follow the instructions for Low Oil Shut Off (below). 4. Shut the system off and check for any leaks that make have occurred during shipment. The fluid level should have dropped as it pressurized the hoses. 5. Fill the tank until the fluid reaches 260 in the sight glass. Your system is now ready to restart. We recommend maintaining your fluid level at 260 in the sight glass. Periodically check your fluid level. 6. Using the handheld remote control, turn your system on and increase the flow to 100-150 and let it run for 5-10 minutes. NOTE: There is an automatic shut off built in to the Swimmer’s Edge 18 swim spa. The hydraulic system will run for 30 minutes and shut off. If this happens, simply turn it back on using the handheld remote control. Low Oil Shut Off The low oil shut off valve is located on the top of the aluminum tank, next to the fill cap. If your system is low on oil, the LED digital readout will indicate “LOW OIL.” You must turn the system off at the breaker and wait 5 minutes before turning it back on. This will reset the program. Fill the tank until the fluid reaches 200 in the sight glass. Turn the power back on at the breaker. Bleeding Air from the Pressure Line When you turn your power unit on and the flow head (water current) does not come on, you must bleed your pressure system (yellow line). With the system running, slowly loosen the yellow pressure hose fitting. Air will escape. Once all the air has escaped, the flow head will spin and the current will resume. Startup and Maintenance The Swimmer’s Edge 18 is full and ready for swimming when the water level reaches ½ inch to 1 inch above the flow head where the water current is produced. (About level with the metal grab rail). NOTE: A low water level can result in filtration and heating problems. Regularly “top off” your Swimmer’s Edge 18 swim spa with a nearby garden hose. A high water level could cause excess overspill and splash out. Once your Swimmer’s Edge 18 is full and all connections are made, the water quality system can be started. Set your filtration mode to your desired setting (see page 32) and set your water temperature (see page 31) to your desired setting (we recommend 80 degrees F, or 27 C, for swimming). It could take 36 to 48 hours to reach your desired Page 28 For HELP, call 727.573.9611
temperature the first time you fill your swim spa. Note: The hydraulic hoses should be changed every year. Balancing the Swim Spa Water Using a water test kit (if one was not provided, please call 877.530.PARTS) test for chlorine, pH, total alkalinity, etc. (You may also take a sample of your water to your local pool dealer.) Follow all instructions with the test kit and take notes accordingly. Water quality is different across the world, so once you know your water type, follow up care will be easier. Your goal is to balance the water to acceptable ranges of total alkalinity, pH and calcium hardness levels. Note: A chlorine-based system with 3-5 ppm of free chlorine is recommended if you intend to keep your swim spa at “swimming pool” temperatures. A bromine- based system is recommended if you intend to keep your swim spa at “hot tub” temperatures. See balanced water chart (Table 2) on page 30. Draining Your Swimmer’s Edge 18 We recommend draining your water every 6-12 months. 1. Turn off the breaker and disconnect electrical power to all equipment. 2. Locate the drain valve at the base of your swim spa cabinet 3. Attached a garden hose to the valve, open the valve and drain Note: For faster draining, you may use a sump pump or siphon. Operational Checks: Dual Zone 18, Swimmers 18/14 (Swim Side) Caution: Do not turn on any pump until your swim spa is properly filled with water. Running any pump without water in your swim spa can cause IMMEDIATE damage, which is not covered under warranty! By now you have rechecked your swim spa’s mechanical connections and filled it with water to about 1” above all jets by adding cold tap water through the pre- filter (if equipped). Turn on power to the swim spa at the main breaker panel and test the operation of the electrical system. If you encounter a problem, please reference the troubleshooting guide on page 45. 1. Turn on the breaker and test the swim side operation of the Ground-Fault Circuit Interrupter (GFCI) breaker by pushing the small button. This should automatically trip the swim spa's circuit breaker. DANGER: If this breaker does not trip, immediately call your electrician. Do not use your swim spa! Page 29 For HELP, call 727.573.9611
Only if pushing this button successfully trips this circuit breaker should you reset this breaker and proceed to the next step. 2. Go to the topside control panel. The swim spa first goes into a 6-minute Priming mode, indicated by “Pr” message. Water heating is disabled during priming. To exit Priming mode and begin normal swim spa operation, press “Up” or “Down” button. The circulation pump starts and water flows through the returns. 3. Press the Jets 1 button. You should hear the pump turn on high speed, see water circulating, and see the Jets 1 icon spin on the information display area. Caution: If water is not flowing from the jets after 2 minutes, turn the power off at the main panel and bleed air from the system (see page 43-44). Turn the power on again. Sometimes momentarily turning the pump off/on will help to prime. Only do this 4 times. 4. If the water is running smoothly through the lines, open the air control valve to the jets and you should see an increase in jet pressure. Check and adjust the water and airflow of every river jet if necessary. An air mixture intensifies the level of your current. Turn the air control valve counterclockwise to increase the air mixture and clockwise to turn it off. To minimize heat loss, close the air control valve when the swim spa is not in use. 5. Press the Jets 1 button a second time to turn off the pump. 6. Press the Jets 2 button. You should hear the pump turn on, see water circulating, and see the Jets2 icon spin on the information display area. 7. Press the Jets 2 button again to turn off the pump. 8. Press the AUX button. You should hear Pump 3 turn on, see water moving, and see the AUX icon spin on the information display area. 9. Press the AUX button again to turn off Pump 3. Operational Checks: All Models (Spa Side) Caution: Do not turn on any pump until your swim spa is properly filled with water. Running any pump without water in your swim spa can cause IMMEDIATE damage, which is not covered under warranty! By now you have rechecked your unit’s mechanical connections and filled it with water to the recommended level). Turn on power to the swim spa at the main breaker panel and test the operation of the electrical system. If you encounter a problem, please reference the troubleshooting guide on page 45. 1. Turn on the breaker and test the operation of the Ground-Fault Circuit Interrupter (or RCD) breaker by pushing the small button. This should automatically trip the swim spa’s circuit breaker. Page 30 For HELP, call 727.573.9611
DANGER: If this breaker does not trip, immediately call your electrician. Do not use your swim spa! Only if pushing this button successfully trips this circuit breaker should you reset this breaker and proceed to the next step. 2. Go to the topside control panel. The spa side of the unit first goes into a 6-minute Priming mode, indicated by “Pr” message. Water heating is disabled during priming. To exit Priming mode and begin normal swim spa operation, press “WARM” (or the up arrow) or “COOL” (or the down arrow). 3. Press the “JETS” button. You should hear pump 1 turn on, see water circulating, and see the Jets light illuminate on the panel. 4. Press the JETS button again. You should hear the pump turn on a higher speed. Caution: If water is not flowing from the jets after 2 minutes, turn the power off at the main panel and bleed air from the system (see page 43-44). Turn the power on again. Sometimes momentarily turning the pump off/on will help to prime. Do this only 4 times. 5. If the water is running smoothly through the lines, open the air control valve to the jets and you should see an increase in jet pressure. Check and adjust the water and airflow of every jet if necessary. Each hydrotherapy jet in the spa side can be adjusted for massage intensity and directional flow. Turn the outer jet dial counterclockwise to increase the water volume and clockwise to turn it off. Pivot the angle of a jet to achieve an optimal massage. An air mixture intensifies the level of your massage. Turn the air control valve counterclockwise to increase the air mixture and clockwise to turn it off. To minimize heat loss, close the air control valve when the swim spa is not in use. 6. Press the JETS button a third time to turn off pump 1. Note: The pump remains on if filtration or heat is needed. 7. Press the LIGHT button to turn on all lights. Verify that the LED light system is on. Press the LIGHT button multiple times to cycle through the many available color patterns. Press the LIGHT button again to turn off the LED light system. Page 31 For HELP, call 727.573.9611
W a t e r B a l a n c i n g Note: Perform water balancing weekly and whenever you change water (or when the swim spa is first filled) to ensure proper water condition. Once your swim spa reaches 95ºF, use our Bromine Test Strips (not included) and add the necessary chemicals (not included) to stabilize your water chemistry. Turn Pump 1 on high speed before starting your tests to distribute chemicals evenly. Wait 5 minutes between measurements to allow added chemicals to mix thoroughly. Important: Test the condition of your water in the following order: 1. Total Alkalinity (80-120 ppm) – Use our Alkalinity Increaser to raise total alkalinity and Alkalinity Decreaser to lower it. Low total alkalinity has little buffering capacity making the pH erratic. High total alkalinity has too much buffering capacity making the pH difficult to change. 2. pH (7.2-7.8) – Use Spa Up to raise the pH level and Spa Down to lower it. Caution: A pH lower than 7.2 can harm the metal surfaces of your swim spa and irritate your eyes and skin. A pH higher than 7.8 can create calcium deposits (scaling) on the shell and equipment. 3. Hardness (150-400 ppm) – Add Increase Calcium until the proper level is achieved. Unfortunately, there is no practical way to lower the native water hardness other than using a different source of water when filling your swim spa. Low hardness causes equipment corrosion and water foaming. 4. Sanitizer (3.0-5.0 ppm) – Use our Deluxe Bromine Kit to add Bromine until the proper level is achieved. Neglected swim spa water can breed bacteria and algae causing bather discomfort, skin rashes, and/or irritation. Test Range 80-120 ppm 7.2-7.8 150-400 ppm 3.0-5.0 ppm Total Alkalinity pH Calcium Hardness Sanitizer Table 2 - Recommended Ranges for Balanced Water Page 32 For HELP, call 727.573.9611
T o p s i d e C o n t r o l s & O p e r a t i o n Swimmer’s Edge 18, Dual Zone 18, Swimmer 18 & Swimmer 14 - Spa Side (MVP 260 Domestic) Figure 21– Topside Callouts for MVP 260 Controls Initial Start Up When your swim spa is first actuated, it will go into Priming mode, indicated by “Pr.” The priming mode will last for less than five minutes. Press “WARM” or “COOL” to skip Priming Mode and then the swim spa will begin to heat and maintain the temperature in “Standard Mode.” Warm/Cool Buttons (Set Temperatures between 80°F - 104°F / 26°C - 40°C) The startup temperature is set at 100°F/37°C. The last measured temperature is constantly displayed on the LCD and is current only when the pump has been running for at least two minutes. To display the set temperature, press the “WARM” or “COOL” button once. To change the set temperature, press the “WARM” or “COOL” button a second time before the LCD stops flashing. Each press of the “WARM” or “COOL” button will continue to raise/lower the set temperature. After three seconds, the LCD will stop flashing and display the current swim spa temperature. Jets Button Press the “JETS” button once to activate the low speed of Pump 1. Press it a second time to activate the high speed of Pump 1. Press it a third time to turn off Pump 1. If left running, the high speed of Pump 1 automatically will turn off after 15 minutes and the low speed of Pump 1 automatically will turn off after 4 hours. The low speed of Pump 1 may be active for at least two minutes every half hour to detect the swim spa temperature and then to heat to the set temperature if Page 33 For HELP, call 727.573.9611
needed (depending on mode). When the low speed turns on automatically, it cannot be deactivated from the panel, however the high speed may be activated. Light Press the “LIGHT” button once to turn on your swim spa lights. Press the LIGHT button multiple times to cycle through the many available color patterns. Press the LIGHT button again to turn off the LED light system. If left on, the lights automatically turn off after 4 hours. Mode Your swim spa operating mode is changed by first pressing the “WARM” or “COLD” button, then pressing the “LIGHT” button. Standard Mode is programmed to constantly maintain the desired temperature. “St” will be displayed momentarily when you switch into standard mode. Economy Mode heats the spa to the set temperature only during filter cycles. “Ec” will display solid when temperature is not current and will alternate with temperature when temperature is current. Sleep Mode heats the swim spa to within 20°F/10°C of the set temperature only during filter cycles. “SL” will display solid when temperature is not current and will alternate with temperature when temperature is current. Preset Filter Cycles The first filter cycle begins six minutes after the swim spa is energized. The second filter cycle begins 12 hours later. Filter duration is programmable for 2, 4, 6 or 8 hours – or for continuous filtration indicated by “FC”. The default filter time is two hours. To program filter cycles, press “WARM” or “COOL” and then “JETS.” Press “WARM” or “COOL” again to adjust to your desired setting. Press “JETS” again to exit filter cycle programming. The low speed of the 2-speed pump runs during filtration and the ozonator will be enabled. Smart Winter Mode If the system (sensor located inside heater) detects ambient conditions below 44ºF/6.7ºC, it automatically enters the Smart Winter Mode for period of four minutes after it detects the swim spa temperature has risen to 45ºF/7.2ºC. Page 34 For HELP, call 727.573.9611
Swimmer’s Edge 18, Dual Zone 18, Swimmer 18 and Swimmer 14 - Spa Side (Export VL600S) The topside control panel operates and programs your swim spa. Basic button functions are described next. Figure 22 – Topside Callouts for VL600S Controls Initial Start Up When your swim spa is first actuated, it will go into Priming mode, indicated by “Pr.” The priming mode will last for less than five minutes. Press “WARM” or “COOL” to skip Priming Mode and then the swim spa will begin to heat and maintain the temperature in “Standard Mode.” Warm/Cool Buttons (Set Temperatures between 80°F - 104°F / 26°C - 40°C) The startup temperature is set at 100°F/37°C. The last measured temperature is constantly displayed on the LCD and is current only when the pump has been running for at least two minutes. To display the set temperature, press the “WARM” or “COOL” button once. To change the set temperature, press the “WARM” or “COOL” button a second time before the LCD stops flashing. Each press of the “WARM” or “COOL” button will continue to raise/lower the set temperature. After three seconds, the LCD will stop flashing and display the current swim spa temperature. Jets Button Press the “JETS” button once to activate the low speed of Pump 1. Press it a second time to activate the high speed of Pump 1. Press it a third time to turn off Pump 1. If left running, the high speed of Pump 1 automatically will turn off after Page 35 For HELP, call 727.573.9611
15 minutes and the low speed of Pump 1 automatically will turn off after 4 hours. The low speed of Pump 1 runs when the “AUX” Pump 2 (if equipped) is on. It may also active for at least two minutes every half hour to detect the swim spa temperature and then to heat to the set temperature if needed (depending on mode). When the low speed turns on automatically, it cannot be deactivated from the panel, however the high speed may be activated. Aux Button Press the “AUX” button once to turn on Pump 2 (if equipped). Press it a second time to turn off Pump 2. If left running, Pump 2 automatically will turn off after 15 minutes. Light Press the “LIGHT” button once to turn on your swim spa lights. Press the LIGHT button multiple times to cycle through the many available color patterns. Press the LIGHT button again to turn off the LED light system. If left on, the lights automatically turn off after 4 hours. Mode Your swim spa operating mode is changed by first pressing the “WARM” or “COLD” button, then pressing the “MODE” button. Standard Mode is programmed to constantly maintain the desired temperature. “Std” will be displayed momentarily when you switch into standard mode. Economy Mode heats the spa to the set temperature only during filter cycles. “Ecn” will display solid when temperature is not current and will alternate with temperature when temperature is current. Sleep Mode heats the swim spa to within 20°F/10°C of the set temperature only during filter cycles. “SLP” will display solid when temperature is not current and will alternate with temperature when temperature is current. Preset Filter Cycles The first filter cycle begins six minutes after the swim spa is energized. The second filter cycle begins 12 hours later. Filter duration is programmable for 2, 4, 6 or 8 hours – or for continuous filtration indicated by “FI LC.” The default filter time is two hours. To program filter cycles, press “WARM” or “COOL” and then “JETS.” Press “WARM” or “COOL” again to adjust to your desired setting. Press “JETS” again to exit filter cycle programming. The low speed of the 2-speed pump runs during filtration and the ozonator will be enabled. Page 36 For HELP, call 727.573.9611
Smart Winter Mode If the system (sensor located inside heater) detects ambient conditions below 44ºF/6.7ºC, it automatically enters the Smart Winter Mode for period of four minutes after it detects the swim spa temperature has risen to 45ºF/7.2ºC. Programming Summary Figure 24 – VL600S Programming Summary NOTE FOR ALL DOMESTIC SWIM SIDE (MVP 260) TOPSIDE CONTROLS: Follow the above steps to set the filter cycle and water temperature. To set the operating modes, follow the steps above except instead of pressing “Mode” – press “LIGHT.” Page 37 For HELP, call 727.573.9611
Dual Zone 18, Swimmer 18 and Swimmer 14 - Swim Side (ML700 Domestic and Export) Figure 23 – ML700 Topside Control Panel Control Panel Legend Heat icon: Indicates different stages of heating Jets icon: Spins fast on high speed; spins slow on low speed Light icon: Light is on/off F1, F2 indicators: Filter cycle 1 or 2 will be illuminated PL, TL indicators: Locking Panel or Set Temperature will be illuminated Temperature Up/Down Buttons Press the Arrow Up or Arrow Down buttons once to display the set temperature. Each time either button is pressed again, the set temperature will increase or decrease depending on which button is pressed. After three seconds, the LCD display will automatically display the current temperature the swim spa water. Mode Button This button is used to switch between standard, economy and sleep modes. Press “Mode” To enter mode programming, press “Cool” through to desired mode (LCD flashes until confirmed), then press “Mode” to confirm selection. Standard mode heats the spa water to the set temperature. The “Standard” icon will display until the mode is changed. Economy mode heats the spa water to the set temperature only during filter cycles. The “Economy” icon will display until mode is changed. Pressing “Jets 1” button while in Economy mode puts the spa in “Standard-In-Economy mode,” which operates the same as Standard mode, and then reverts to Economy mode automatically after one hour. During this time, a press of the “Mode” button will revert to Economy mode immediately. Because your swim spa is equipped with a 24-hour circulation pump the filtration cycle program operates only on a limited basis. At the start of each filter cycle, Pumps 1, 2 and 3 will run for five minutes Page 38 For HELP, call 727.573.9611
to prevent the spa water from becoming stagnant in the plumbing and air lines and improve skimming action to remove debris and suspensions from the water surface. In addition, the programmable filtration cycle (start/end) times of each cycle will designate the start and end time where the heater is allowed to operate in economy and sleep modes. Sleep mode heats the spa water to within 20F (11C) of the set temperature only during filter cycles. The “Sleep” icon will display until mode is changed. Standby Mode: Pressing “Warm Arrow Up” or “Cool Arrow Down” then “Jets2” button will turn off all spa functions temporarily. This is helpful when changing filter cartridges. Press any button to exit Standby mode. Jets 1 Button Press the “Jets 1” button once to turn pump 1 on or off. If left running, the jet turns off after 15 minutes. Jets 2 Button Press the “Jets 2” button once to turn pump 2 on or off. If left running, the pump 2 turns off after 15 minutes. Aux Button (Jets 3) Press the “Aux” button once to turn pump 3 on or off . If left running, the pump turns off after 15 minutes. Light Button (If Equipped) Press the “Light” button to turn the spa light system on and off. The LED light system is preprogrammed with an assortment of lighting effects. When you turn Light off and turn on again within five (5) seconds, it advances to the next effect. When you turn Light off for more than five (5) seconds, it remembers that last effect you selected. The next time you turn on the Light will display the same effect. The Light will automatically turn off after approximately four (4) hours. Time Button Once your spa has been properly connected the first time the “Time” icon appearing on the screen and flashing. Press “Time” pad, then “Mode.” Select the hour by pressing “Warm” or “Cool” (each press changes time by 1 hour). Press “Mode” pad again and select minutes by pressing “Warm” or “Cool” (each press changes time by 1minute). Press “Mode” pad to exit the time setting procedure and enter the optional filter cycle programming. Press “Time” pad to exit programming. The Time setting on 2000 systems is not preserved in the event of power loss; time will have to reprogram upon each power up. Inverting the Information Display Area Readout Press “Warm Arrow Up” or “Cool Arrow Down” button, followed by the “Aux” button to change the numbers in the display to read upside down. Page 39 For HELP, call 727.573.9611
Circulation Pump Operation Your system is equipped with a circulation pump. The circulation pump provides 24-hour continuous water circulation and filtration. It works like this: a dedicated, energy efficient circulation pump constantly draws water from the spa, runs it through the filter and the heater (heating only when necessary), then back to the spa. The ozone output is on whenever the circulation pump is running except when the jet pump(s) or blower is (are) activated by the user. The ozone generator will turn off for one (1) hour any time a function button (Jets 1, Jets 2 or Aux.) is pressed. The Circulation pump will turn off for 30 minutes at a time when the water temperature reaches 3F (1.5C) above the set temperature (most likely this will happen in a very hot climate or during summer). Heater Operation Your spa is equipped with an electrical heater. By setting your thermostat to the desired temperature, your heater will automatically turn on and off as needed. The temperature set point (set temperature) can be adjusted from 80F to 104F/26C-40C. To raise the set temperature press the “Warm Arrow Up” button. To lower the set temperature, press the “Cool Arrow Down” button. The start up temperature is set at 100F/37.5C. The last measured temperature is constantly displayed on the LCD. In Economy mode the heater heats the spa water only during filter cycles. In sleep mode the heater heats the spa water to within 20F (11C) of set temperature only during filter cycles. Filter Cycle Programming - Optional As explained above in a 24-hour circulation pump system the filtration cycle program operates only on a limited basis. At the start of each filter cycle, pumps 1, 2 and 3 will run for five minutes to prevent the spa water from becoming stagnant in the plumbing and air lines and improve skimming action. In addition, the programmable filtration cycle (start/end) times of each cycle will designate the start and end time where the heater is allowed to operate in economy and sleep modes. The default filter cycles are as follows: The first filter cycle is automatically activated at 8 a.m. and operates the pump until 10 a.m. The filter indicator icon will light when filter 1 cycle is running. The second filter cycle is automatically activated at 8 p.m. and operates the pump until 10 p.m.. The filter indicator icon will light when filter 2 cycle is running. Time of day settings are not preserved in the event of power loss; time will have to reprogrammed upon each power up. Spa settings (temperature set point, filter cycles) are preserved. Ozonator System Your spa is equipped with an ozone purification system. You will find that your spa water stays fresh and clear with significantly less chemical sanitizer usage. You will be able to go longer between complete spa draining. The ozone generator operates in conjunction with the circulation pump. Ozone generator is on any time the circulation pump is running. Ozone generator will turn off for one (1) hour any time a function button (Jets 1, Jets 2, Aux) is pressed. Page 40 For HELP, call 727.573.9611
Freeze Protection If the temperature sensor detects a temperature drop to 44F (6.7C) within the heater, then the pump automatically activates to provide freeze protection. The equipment stays on until four (4) minutes after the sensors detect that the spa water temperature has risen to 45F (7.2C) or higher. In colder climates, an optional additional freeze sensor may be added to protect against freeze condition that may not be sensed by the standard sensors. Auxiliary Freeze sensor protection acts similarly except with the temperature thresholds determined by the switch and without a four (4) minute delay in turnoff. See your dealer for details. Locking the Panel Press “Time”, “Jets 1” then “Warm Arrow Up” buttons within three (3) seconds. When locked, the “PL” indicator light will light. All buttons are frozen except the “Time” button. To unlock the panel, press “Time”, “Jets 1” then “Cool Arrow Down.” Locking the Temperature Setting Press “Warm Arrow Up” or “Cool Arrow Down” then “Time,” “Jets 1,” and “Warm Arrow Up” buttons within three (3) seconds to activate lock. When locked, the “TL” indicator light will light when the set temperature is locked. To unlock the set temperature, press “Warm Arrow Up” or “Cool Arrow Down” then “Time”, “Jets 1,” and “Cool Arrow Down.” Page 41 For HELP, call 727.573.9611
Swimmer’s Edge 18 - Swim Side (Turbine Propeller, All Units) When you are ready to swim in the Swimmer’s Edge 18 Swim Spa, press the “ON/OFF” button on the waterproof touchpad panel located on swim spa lip. Your digital readout will default to the No. 50. Increase to your desired swim speed by pushing the “FAST” arrow up button. A “220” readout is approximately 3 miles per hour and should provide most people with a comfortable workout. A “300+” readout is recommended for advanced swimmers. Decrease the speed of the unit by pressing the “SLOW” arrow down button. The digital readout numbers range from 50-999. They do not represent anything specific, but rather they provide each swimmer a benchmark to enjoy the same swim experience every time. Press the “ON/OFF” button a second time to turn off the propeller. If you do not turn the propeller off, it will automatically turn off after 30 minutes. Figure 25 – Touchpad for Hydraulic Turbine Propeller Page 42 For HELP, call 727.573.9611
S t e r e o S y s t e m Figure 26 – Stereo Callouts The built-in AM/FM/Weather Band stereo CD system (if equipped) plays CDs and MP3s. Playing a CD 1. Press the POWER button on the stereo 2. Press the OPEN button on the top of the stereo 3. Insert a CD 4. Press the CD button on the remote control 5. Press PLAY on the remote control 6. Press the Previous/Next button on the remote control to go to the previous/next track Listening to the Radio 1. Press the POWER button on the stereo 2. Press the Stereo button on the top of the remote control 3. Press the Channel Up/Down button on the remote control to scan for the next/previous station 4. Press the Previous/Next button on the remote control to go to the previous/next pre-programmed station For complete information on the audio capabilities and features, see the manufacturer’s manuals (enclosed). Page 43 For HELP, call 727.573.9611
Using the Built-in MP3 Docking Station and Speakers Figure 27 – Optional MP3 Docking Station with Jack If equipped, simply plug in your MP3 player, push play and select your desired volume. Your favorite music is amplified through a built-in subwoofer (underneath your swim spa) and is heard through the speakers. For safety reasons, rest your MP3 player inside the docking station and slide the plastic cover down to protect from water splashing. Do not attempt to handle your MP3 player while swimming in your swim spa. C o v e r Place the insulated cover on your swim spa. Keeping the cover in place anytime the swim spa is not in use reduces the heating time and minimizes operating costs. The time required for initial heat-up varies depending on the starting water temperature, ambient temperature, and the capacity of your swim spa. Figure 28 - Cover Callouts 1. Lock-down tab 2. Double-stitched seams 3. Marine-grade cover material 4. Edge overlap material Page 44 For HELP, call 727.573.9611
5. Grip handle 6. Aluminum channel 7. Heat-sealed insulation 8. Chemical-resistant vapor barrier 9. Polystyrene seam stoppers 10. Reinforced edges 11. Breathable underside material Use the lock-down tabs to prevent access to the swim spa by children and to prevent the wind from lifting the cover off. Figure 29 - Lockdown Tabs Sitting, standing, and snow buildup on the cover will break the cover. Dragging it over rough surfaces will scuff or tear the fabric. Always lift by the handles or use the optional cover lift device. Figure 30 – Swim Spa Cover Sections for “18” Models F r e q u e n t l y A s k e d Q u e s t i o n s Who do I call for warranty information or service? Call our customer care center between 8 a.m. and 5 p.m. EST Monday through Friday at 727.573.9611. Our representatives are eager to assist or you can get parts and information online at www.HotTubParts.com. How do I bleed air from my system? When draining and refilling your swim spa, the pump may become air locked. Air- locked pumps stop water from flowing in your swim spa and is easily resolved by bleeding off the trapped air. To do this: 1. Turn off the GFCI breaker 2. Open the access panel below the topside control panel Page 45 For HELP, call 727.573.9611
3. Loosen a heater union until you hear the trapped air escape 4. Once water drips out in a continuous stream, hand tighten the union until the water stops leaking 5. Loosen the discharge union on Pump 2 (if equipped) 6. Once water drips out in a continuous stream, hand tighten the union until the water stops leaking 7. Turn on all pumps to make sure that there are no leaks 8. Put the access panels back on 9. Turn on the GFCI breaker Figure 31 - Bleeding Air What happens when my warranty expires? Premium Leisure will continue to provide service for your swim spa after your warranty has expired via our customer care center at 727.573.9611. Where can I get more Chemicals or other accessories? Visit www.hottubparts.com or call 877.530.PARTS. How should I clean my swim spa? Use non-sudsing cleaners and non-oily polishes (see page 50). Our Citra Bright Spray Cleaner and our Tub Rub cleaning pad quickly removes scum lines and helps restore your shell’s original beauty. Rinse all filters, covers, pillows, and surfaces thoroughly with warm tap water. Our Filter Clean concentrated cleanser is a safe, effective way to clean and re-use your filters and our Jet Clean plumbing cleanser cleans the inside of all plumbing in your swim spa. Call 727.573.9611 to order these easy-to-use cleaning products. How often should I drain my swim spa? You should drain and refill your swim spa every 6-12 months depending on usage. Every other time you drain and refill, you should also replace the filters and wipe down the swim spa (see pages 50). How do I adjust my spa jets? Simply turn the jets counterclockwise to open and clockwise to close. Be careful not to overturn the jets, as damage can occur. Page 46 For HELP, call 727.573.9611
Caution: Do not turn off too many jets at the same time. This can create backflow and possible damage to your swim spa! Do not attempt to adjust the oval jets on the swim side of the unit. Are the spa jets removable? Interchangeable? Replaceable? Most spa jets are made removable and adjustable for customized hydrotherapy. Do not attempt to remove the oval jets on the swim side of the unit. T r o u b l e s h o o t i n g If a problem arises, you can check this list for a quick solution. If this does not resolve your problem, please call our customer care center, at 727.573.9611. Additional information is also available at www.PremiumLeisure.com. You will need your serial number to access this site. Important – Most problems can be quickly resolved by resetting the GFCI breaker. Try this first before proceeding. Spa Side Troubleshooting PROBLEM Breaker trips CAUSE Wiring error SOLUTION Load Neutral wire not connected to GFCI (connected to Neutral bus) GFCI breaker is wrong size Remove tube from ozonator and allow 2 days to dry out Close the air control valves and allow filtration cycle to run Add defoamer Drain and clean your swim spa Clean or change filters Rinse all bathing suits before bathing Check and hand-tighten unions at heater & pumps, or clamps on jets Close drain valve or replace cap Replace bulb Check wiring harness to LED Reseat J20 plug on swim spa pack Bleed air from the system (page 43-44) Check and clean or replace filter Open all jets by turning CCW Open all T-handle shutoff valves on heater and pumps Close air control valves Fill swim spa 1” above all jets Wrong GFCI Ozonator wet Foamy water Soaps, skin oils, or undissolved sanitizer particles Leak Loose connection Drain open LED burnt out Loose wire Loose plug Air lock Dirty filter Closed jets Closed valves Light doesn’t work Low/no jet pressure ACV open Low water Page 47 For HELP, call 727.573.9611
PROBLEM Moved my swim spa and now it doesn’t work Nothing works CAUSE Wiring error at GFCI No power to swim spa Breaker has tripped SOLUTION Check Neutral wiring of GFCI (see diagrams on pages 10-22) Reset circuit breakers on GFCI panel and main circuit breaker panel Check and reset breaker. If problem persists, check for loose electrical connections. Check for Neutral wiring error at GFCI. Check for blown fuses inside of spa pack. Reset circuit breakers on GFCI panel and main circuit breaker panel Bleed air from the system (page 43-44) Open all jets by turning counterclockwise Close air control valves Turn down set temperature on topside control panel Remove the cover Pump not running Water does not flow Water too hot Fuse blown No power to swim spa Air lock Closed jets ACV open High set temperature High ambient temperature Thermostat is set too low Air open Dirty filter Blown fuse Slide valve closed Cover off Swim spa in Economy mode Water will not heat Check and reset to desired temperature Close air control valve Check and clean filter Check and replace fuse Check and open all valves Put the cover back on Press the Standby button and take out of Economy Common Error Codes: MESSAGE (none) MEANING No message on display. Power has been cut off to swim spa. The swim spa has shut down from high heat detection. One of the sensors detected 118ºF (48ºC) at the heater. The swim spa has overheated and shut down. One of the sensors detected that the swim spa water is 110ºF (43ºC). ACTION REQUIRED The control panel is disabled until power returns. Swim spa settings are preserved. Do not enter the water. Remove the cover and allow the water to cool. Once cool, push any button. If the swim spa does not reset, turn off the GFCI and call service. Do not enter the water. Remove the cover and allow the water to cool. At 107ºF (42ºC), the swim spa resets automatically. If the swim spa does not reset, turn off the GFCI and call service. OHH HH OHS OH Page 48 For HELP, call 727.573.9611