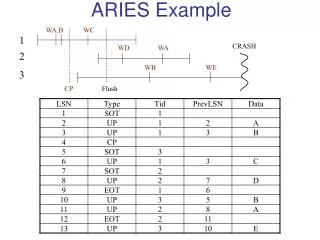
How to create Popup Pages using EGL/JSF
310 likes | 521 Vues
How to create Popup Pages using EGL/JSF. This Learning Module shows how to utilize the RBDe tooling to create Popup pages. The tutorial explains how to pass parameters to and from Popup pages, as well as create a Popup page with pure JavaScript. Pop-Up Pages.

How to create Popup Pages using EGL/JSF
E N D
Presentation Transcript
How to create Popup Pages using EGL/JSF This Learning Module shows how to utilize the RBDe tooling to createPopup pages. The tutorial explains how to pass parameters to and fromPopup pages, as well as create a Popup page with pure JavaScript.
Pop-Up Pages • It is a very common requirement to have to want to, upon some event on a page: 1. Open a Popup window, 2. Allow the user to select some value from that window and 3. Return the value to the calling (parent) window. • There are various ways of doing Pop-ups, and we’ll show you three: • Using the Panel-Dialog control • Using a page launched via JavaScript • Opening a window in a new frame Requirements From a “parent page” allow users to click a link that opens a “popup child page” – where users select a value that is returned to a parent page control Click to return a value to the parent page Click to open a popup page
Creating and Utilizing Pop-Up Pages Using the JSF Panel-Dialog Component • You can use the JSF Panel-Dialog component to create (or actually) to simulate Pop-up pages. • The Panel-Dialog: • Is a component placed on your “parent” page • Is initially hidden (typically) – and then rendered upon some event, which you have full control over • Uses (has access to) all of the data on your parent page • Creates a pop-up page effect • Which allows you a lot of visual (U.I.) control – including: • Placement • .CSS • Etc. • Can be placed under AJAX control • And can utilize your parent page’s preRender functionality • Can realize the following use cases: • Show data in a pop-up • Pass selected parameters back to the parent page data • Be passed parameters from the parent page • As existing values on the form • Through AJAX (preRender) functionality • Follow the steps on the next set of slides to try this simple approach to pop-up pages.
Creating and Utilizing Pop-Up Pages Using the JSF Panel-Dialog Component • Create a new web page called tabDialogPage.jsp • Copy/Paste the code in the notes section into the page code (There’s not really anything in the logic that should be new…so...) • Save (Ctrl/S) the EGL JSFHandler code • Return to Page Designer, and from Page Data select and drag customer onto the Page – as an input record • From the Palette select and drag three submit buttons on the page as shown • From each button’s Properties: • Their JSF IDs should be: • Button1 • Button2 • Button3 • Change the Display • Button label – as shown
Using the JSF Panel-Dialog Component – Static Data From the Parent Page • From the Palette select and drag a Panel – Dialog component, below the customer record. • It will create a small control that looks like this • Customize the control as follows: • From Page Data, drag and drop the orders array on top of the new control • Select some (not all) of the Orders columns as fields (be sure to select the CustomerID column) • With the Panel Dialog control selected, from the Properties view, specify the following: • Show the dialog by clicking: Button1 • Position the dialog horizontally and vertically relative to: textCustomerID1 • From Display options, specify the Msg field (from the EGL Handler) for the title bar
Using the JSF Panel-Dialog Component – Static Data From the Parent Page • Run the page • Click the Show Orders For This Customer submit button • Wow… • However – this is only one use case scenario (Pop-ups based on static data). • Let’s check out a few other things we can do with the Panel-Dialog component
Using the JSF Panel-Dialog Component – Returning Data to the Parent Page • From the Palette select and drag another Panel – Dialog component, below the first component • Customize the control as follows: • From Page Data, drag and drop the customers array on top of the new control • Select some (not all) of the customer columns as fields • With the Panel Dialog control selected, from the Properties view, specify the following: • Show the dialog by clicking: Button2 • Position the dialog horizontally centered and vertically in the middle of the page • From Display options, type in a title bar literal: Please select a customer from the list • Select the dataTable, and from its Properties: • Add a Border: 1 • From Display options: • Specify Alternate row colors (by deleting the ColumnClass) • From Row Actions: • Add an action that’s performed when a row is clicked • Submit the entire form (bottom radio button selection) • From All Attributes, bind the action property to the selCust() EGL function
Using the JSF Panel-Dialog Component – Returning Data to the Parent Page • Run the page • Click Select a Customer Let’s do one more of these (like the above), then we’ll move on to the final use case
Using the JSF Panel-Dialog Component – Returning Data to the Parent Page • From the Palette select and drag another Panel – Dialog component, below the second component • Customize the control as follows: • From Page Data, drag and drop the states array on top of the new control • Select the StateName field • Create StateName as an output control • With the Panel Dialog control selected, from the Properties view, specify the following: • Show the dialog by clicking: Button3 • Make the Pop-up Modeless • Position the dialog horizontally right and vertically at the bottom of the page • From Display options, type in a title bar literal: Please Select a State • Select the dataTable, and from its Properties: • Add a Border: 1 • Make the dataTable Width: 200 PX • From Display options: • Specify Alternate row colors (by deleting the ColumnClass) • Specify 400 px – as the Height of a scrollable area • From Row Actions: • Add an action that’s performed when a row is clicked • Submit the entire form (bottom radio button selection) • From All Attributes, bind the action property to the selState() EGL function
Using the JSF Panel-Dialog Component – Returning Data to the Parent Page • Run the page. Click Get State Abbreviation. Also, try moving the Pop-up window around. • Equate F4 with a button click • Note that you could: • Select the entire form • From Properties: • Add an action assigned to a keystroke
Using the JSF Panel-Dialog Component – Using AJAX for Dynamic Content – 1 of 4 • Note – this technique is similar to the topic: OPTIONAL WORKSHOP – Use Request From a dataTable Row-Click – previously presented in this course. If you haven’t done that workshop, you might consider doing – or at least reviewing it before starting in on this workshop. • From Page Data select and drag customers2 onto the page, and create a dataTable control with some of the customer columns as fields • From the Palette drag a hidden input field into the customerId column • From Properties - name the field: custH … as the JSF Id • Bind its value to: the CustomerID column in the customers2 array • You can see a picture of ths, on the next slide • From the Palette select and drag another Panel – Dialog component, below the third component (or really, anywhere on the page) • Customize the control as follows: • From Page Data, drag and drop the orders2 array on top of the new control • Select some of the fields • With the Panel Dialog control selected, from the Properties view, specify the following: • DO NOT SELECT A FIELD TO SHOW THE DIALOG (we’ll use AJAX for that) • Position the dialog relative to: textCustomerId3 • From Display options, type in a title bar literal: Orders For Selected Customer • Select the orders2 dataTable, and from its Properties: • Add a Border: 1 • From Display options: • Specify Alternate row colors (by deleting the ColumnClass)
Using the JSF Panel-Dialog Component – Using AJAX for Dynamic Content – 2 of 4 • Select the dataTable’s CustomerID column. Then double-click an Enhanced Faces Link component. Do not specify a URL • With the Link component selected – from Quick Edit • Select the onclick event • Check Use pre-defined behavior. Select Multiple Actions – and define two actions: • Invoke Ajax behavior on dialog4 • Show the specified tag dialog4 • See Slide Notes: • For an explanation of • what’s happening • behind the scenes
Using the JSF Panel-Dialog Component – Using AJAX for Dynamic Content – 3 of 4 • Select the dialog4 (Panel-Dialog you just added to the page). From its Properties • Select the Ajax sub property • Check: Allow Ajax updates and Type of update: Refresh • Click the Click to edit Ajax request properties icon • Click Add Parameter – and add the following string: $$AJAXROW$$form1:tableEx4:custH See Slide Notes
Using the JSF Panel-Dialog Component – Using AJAX for Dynamic Content – 4 of 4 • Run the page. • Click one of the rows in the dataTable (for a customer with orders)
Creating and Utilizing Pop-Up Pages (JavaScript) – 1 of 4 • Create a new web page called parentPage.jsp • Copy/Paste the code in the notes section into the page code (There’s not really anything in the logic that should be new…so...) • Save (Ctrl/S) the EGL JSFHandler code • Return to Page Designer, and from Page Data, select and drag rec onto the Page • Create inputField as an “input field” • Create outPutField as an “output field” • Customize the Submit Button (Options…) as shown in the screen capture • From the \WebContent\images\ directory • Drag: popupPage.jpg onto the field • From Page Data, select and drag the moveValue() function on top of the Submit Button to bind it • Your page should look something like this No need to fret over getting the U.I. exact. What’s important in this workshop is coming up on the next slide…
Create a Popup JavaScript Function – 2 of 4 • Select the popupPage image in Page Designer, and from QuickEdit, select the onclick event. Add the following JavaScript statement: my_window = window.open('http://localhost:9080/EGLWeb/faces/childPage.jsp',"myWin",'scrollbars=no,width=190,height=385,top=20,left=550'); Let’s dissect this – as you may have to modify it • my_window=window.open declare a JavaScript variable for a command that opens a new browser (“window”) • http://localhost: my computer • 9080 The port on my computer WebSphere is listening on, for TCP/IP commands. • NOTE – this value must match the URL you see when you run your pages. If your port is: 9081 – make this # 9081. If you’re running Tomcat, make this # Tomcat’s Port (typically, 8080) • EGLWeb/faces/ my project’s root directory in WebSphere, and the /faces/ subdirectory where WebSphere finds the faces “listener program” • childPage.jsp The popup page you’re about to create • “myWin” a variable for the window name – that you can refer to (say if you want to close the popup page, from the parent page!) • Scrollbars=no Don’t add scrollbars to the popup window (you can change this if you want to see what it does) • Width how wide to make the popup window in the browser • Height how tall to make the popup window in the browser • Top how far down (in pixels) from the top of the screen to position the top left corner of the popup window • Left how far to the right (in pixels) to position the left border of the popup window
Creating and Utilizing Pop-Up Pages – 3 of 4 • Now Create a new web page called childPage.jsp • Copy/Paste the EGL code in this slide’s Notes into the JSFHandler • Save (Ctrl/S) From Page Designer. • Drag the customer array onto the page • Specify as (read-only) • Select only the “FirstName” and “LastName” columns to display. • In the dataTable - Select the LastName field • From Enhanced Faces Components - Double click on a link • Specify the following URL: parentPage.faces
Creating and Utilizing Pop-Up Pages – 4 of 4 • With the LastName field (and the link) still selected, click the QuickEdit tab • Select the “onclick” event and add the code in the notes to the text area This JavaScript basically: • Defines a variable for the browser type, as different browsers have different interpretations of JavaScript • Defines a variable for the selected row’s LastName value (conditionally, based on browser type) • Returns this value to the “window that opened me” – and it’s textInputField1 JSF variable. Note that this is the fully-qualified name (“form1:textinputField1”) JSF id of the input field
(OPTIONAL) Modal Pop-Up Pages You can modify the previous example to make the child page modal (meaning the user MUST close the pop-up, before continuing to work from the parent page) by doing the following: • (from within the source of parentPage.jsp) find the function that invokes the childPage and: • Copy/paste the line current line that invokes the child page then comment out the original • In the new line, change: window.open window.showModalDialog • Add a line to value: textInputField1 with the returned value from the popup • (from within the source code of childPage.jsp) – find the function that returns, and: • Comment out the existing return line • Add the two lines shown here 3. From Page Designer, select the link, and remove the URL Property 4. Run the page on the server, and test the Modal Popup
(Optional Lab) Another Popup Page Scenario 2. A popup page that opens showing all Orders greater than the value passed from the clicked row in the parent page 1. Click a row and pass an OrderAmount value to… 3. Click a row in the popup page, and return a selected value to the parent page In your real life projects, you may need to pass parameters to pop-up pages. In this example, you will do just that, using a session variable. The steps begin on the next slide
1. Create a New Parent Page Let’s create the pages you saw on the previous slide. In this example, you will pass parameters from a parent to a popup page using a session variable. Create a new web page called parentPage2.jsp • Change the default header text. Here is an example of what you might want to say about the pages functionality
2. parentPage JSFHandler Code • Copy the code in the Notes section of the slide, and replace the boilerplate JSF Handler code. Note the following: • The onConstruction() function populates the orders array. • The getCustForOrderFunc() utilizes JSF Component tree API calls to determine which row of the data table you clicked. • You add 1 to the row index since Java arrays are 0 based. • You then set a session variable to be identified by “oamt.” • This session variable holds the clicked row’s OrderAmount value • The page is then forwarded to “childPage2” which we will be creating shortly. • childPage2 will open in a new (popup) window • Save (Ctrl/S) your code
3. Design the Page • Drag the orders item onto the page. • Display an existing record (read-only) • Columns to display (only check these columns) • OrderId • CustomerId • OrderAmount • OrderDate • Drag the custName item onto the page underneath the orders array. • From Options… do not add submit or delete buttons to the page • Your page should look like this
3. Add Row Action Event to the Page • Select the dataTable in it’s entirety (click any column in the dataTable, then press the up arrow key twice). Then… 1. Go to the Properties tab, select “Row actions.” 2. Click: Add an action that’s performed when a row is clicked 3. In the small configure window that pop’s up, select: • Clicking the row submits the form to the server. Parameters have to be set manually. • Click: OK 3. 2. 1.
3. Finish the parentPage U.I. Development • A new column should now appear in the dataTable: • Drag the getCustForOrderFunc() onto the “chain link” located in the newly created column. • We must now add functionality in order to get a pop-up page: • Click anywhere in the form (the dotted line box most likely surrounding the dataTable and custName input field) • Select the Properties/All Attributes tab. • Find the target attribute, and select: New Window All Attributes
1. Create a new page • Create a new Web Page and call it childPage2.jsp • Add the header text seen in this image • Let’s examine the page • This page contains a dataTable with two columns. • The Last_Name column is a link which fires a small piece of javascript code.
2. JSFHandler Code • Copy the code in the Notes section of the slide, and replace the boilerplate JSF Handler code. • Note the following: • The onConstruction() function retrieves the session variable passed to it by the parent page. • It then populates the custOrders array with a custom sql statement which retrieves the Last_name and Order_Amount for rows where: Orders.Order_Amount > :ordAmt • ordAmt is the value passed in from the parentPage • The statement then displays the rows returned in descending Order_Amount, within ascending Last_Name • SQL question • Why order by 1, 3
3. Design the Page • Drag the custOrders item onto the page • Display an existing record (read-only) • Columns to display: (only check these columns) • Last_Name • Order_Amount • Select the Last_Name variable on the page • From the Enhanced Faces Components drawer, double-click a • Do NOT specify a URL for this link • With the link and Last_Name variable selected • Go to the QuickEdit tab • Select “onclick” • Add the code in the notes section as shown below.
Run On Server • Run parentPage2 on Server. • Notice you can click any row in the parent page • The child page pops up displaying only rows with Order_Amount >= to the one you clicked. • Clicking a Last_name closes the pop-up, and populates the CustName field on parentPage2.