Download
1 / 32
320 likes | 440 Vues
Join Dr. Melissa S. Medina from the University of Oklahoma for an insightful seminar on designing GREAT posters. This session covers essential design principles and communication strategies to enhance your poster presentations. Participants will evaluate sample posters, explore key design categories, and learn about the necessary sections a poster should include. By the end of the workshop, attendees will have the knowledge and tools required to create visually appealing and informative posters, effectively communicating their research to diverse audiences.

E N D
Creating GREAT Posters Melissa S. Medina, Ed.D. Assistant Dean of Assessment & Evaluation & Associate Professor University of Oklahoma College of Pharmacy GREAT Seminar February 24, 2011
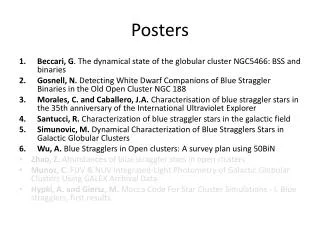
GREAT Poster Objectives • Evaluate a poster example & template • Review 6 specific categories of design considerations for an effective poster • Identify the 7 sections that a poster should contain • Create a poster using session guidelines
3 GREAT Poster Requirements • Aesthetically pleasing visual presentation • Effective communication of ideas • Engaged presenter characteristics
Activity • Take 3 minutes and evaluate sample poster using checklist in handout • Discuss strengths & weaknesses
Step 1: Printing Considerations & Poster Templates
Poster Template • Typically created on a PowerPoint slide • Historically created on individual slides • Currently printed as one large sheet • Template typically created on PowerPoint • http://www.ouhsc.edu/gsa/Workshops2009.asp
Table 1: Example of Results Table 3:TBL vs. Lecture-based Course Exam Comparisons Title of Poster (remove shadowing & italics if default) – use bold Arial font Authors’ full names and titles should be included here. The University of Oklahoma Health Sciences Center College of Pharmacy; Oklahoma City, Oklahoma • Results – Objective 1 • Consider reporting your results using your study objectives to demonstrate alignment and facilitate comprehension. • Try to put your results into a readable table or picture format. • A summary section of text can accompany the table in a separate text box such as this example. • Make sure to refer to the table (See Table 1). • Discussion • For this section you could number your content to match your objectives. For example, discuss the results from objective 1 here. • Then discuss or interpret results from objective 2 here. • Objectives • Make sure to include objectives that start with measurable action verbs • Should an abstract be included on the poster? If the conference guidelines request its inclusion then yes, otherwise the abstract can be omitted for 3 reasons: • Some abstracts are printed in the conference pamphlet, so it may already available. • If lack of space is an issue, the abstract can be deleted since the ideas are available in the remaining poster sections • A printout could be available for conference attendees that has a picture of your poster on one side and your abstract, contact information, and poster references on the other side • Conclusions • This section could also be called summary, recommendations, etc. • You could also include a “future studies” slide. • Notes on Using Tables. Etc. • Using tables as seen in the example above encouraged when creating your poster. • Line or bar graphs, timelines and other schemas are also encouraged. • Sometimes inserting a table into this slide can be difficult. It may be easier to create the table in word and copy and paste it into your text box or save & insert it as a picture • A table like table 2 below should be avoided because it is hard for the audience to comprehend your message. Use alternate diagram instead or make sure to explain with text. Example of Methods Schema • Other Poster Guidelines • Final guidelines to consider: • Recommended poster dimensions are 3 x 5 ft • (36 by 56 inches – defaulting to 56) • or (18 by 30 inches and tell Photo services to double the poster size (which will also double your current font size) • 3 x 5 is more affordable option (vs. 4X6). • Photographic services can print your poster (405-271-2173 in OKC). Remember to give yourself at least 3 days for drying time. • To use this template, delete text and use (or copy and paste) text boxes. • Box widths can be adjusted. • Introduction • Guidelines for the text box sections of the poster • Use Arial or other sanserif font. Use only 1 font on poster. • Bold the title of each section for emphasis. • Remove italics and shadowing on all text. – hard to read • Avoid using all capital letters. • All capital letters are easy to ignore and italics and show are hard to read. • Use bold and underline instead. • When creating the sections for your poster, avoid typing in paragraphs and instead bullet or number all information. • Each bullet should be no more than 2 lines of text per bullet. • Add spaces between bullets so all of the text in the section is not crowded together. • Open space facilitates reading the poster at a distance. • Align text using unjustified (uneven line lengths) because easier to read from a distance • There is an implied poster flow from left to right and top to bottom. • Consider 4 columns– intro, methods, results, discussion/summary • Results – Objective 2 • Grade Analysis • Sample language structure for results: Analysis of student performance using multivariate linear regression on scores from TBL activities to determine impact on final grade revealed that IRAT and team contribution scores significantly predicted overall grades in the course (p<.001). • Remember to state test used & p-values. Font Size Guidelines Table 2: Avoid These Tables
Select Poster Colors • Selecting colors for background • Improved readability • Limit the number of colors to 4 (includes B&W) • Light background with dark text • Consider cool background colors to recede into background • Light blues, grays, purples • Crimson and cream are popular choices • use strategically and abstractly
Poster Colors to Avoid • Options to avoid: • Very bright colors can be distracting • Blurry • Red text on a blue background • Blue text on a red background • Hard to read • Black text on a blue background • Yellow text on a white background
Printing Considerations • Consider at initial planning stage • Printing deadline considerations • drying time • unforeseen problems • Give yourself > 1 week lead time • Call Photographic services • OKC campus (LIB-142: 405-271-2173)
Poster Size Considerations • Poster size/dimensions • consider “photograph” size • 3x5 (36 x 60) • 4x6 (48 x 72) • Priced by dimension/size • $6.75 per square foot • 3x5 poster = 15 x $6.75=$101.25 • 4x6 poster = 24 x $6.75=$162.00 • 36 x 56 (3 x 4.6) =$94.50
Step 2: 7 Poster Sections
1. Banner • Include banner • Research project title • Author names • University affiliation • If OU seal used, ensure permissions granted
2. Should Abstract be Included? Yes No Redundant of other poster content Takes up valuable space May be printed in conference abstract Could be offered as a handout Abstract & contact information Copy of poster • Conference guidelines require inclusion • Audience likes to read because efficient
3. Introduction • State hypothesis or study objectives • May have as a separate section • Use measurable verbs • Explain importance of study question(s) • Include reference to vital literature • Only very pertinent studies, • Can’t include y our entire literature review
4. Methods • Consider putting vital information in table format • Line or bar graphs, timelines also encouraged • Inserting a table into poster can be difficult • Easier to create table in word • Copy and paste it into your text box • or save & insert it as a picture
5. Results • Consider aligning study objectives with results reporting • Try to put your results into a readable table or picture format • Text summary can accompany table in a separate text box • Make sure to refer to the table (See Table 1) • Not all tables are GREAT!
Tables vs. Other Displays • Avoid requiring audience to interpret table data • Can happen with large tables • Evaluate big picture of results • what is table revealing (increases, etc) • Consider use of line graph, bar graphs, pie graphs instead
6. Discussion - Conclusions • Interpret results in discussion • Consider alignment with objectives • Discuss: • theoretical and clinical significance of results • implications of results • May include future directions text • Conclusion section could be included with take home points
7. References • All information from other sources used in the poster must be referenced • Can be typed in a smaller font
Step 3 Design considerations for GREAT posters
Poster Goal • Intentionally consider goal of your poster • Repeat message throughout • Design poster to address one central question and state that question clearly • Use data to support central question • Provide an explicit take home message
Flow • Follow the guidelines of a published paper • Implied flow • Top to bottom • Left to right. • Consider 4 column format • intro • methods • results • discussion
Amount of Content • Avoid large paragraphs & large blocks of text • Use bullets for your statements • Leave open space using hard returns • Do not crowd text, lists, diagrams, etc. • Consider using 1.5 spacing between lines of text • Present information concisely • Space is limited • Use the active voice
Text Size & Font Selection • Text is read from a distance of approximately 3-6 feet • Readability from distance • Use SanSerif styles (like Arial) for reading from distance • Avoid serif styles (like Times New Roman) • Use only 1 font • Type in uneven length lines (flush left, jagged right) • Emphasis • AVOID USE ALL CAPITAL LETTERS, EVEN IN THE TITLE AND HEADINGS, BECAUSE IT IS DIFFICULT TO READ. • Use bold, underline, italics, and color, and vary font size
Graphics • Graphics can increase communication effectiveness 40-50% • Wrong visual aids have opposite effect • Decreased understanding • Ask yourself, does the graphic image: • Increase audience interest? • Increase audience understanding? • Enhance retention? • Increase efficiency (message is communicated faster)?
Summary • Many other posters to choose from • Why choose yours? • Aesthetically pleasing colors • Vital information/sections present • Organized, concise and bulleted text that can be read from distance • Tables/pictures/graphs used appropriately and described • Intentionally aligned study objectives, methods, results and discussion
Creating GREAT Posters Melissa S. Medina, Ed.D. Assistant Dean of Assessment & Evaluation and Associate Professor University of Oklahoma College of Pharmacy GREAT Seminar February 24, 2011