Master Sharpening Technique for Enhanced Images
Learn expert Photoshop tips to sharpen images effectively for professional prints. Follow step-by-step instructions to create crisp, high-quality photos using advanced editing tools. Enhance your photography skills with this detailed guide.

Master Sharpening Technique for Enhanced Images
E N D
Presentation Transcript
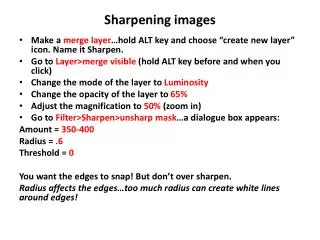
Sharpening images • Make a merge layer…holdALT key and choose “create new layer” icon. Name it Sharpen. • Go to Layer>merge visible (hold ALT key before and when you click) • Change the mode of the layer to Luminosity • Change the opacity of the layer to 65% • Adjust the magnification to 50% (zoom in) • Go to Filter>Sharpen>unsharp mask…a dialoguebox appears: Amount = 350-400 Radius = .6 Threshold = 0 You want the edges to snap! But don’t over sharpen. Radius affects the edges…too much radius can create white lines around edges!
Final Sharp • Make an empty layer…nameit Final Sharp • Merge into new layer (hold ALT key) • Change layer mode to Luminosity • Filter>unsharpmask • Change threshold to 4 • Change layer mode to Overlay, opacity to 50% • Filter>other>High Pass • If too sharp reduce opacity of layer This final sharpening can make a huge but subtle difference in your prints…it was developed by a Photoshop master and is used by the pros.