WRF Tutorial
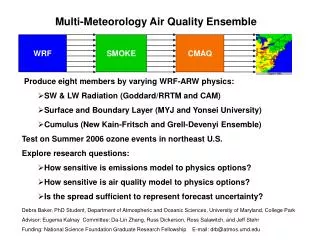
WRF Tutorial. A Hands-on Overview of the WRF Modeling Process Condensed Version for WFO ANC. September 2009. WRF Architecture. A Typical WRF Run on midnight (Overview). Run a script to install template directories in your filesystem Create a model domain

WRF Tutorial
E N D
Presentation Transcript
WRF Tutorial A Hands-on Overview of the WRF Modeling Process Condensed Version for WFO ANC September 2009
A Typical WRF Run on midnight (Overview) • Run a script to install template directories in your filesystem • Create a model domain • Get input data for initial and lateral boundary conditions • Ungrib the input data to an intermediate standard form understood by WRF pre-processing utilities • Extract and interpolate the input data to match the model domain • Extract initial and lateral boundary conditions from input data and modify vertical coordinate system • Run the model • Do something with the output
Install Template Directories in Your Filesystem • There is a centralized version of WRF installed on midnight. • However, WRF is set up such that you need to be doing your runs in the same directory as the executables. • We have set up a system that will create template directories in your own filesystem for WPS and WRF • For each domain that you work with, you’ll set up your own WPS/WRF template directories • Example – for a 10km domain over Alaska, you might have your work in directories WPS-Alaska10km and WRFRun-Alaska10km
A Typical WRF Run on midnight (Overview) • Run a script to install template directories in your filesystem • Create a model domain • Get input data for initial and lateral boundary conditions • Ungrib the input data to an intermediate standard form understood by WRF pre-processing utilities • Extract and interpolate the input data to match the model domain • Extract initial and lateral boundary conditions from input data and modify vertical coordinate system • Run the model • Do something with the output
Create a Model Domain • This step sets up the model domain boundaries, resolution, topography, nests and creates the static file (land use, soil type, etc.) needed by a model run • We only do this once for a given model domain • Procedures • Define your domain – lat/lon, size, resolution, projection, etc. • Edit a namelist file (specifying domain parameters) • Run geogrid.exe to create the domain • Verify successful creation
Namelist file for Domain Creation namelist.wps
Create the Domain netCDF file produced by geogrid.exe
Create the Domain, Then Verify • Run geogrid.exe – this program looks at parameters in namelist.wps, then generates the domain in a netCDF file, geo_em.d01.nc • This file is viewable with various tools, including ncview
Or, Generate Map Outline NOTE – you may need to run module load ncl-5.1.0 before idt will work
Nested Domain for Alaska 9 km 3 km
A Typical WRF Run (Overview) • Run a script to install template directories in your filesystem • Create a model domain • Get input data for initial and lateral boundary conditions • Ungrib the input data to an intermediate standard form understood by WRF pre-processing utilities • Extract and interpolate the input data to match the model domain • Extract initial and lateral boundary conditions from input data and modify vertical coordinate system • Run the model • Do something with the output
Get Input Data • Numerous sources of different types • Reanalysis for historical runs • Global Final Analysis (FNL) – global coverage, 1-degree resolution • North American Regional Reanalysis (NARR) • Recent model output for real-time runs • North American Mesoscale model (NAM) • Global Forecast System (GFS) • Observations for data assimilation
A Typical WRF Run (Overview) • Run a script to install template directories in your filesystem • Create a model domain • Get input data for initial and lateral boundary conditions • Ungrib the input data to an intermediate standard form understood by WRF pre-processing utilities • Extract and interpolate the input data to match the model domain • Extract initial and lateral boundary conditions from input data and modify vertical coordinate system • Run the model • Do something with the output
Make links to the input files Contents of /datadir/morton/TutorialData/KatrinaAVN
Run ungrib.exe Ungribbed files
A Typical WRF Run (Overview) • Run a script to install template directories in your filesystem • Create a model domain • Get input data for initial and lateral boundary conditions • Ungrib the input data to an intermediate standard form understood by WRF pre-processing utilities • Extract and interpolate the input data to match the model domain • Extract initial and lateral boundary conditions from input data and modify vertical coordinate system • Run the model • Do something with the output
Extract and Interpolate Degribbed Data to Match Model Domain • So far, we’ve managed to convert the original input data to an intermediate form • Next, we extract data from the intermediate files that correspond to our selected domain. Where necessary, we interpolate so that the resulting files consist of input values matched to our specific grid • To do all this, we modify namelist.wps (though it’s typically already set up correctly for this), and then we run metgrid.exe
Run metgrid.exe netCDF files containing input data translated and interpolated for our particular grid
A Typical WRF Run (Overview) • Run a script to install template directories in your filesystem • Create a model domain • Get input data for initial and lateral boundary conditions • Ungrib the input data to an intermediate standard form understood by WRF pre-processing utilities • Extract and interpolate the input data to match the model domain • Extract initial and lateral boundary conditions from input data and modify vertical coordinate system • Run the model • Do something with the output
Extract Initial and Boundary Conditions • The files we created with metgrid.exe represent the input data mapped to our specific domain grid • The next step is to extract what we need from this input data for initial and lateral boundary conditions • To do this, we • Change to our WRFRun directory • Edit namelist.input • Copy the met_em* files produced with metgrid.exe • Run real.exe, and get two files that will contain the boundary conditions for running WRF – wrfbdy_d01 and wrfinput_d01
Get Value of num_metgrid_levels Use ncdump to query one of the met_em* files
Run real.exe (or real-serial.exe) From WPS Lateral BC’s Initial conditions
A Typical WRF Run (Overview) • Run a script to install template directories in your filesystem • Create a model domain • Get input data for initial and lateral boundary conditions • Ungrib the input data to an intermediate standard form understood by WRF pre-processing utilities • Extract and interpolate the input data to match the model domain • Extract initial and lateral boundary conditions from input data and modify vertical coordinate system • Run the model • Do something with the output
Run the Model • Use the same namelist.input from the previous step (real.exe). In most cases you won’t need to modify anything. • Run ./wrf.exe (or ./wrf-serial.exe)
A Typical WRF Run (Overview) • Run a script to install template directories in your filesystem • Create a model domain • Get input data for initial and lateral boundary conditions • Ungrib the input data to an intermediate standard form understood by WRF pre-processing utilities • Extract and interpolate the input data to match the model domain • Extract initial and lateral boundary conditions from input data and modify vertical coordinate system • Run the model • Do something with the output
Postprocessing • The default output file is a netCDF file, named something like wrfout_d01_2005-08-28_00:00:00 • Numerous utilities exist for viewing in native netCDF format, or converting to other formats (e.g. GRIB, Vis5D, BUFR) Start time
ncview Model Output • Using a quick and dirty netCDF viewer to look at model output
Running wrf.exe in Parallel wrfrun.pbs
Resources • ARSC-WRF Google Group – http://groups.google.com/group/arsc-wrf • WRF Users Page – http://www.mmm.ucar.edu/wrf/users/ • WRF ARW Users Guide – http://www.mmm.ucar.edu/wrf/users/docs/user_guide_V3/contents.html • WRF ARW Online Tutorial – http://www.mmm.ucar.edu/wrf/OnLineTutorial/index.htm