Hyperbola
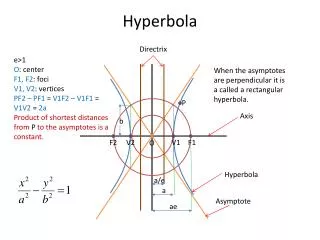
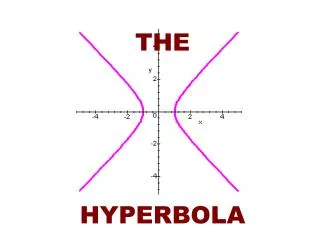
Hyperbola. Directrix. e>1 O : center F1, F2 : foci V1, V2 : vertices PF2 – PF1 = V1F2 – V1F1 = V1V2 = 2a Product of shortest distances from P to the asymptotes is a constant. When the asymptotes are perpendicular it is a called a rectangular hyperbola. P. Axis. b. F2. V2. V1.

Hyperbola
E N D
Presentation Transcript
Hyperbola Directrix e>1 O: center F1, F2: foci V1, V2: vertices PF2 – PF1 = V1F2 – V1F1 = V1V2 = 2a Product of shortest distances from P to the asymptotes is a constant. When the asymptotes are perpendicular it is a called a rectangular hyperbola. P Axis b F2 V2 V1 F1 O Hyperbola a/e a Asymptote ae
Draw an ellipse, focus is 50 mm from the directrix and the eccentricity is 3/2 HYPERBOLA DIRECTRIX-FOCUS METHOD 2’ P2 1’ A VE = VF1 P1 E DIRECTRIX F1-P1=F1-P1’ = 1-1’ F1-P1/(P1 to directrix AB) = 1-1’/C-1=VE/VC (similar triangles) =VF1/VC=2/3 THEREFORE P1 AND P1’ LIE ON THE HYPERBOLA V F1 ( focus) (vertex) C 1 2 F1-P2=F1-P2’= 2-2’ P2 AND P2’ ALSO LIE ON THE HYPERBOLA P1’ B P2’
40 mm 30 mm HYPERBOLA THROUGH A POINT OF KNOWN CO-ORDINATES Problem: Point P is 40 mm and 30 mm from horizontal and vertical axes respectively. Draw a Hyperbola through it. Solution Steps: 1)Extend horizontal line from P to right side. 2)Extend vertical line from P upward. 3)On horizontal line from P, mark some points taking any distance and name them 1, 2, 3 etc. 4)Join 1-2-3 points to pole O. Let them cut part [P-B] at 1’,2’,3’ points. 5)From horizontal 1,2,3 draw vertical lines downwards and 6)From vertical 1’,2’,3’ points [from P-B] draw horizontal lines. 7) Vertical line from 1 and horizontal line from 1’ P1.Similarly mark P2, P3, P4 points. 8)Repeat the procedure by marking points 4, 5 on upward vertical line from P and joining all those to pole O. They cut the horizontal line from P at 4’ and 5’. Repeat earlier procedure to obtain points P4, P5. Join them by a smooth curve. 5 P5 4 P4 P 5’ 4’ 1 2 3 P1 1’ P2 2’ P3 3’ O B
Hyperbola-rectangle method 1’ 2’ 2 1 Base Height of hyperbola Axis height
10 9 Form a table giving few more values of P & V 8 + 7 P V = C + 6 = = = = = = 1 2 2.5 4 5 10 10 10 10 10 10 10 10 5 4 2.5 2 1 + + 5 + + Now draw a Graph of Pressure against Volume. It is a PV Diagram and it is a Hyperbola. Take pressure on vertical axis and Volume on horizontal axis. + 4 3 2 1 10 1 2 3 4 5 6 7 8 9 HYPERBOLA P-V DIAGRAM Problem:A sample of gas is expanded in a cylinder from 10 unit pressure to 1 unit pressure. Expansion follows law PV=Constant. If initial volume being 1 unit, draw the curve of expansion. Also Name the curve. PRESSURE ( Kg/cm2) 0 VOLUME:( M3 )
ELLIPSE TANGENT & NORMAL C p4 p3 p2 p1 B A O F1 F2 1 2 3 4 D Problem : • TO DRAW TANGENT & NORMAL • TO THE CURVE AT A GIVEN POINT ( Q ) • JOIN POINT Q TO F1 & F2 • BISECT ANGLE F1Q F2 THE ANGLE BISECTOR IS NORMAL • A PERPENDICULAR LINE DRAWN TO IT IS TANGENT TO THE CURVE. NORMAL Q TANGENT
TO DRAW TANGENT & NORMAL TO THE CURVE AT A GIVEN POINT ( Q ) ELLIPSE A 1.JOIN POINT Q TO F. 2.CONSTRUCT 900 ANGLE WITH THIS LINE AT POINT F 3.EXTEND THE LINE TO MEET DIRECTRIX AT T 4. JOIN THIS POINT TO Q AND EXTEND. THIS IS TANGENT TO ELLIPSE FROM Q 5.TO THIS TANGENT DRAW PERPENDICULAR LINE FROM Q. IT IS NORMAL TO CURVE. DIRECTRIX V (vertex) F ( focus) B ELLIPSE TANGENT & NORMAL Problem: T 900 N Q N T
TO DRAW TANGENT & NORMAL TO THE CURVE AT A GIVEN POINT ( Q ) PARABOLA A 1.JOIN POINT Q TO F. 2.CONSTRUCT 900 ANGLE WITH THIS LINE AT POINT F 3.EXTEND THE LINE TO MEET DIRECTRIX AT T 4. JOIN THIS POINT TO Q AND EXTEND. THIS IS TANGENT TO THE CURVE FROM Q 5.TO THIS TANGENT DRAW PERPENDICULAR LINE FROM Q. IT IS NORMAL TO CURVE. V VERTEX F ( focus) B PARABOLA TANGENT & NORMAL Problem: T 900 N Q N T
TO DRAW TANGENT & NORMAL TO THE CURVE FROM A GIVEN POINT ( Q ) A 1.JOIN POINT Q TO F. 2.CONSTRUCT 900 ANGLE WITH THIS LINE AT POINT F 3.EXTEND THE LINE TO MEET DIRECTRIX AT T 4. JOIN THIS POINT TO Q AND EXTEND. THIS IS TANGENT TO CURVE FROM Q 5.TO THIS TANGENT DRAW PERPENDICULAR LINE FROM Q. IT IS NORMAL TO CURVE. F ( focus) (vertex) V B HYPERBOLA TANGENT & NORMAL Problem 16 T 900 N N Q T
Concept of Principal lines of a plane All the points lie on a straight line representing the edge of the plane Point view C B TL A1 T • Draw a line on the plane in one view parallel to the other plane. • The corresponding projection in the other plane will give the true length. A T F A’ C’ Principal line B’
Principal lines: Lines on the boundary or within the surface, parallel to the principal planes of projection -They can be frontal lines (parallel to frontal plane)-Horizontal lines (parallel to top plane) Frontal line (parallel to frontal plane) b True length b l a f l a c T c T F c’ F c’ a’ l’ f’ a’ True length b’ l’ Horizontal line (parallel to top plane) b’
To obtain the edge view of a plane x1 b1 Edge view of the plane b True length a1 l a c1 c -Draw a principle line in one principle view and project the true length line in the other principle view -With the reference line perpendicular to the true length line, draw a primary auxiliary view of the plane, to obtain the edge view Distances: a1, b1, c1 from x1y1 = a’, b’, c’ from xy respectively T y1 x y c’ F l’ a’ b’ Horizontal line (parallel to top plane)
Auxiliary view of TRUE SHAPE of a plane always gives an EDGE VIEW True shape is the auxiliary view obtained from the edge view x1 b4 Edge view of the plane b1 b True length b2 a1 c4 l a a c1 c a4 True shape and dimensions of the plane T y1 y x c2 a2 F c’ a is the angle of the plane with the HP b3 l’ c3 a’ a3 b’ Edge view of plane Horizontal line (parallel to top plane)

