Download
1 / 28
280 likes | 303 Vues
Simplify class interaction for instructors and students using the Homework Manager system by McGraw-Hill. Create a unique class homepage to manage assignments, grading, and feedback efficiently.

E N D
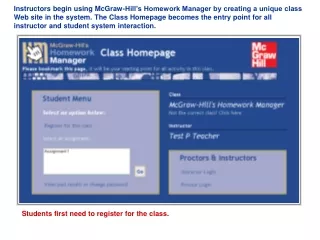
Instructors begin using McGraw-Hill’s Homework Manager by creating a unique class Web site in the system. The Class Homepage becomes the entry point for all instructor and student system interaction. Students first need to register for the class.
From their instructor’s Class Homepage, students register for the class by entering their unique PIN code, found on the inside front cover of their User’s Guide. After they set up a login name and password, they can access any assignments that are available on the Class Homepage. Students create their own unique login name and password.
To begin, students select one of the available assignments and click “Go.”
Students will arrive at the Student Login page, where they are prompted for their login name and password.
Questions are presented one at a time within the assignment. Students can navigate between questions in any sequence, entering their answers until they have completed the entire assignment. Upon completion, they choose “Grade” to submit their responses for automatic grading. Instructors can control the feedback elements that are displayed to students. Begin by answering Question 1. When you complete Question 1, click “Next” to proceed to Question 2. When you complete all questions, click “Grade.”
Some of the problems may require the use of the Math Package, which allows you to enter symbolic math expressions in your question responses. You will be notified that the system is downloading and installing some required math controls when you first log in to an assignment that requires these elements.
When the assignment is graded, the student sees a summary report that shows their score on each question. Clicking View Details presents the details for all questions, including their graded response and feedback for each incorrect answer. Click a question in the list to see the detailed solution.
When students select View Details, they can see the full solution to the problem, including algorithmically generated answers to the question as it was presented to them in their assignment. The student’s results are automatically recorded in the instructor’s Gradebook. Correct answers are identified with a green and incorrect answers with a red. Click “Quit” to exit the feedback page and return to the Class Homepage.
Instructors begin the registration process by accessing the Information Center of their McGraw-Hill textbook’s web site. Click on the Homework Manager link in the left-hand menu.
Access to Homework Manager, the Guided Tour, and downloads of the Instructor’s Documentation for the Homework Manager System and the Student User Guide are all available on this page. Under the “Set Up Your Class Today!” heading, note the Registration Code given, then click the hyperlink text below it.
Instructors are asked to select their course template from a drop-down menu, selecting the McGraw-Hill text that they are using. They are prompted for their registration code (from the text web site) and then proceed to the Instructor Registration page. Each instructor gets their own Class Homepage in the system, populated with question banks and assignments. Instructors can distribute their unique Class Homepage URL to their students.
The instructor arrives at the Instructor Login page and is asked for the password they created during registration.
The program has four main parts, clearly laid out on this page. Most instructors will spend the bulk of their time with the Assignment Editor and the Gradebook. Select “Gradebook.”
The Gradebook provides tools for viewing and analyzing assignment scores and statistics, as well as exporting grades to external gradebooks. Click one of the assignments and then the “Get Report” button.
Reports that are gathered by the system during student sessions include statistical analysis of student and class performance. Click a student’s name to see specific information on a submitted assignment.
This is a sample report covering a single assignment. Multiple attempts by students are recorded in addition to all of the student’s work to date. Click “Close” to return to the Student Statistics tab.
Click the Home icon to return to the Instructor Main Menu screen.
The Assignment Editor allows instructors to create new assignments, to edit the content or appearance of existing assignments, or to delete assignments. Select “Assignment Editor.”
Use the menu bar across the top of this page to perform key functions within the Assignment Editor. Use the menu on the left side to navigate within the program. Select “Add” to create a new assignment.
“Choose Name” allows instructors to create a unique name for their new assignment. Type in the name of your new assignment and click the Select Questions tab.
“Select Questions” allows instructors to select multiple question banks as a source to use for creating their new assignment. Select the question bank you want to use.
Within the Assignment Editor, instructors can preview questions, select questions for an assignment, set question weighting, set assignment policies, scramble question delivery, and annotate questions to provide additional instructions, hints, and Web links to outside material. “A” indicates the system can algorithmically generate many versions of the same problem type. “C” indicates the problem has associated comments and feedback.
Within the Select Questions screen, instructors can add and delete questions and adjust the exercises for the assignment. Next, click the Set Policies tab.
Using the options on this page, instructors can use the same database of questions to create practice assignments, graded homework, or even tests. Feedback (solutions) and other assignment behaviors are instructor-configurable, and each assignment can be scheduled. Next, click the Review & Finish tab.
Within this screen, instructors can confirm the summary of the criteria established for the assignment. Complete the assignment setup by clicking the Finish button.
Upon completion, the assignment is saved and now appears in the list of assignments here, and also on the Class Homepage menu (subject to instructor scheduling). Select “Main Menu” to return to the Instructor’s Main Menu.
This completes your walk-through of the basic features of McGraw-Hill’s Homework Manager. Please be sure to check out the live demonstration sites available on the McGraw-Hill’s Homework Manager Web site.