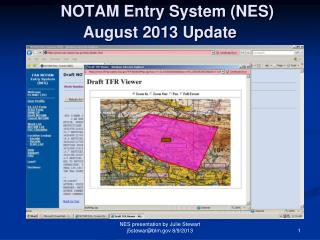
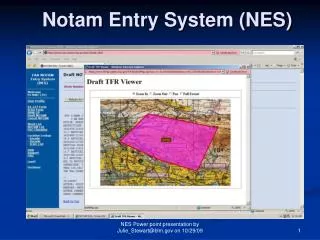
Notam Entry System (NES)
Notam Entry System (NES). Content Directory. Ch 1 – Introduction Ch 2 – Entering a Basic TFR Ch 3 – If you do not know which ARTCC Ch 4 – Entering a time specific TFR Ch 5 - Entering a Polygon TFR Ch 6 – What is a T-VOR and a NDB? Ch 7 – Adding Additional Text in the TFR

Notam Entry System (NES)
E N D
Presentation Transcript
Notam Entry System (NES) NES Power point presentation by Julie_Stewart@blm.gov on 10/29/09
Content Directory NES Power point presentation by Julie_Stewart@blm.gov on 10/29/09 Ch 1 – Introduction Ch 2 – Entering a Basic TFR Ch 3 – If you do not know which ARTCC Ch 4 – Entering a time specific TFR Ch 5 - Entering a Polygon TFR Ch 6 – What is a T-VOR and a NDB? Ch 7 – Adding Additional Text in the TFR Ch 8 – Obtaining your TFR from DINS Ch 9 – Obtaining your TFR from www.faa.gov Ch 10 – How to delete Ch 11 – Registering New Users
Ch 1 – Introduction - What is NES? • The NOTAM Entry System (NES) is an FAA program designed to simplify and expedite the TFR request process. • It was created by the FAA to enable authorized users a method to input TFR requests using a web browser that creates a draft TFR that is sent to the appropriate ARTCC who forwards it to the US NOTAM office for issuance. NES Power point presentation by Julie_Stewart@blm.gov on 10/29/09
Instructions for the NOTAM Entry System (NES) • It is accomplished through the acquisition of an internet “Certificate” which may be considered a passport to the secured FAA NES Website. • Authorized users are required to down load a “certificate” to their computer and register as users of the NOTAM Entry System. NES Power point presentation by Julie_Stewart@blm.gov on 10/29/09
What can NES do? • Once you have a certificate, you may: • Create a NOTAM draft • Preview a NOTAM draft • Print a NOTAM draft • Preview TFR graphical depiction • Submit your NOTAM draft request NES Power point presentation by Julie_Stewart@blm.gov on 10/29/09
Chapter 2 - Entering a Basic TFR 1: Select and Click on Favorite Button or go to https://www.nes.notams.faa.gov 2:You will get a security selection – click on OK. NES Power point presentation by Julie_Stewart@blm.gov on 10/29/09
3: You will most likely get a security Certificate “problem” – click/select “Continue to this website…” NES Power point presentation by Julie_Stewart@blm.gov on 10/29/09
4: Again – you will be asked to select the Certificate – click/select OK. NES Power point presentation by Julie_Stewart@blm.gov on 10/29/09
The Log On Process 1:Add the website to your favorites. 2: Select and Click on “LOGON 1a: Select from your favorites NES Power point presentation by Julie_Stewart@blm.gov on 10/29/09
3: Sometimes nothing will happen the first time you log on. You may have to sign on a second time (security measures). The computer appears stagnant and will NOT instruct you to log on a second time. But after several minutes of nothing happening, you will realize that you have to sign on a second time….. 11 NES Power point presentation by Julie_Stewart@blm.gov on 10/29/09
5: Enter your password 6: Click Submit Button 4: Enter your Initials. NES Power point presentation by Julie_Stewart@blm.gov on 10/29/09
Locked Out? NES Power point presentation by Julie_Stewart@blm.gov on 10/29/09 Note – the system will lock you out if you try to log on three times unsuccessfully. You will have to call the US NOTAM office at 703-904-4557 and ask them to “unlock” your account. Be sure to have your branch name available (FS-RAL or FS-NWC for example)
If you have to change your password Click on User Profile Where is says Change Password, Click Here. NES Power point presentation by Julie_Stewart@blm.gov on 10/29/09
Type in your old password. Create a new password and click on Change Password. NES Power point presentation by Julie_Stewart@blm.gov on 10/29/09
Entering the TFR Information Once in the system, select 1. Once in the system, Select/Click on 91.137 Form. NES Power point presentation by Julie_Stewart@blm.gov on 10/29/09
2: The 91.137 (a) (1) is automatically highlighted – do NOT use. 3: You must click/select on 91.137 (A) 2 NES Power point presentation by Julie_Stewart@blm.gov on 10/29/09
4. Click on “Select” and use drop down menu for selecting reason for requesting TFR under 91.137 (A) (2). For wildland fires select “Fire Fighting” 5. After the word “Firefighting” add the words “Aviation Operations” so it reads “Firefighting Aviation Operations” NES Power point presentation by Julie_Stewart@blm.gov on 10/29/09
6. Type in Incident Name and the word “fire” For example: The Cedar Fire NES Power point presentation by Julie_Stewart@blm.gov on 10/29/09
7. Click on ARTCC for Drop down menu. Select the appropriate ARTCC for the TFR location. (you must use the 3 letter code as specified. NES Power point presentation by Julie_Stewart@blm.gov on 10/29/09
8. Select the State in which the incident is located from the Drop down menu. 9. General Location: Type in the City or well known geographical reference nearest to the Incident. NOTE – you MUST add the State abbreviation such as “24 NM West of Olympia, WA” or the TFR will NOT map correctly. NES Power point presentation by Julie_Stewart@blm.gov on 10/29/09
Next step – Time Range NES Power point presentation by Julie_Stewart@blm.gov on 10/29/09 For 24 hour TFRs, continue to the next slide For a “Time Specific” TFR (dates and hours), please refer to Chapter 4
10: Click on Time Ranges. This will open a box which allow you to specifies time ranges for the TFR. 11: For 24 hour coverage, Do not change the effective time and expire time that are Pre-specified under Step # 1. (For specific hour TFRs, please refer to slides in Chapter 5) NES Power point presentation by Julie_Stewart@blm.gov on 10/29/09
12: Click on “Get Time Range in Step 2. This will bring in the time ranges specified in Step 1. 13: Click on “Save New Time Range” in Step 3. This will populate the TFR form with your time range. NES Power point presentation by Julie_Stewart@blm.gov on 10/29/09
14: Once your selected time range is “saved” (populated in the time box). Click on exit button. NES Power point presentation by Julie_Stewart@blm.gov on 10/29/09
Next Step – Shape of TFR NES Power point presentation by Julie_Stewart@blm.gov on 10/29/09 For a circular TFR, continue to the next slide For a polygon TFR, please go to Chapter 5
15. Affected Area: To begin the description, enter the TFR dimension by choosing either Circle or Polygon. DO NOT SELECT “Corridor” as that is only used for Presidential TFR motorcades. NES Power point presentation by Julie_Stewart@blm.gov on 10/29/09
Circular TFR (For Polygon TFRs go to Chapter 5) 16. Enter Circle Radius as specified on the TFR request form. Suggested guideline is 5 NM 17. Enter latitude and longitude of the TFR. Remember to Type N (north) after latitude and W (west) after Longitude. Remember Latitude and Longitude need to be in Degree,Minutes,Seconds. NOT IN DECIMALS and no punctuation. NES Power point presentation by Julie_Stewart@blm.gov on 10/29/09
The only accepted lat/long format by the FAA US NOTAM office for TFR’s is Degrees, Minutes, Seconds With no punctuation. Note the attempt to put in Degrees, Minutes, Tenths was rejected by NES. NES Power point presentation by Julie_Stewart@blm.gov on 10/29/09
18. Click on “Find Navigation Aids” Button which will provide a list of the closest NavAid VORs. 19. Select the top NavAid as this is usually the closest to the incident. (But do not select it if it is a TVOR or a NDB – see Chapter 6) NES Power point presentation by Julie_Stewart@blm.gov on 10/29/09
20. Check the VOR type – if it says “NDB” (Non Directional Beacon, then do NOT use it and use the navaid listed below it. Even though NES lists it, it is NOT a valid or appropriate navaid for a TFR. “As the name implies, the signal transmitted does not include inherent directional information, in contrast to other navigational aids such as Low Frequency Radio Range, VHF omnidirectional range (VOR) and TACAN. However, the NDB signal is affected more by atmospheric conditions, mountainous terrain, coastal refraction and electrical storms, particularly at long range.” Therefore we do not use them in a TFR.” (Wikipedia reference) NES Power point presentation by Julie_Stewart@blm.gov on 10/29/09
Know your NavAids NES suggests St George (OZN) Do not use even if it is the closest Nav Aid as it is a TVOR. (for further information, see Chapter 6) NES Power point presentation by Julie_Stewart@blm.gov on 10/29/09
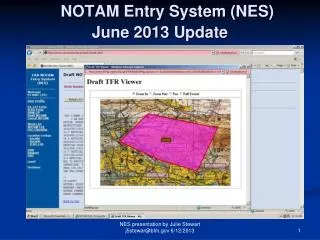
21. The selected VOR Nav Aid and the latitude/Longitude will “populate” in the Box under Preview. 22. To see a TFR on a Sectional map Select /Click on “view graphic”. This will Allow you to see what the TFR will look like. NES Power point presentation by Julie_Stewart@blm.gov on 10/29/09
Preview of TFR NES Power point presentation by Julie_Stewart@blm.gov on 10/29/09
What am I looking at? NES Power point presentation by Julie_Stewart@blm.gov on 10/29/09 You actually are looking at two circles. One is red and the other is blue. Each circle represents the area closed by either the description of the navaid by distance or the latitude/longitude. The FAA accepts a certain distance between the two circles. If the distance is too far, NES will give a suggestion as to how to fix either the latitude/longitude or bearing/distance.
If you wish to save this graphic! • You may choose at this time to send the graphic to the requesting unit to verify the position of the TFR. You can do a screen capture and send the .jpg to the requesting unit if you have doubts about the location. You will not have a chance to save this graphic after it is submitted. NES Power point presentation by Julie_Stewart@blm.gov on 10/29/09
23. Click on “Save Circle” to save the Circle TFR information. NES Power point presentation by Julie_Stewart@blm.gov on 10/29/09
Alternate way to describe TFR is by using a Nav Aid Bearing and Distance. a. Select or click on the grey bar “Define by Navigation Aid”. NES Power point presentation by Julie_Stewart@blm.gov on 10/29/09
b. Enter a bearing and distance from the closest Nav Aid Then Click on the highlighted latitude/longitude and it will populate the description box. NES Power point presentation by Julie_Stewart@blm.gov on 10/29/09
The dimensions of the TFR will appear in the Box Under the words “Affected Area”. 24. Type in Altitude from TFR request form and Select MSL. All wildland fires are in MSL. FAA will not convert for you. NES Power point presentation by Julie_Stewart@blm.gov on 10/29/09
25. Type in the TFR Coordinating Unit This will be published in the TFR NOTAM. It could be the local GACC or Dispatch Center for the Incident depending on your local policy. Do not use Acronyms or 3 letter/4 letter codes. Type the full name of the unit for example “Puget Sound Interagency Dispatch Center” NES Power point presentation by Julie_Stewart@blm.gov on 10/29/09
26. Type in the GACC or Dispatch Center Phone number – This will be published in the TFR NOTAM. Needs to be a 24 hour a day contact number if your TFR is for 24 hours a day. Do not use 1-800 phone numbers. Use the FAA format and dashes. NES Power point presentation by Julie_Stewart@blm.gov on 10/29/09
27. “Authors” Comments Box: This information is not published in the NOTAM but is shared internally between FAA offices and the person inputting the TFR into NES. Suggest putting your name and phone number as point of contact so the ARTCC can call you if they have any questions. Additional useful information is the impacted MTR’s route name and segments and SUA’s. For example – “Affects IR345 Segments B-J and the Goose MOA” which can be provided from IAMS/CAHIS. You may add comments such as the Resource Order Number and Request Number for the TFR request. NES Power point presentation by Julie_Stewart@blm.gov on 10/29/09
28. USNOF Reserved for use only by the US Notam Office. NES Power point presentation by Julie_Stewart@blm.gov on 10/29/09
29. Preview Button, To review TFR before submitting to ARTCC. Print and attach to the TFR resource order. This is your ONLY chance to preview both the TFR AND GRAPHIC before it is submitted. Once submitted, you will not be able to see the graphic anymore. 31. Click on Save Button to save TFR information. 30. Click on “Submit to Approver” to Submit Draft TFR to ARTCC 32. Delete Button, Delete all TFR information if necessary. NES Power point presentation by Julie_Stewart@blm.gov on 10/29/09
What if it won’t go through? Look for the RED ERROR messages and make your corrections. NES Power point presentation by Julie_Stewart@blm.gov on 10/29/09
Now is the time to make your phone call !! NES Power point presentation by Julie_Stewart@blm.gov on 10/29/09 Place a call to your ARTCC Air Route Traffic Control Center Also known as ATC Such as “L.A. Center” or “Seattle Center”
Preview of TFR Draft NOTAM a. Work Number automatically assigned by Software. b. “Return to Draft” Button brings you back to Draft TFR work page. c. TFRMAP Button produces a preview graphic map d. Print Button allows you to print the TFR draft information for documentation. NES Power point presentation by Julie_Stewart@blm.gov on 10/29/09
Work Lists • Once the Draft TFR is saved and /or submitted to the ARTCC, the DRAFT moves to the work list. Work List can be accessed by Selecting/Clicking on Work List. 2. The work List allows you to follow the approval process of the TFR. (You have to refresh the screen to view the TFR process). First you will see the ARTCCFour letter code show up under approver. Their initials will show up after The TFR is sent to the USNOF (US Notam Office) and the draft will drop To the next screen. After a screening process by the USNOF, the draft will drop to the “Drafts Pending entry into the USNS. When the draft disappears from the work list, you may to go To DINS on the internet and locate your TFR. NES Power point presentation by Julie_Stewart@blm.gov on 10/29/09
4. NOTAM List show the status of your TFR and the NOTAM number for the TFR 3. The ARTCC ID will show up when the Center has “picked up” the TFR on NES – if it’s not there, they have not done any action and you should call them….. NES Power point presentation by Julie_Stewart@blm.gov on 10/29/09
The TFR at this point is being processed by Seattle Center NES Power point presentation by Julie_Stewart@blm.gov on 10/29/09