點選 Teach Board 制作生產程式 .
點選 Teach Board 制作生產程式. 一、 Teach Board 重做新程式. Board Parameters. 基板 (PCB) 參數設定. X size 228.600. (PCB) 基板 X 軸方向長度. Board Parameters. Y size 406.400. (PCB) 基板 Y 軸方向寬度. Thickness 1.570. (PCB) 基板厚度. 二、 選擇 Board Parameters 進入 PCB 參數設定. Hardware Required: Board.
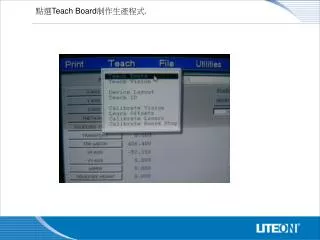

點選 Teach Board 制作生產程式 .
E N D
Presentation Transcript
Board Parameters 基板(PCB)參數設定 X size 228.600 (PCB)基板X軸方向長度 Board Parameters Y size 406.400 (PCB)基板Y軸方向寬度 Thickness 1.570 (PCB)基板厚度 二、選擇Board Parameters 進入PCB參數設定 Hardware Required: Board
三、選擇Teach Boardstops進入基板停止位置參數設定 Teach Boardstops Hardware Required: , Stencil , Tactile
四、選擇Stencil進入測鋼板高度參數設定 。 Hardware Required: Stencil Board , Stencil , Tactile , Please install a stencil now. The FRAME CLAMPS will activate when you press NEXT. Press NEXT to Continue, or EXIT to Quit. Please install a stencil now. (請現在放入鋼板) The FRAME CLAMPS will activate when (按NEXT後,啟動鎖住鋼板) you press NEXT. Press NEXT to Continue, or EXIT to Quit. (按NEXT繼續, 按EXIT離開)
五、選擇Squeegee進入測刮刀高度與刮刀行程參數設定五、選擇Squeegee進入測刮刀高度與刮刀行程參數設定 Hardware Required: Squeegee Squeegee Blades , Stencil , Tactile This Utility will set the SQUEEGEE height. Press NEXT to Continue, or EXIT to quit. This Utility will set the SQUEEGEE height.(使用測刮刀高度) Press NEXT to Continue, or EXIT to quit. (按NEXT繼續, 按EXIT離開)
Squeegee Board Parameters 刮刀設定參數 基板(PCB)參數設定 Total Force 5.4 Snap off 0.000 PCB與鋼板之間隙(數字越大,間隙越大) 刮刀向下壓力[(刮刀長度X1.2)/2.2] Down Stop 1.905 Tooling Type Unier. Dedicat. 刮刀碰到鋼板後再向下壓之距離 治具不使用治具 使用治具 Print Speed 25 刮刀印刷行程之速度 六、選擇Print Parameters進入印刷參數設定 Hardware Required: Print Parameters None Press Done when finished. (按Done完成) Press Done when finished. (按Done完成)
Slow Snop off 慢速脫模參數設定 Enabled No Yes 不使用慢速脫模 使用慢速脫模 Down Delay 0.00 脫離鋼板前延遲時間 Distance 1.570 慢速脫模之距離 Speed 1 2 3 4 5 6 慢速脫模速度1脫模速度5mil/s 2脫模速度10mil/s 3脫模速度15mil/s 4脫模速度20mil/s 5脫模速度25mil/s 6脫模速度30mil/s 七、輸入印刷參數 Press Done when finished. (按Done完成)
八、 TEACH is now complete. (程式現在設定完成) Press SELECT to save now, or(按SELECT現在存入檔案) Press NEXT to continue. (按NEXT繼續回主畫面
九、輸入程式名稱並保存 Press NEXT to continue. (按NEXT繼續,回主畫面)
十、點選Teach Vision做一片PCB新程式的Mark點 about to enter VISION TEACH operation. Press NEXT to Continue, or EXIT to Quit. about to enter VISION TEACH operation. (即將進入視覺系統設定操作) Press NEXT to Continue, or EXIT to Quit. (按NEXT繼續, 按EXIT離開 你按NEXT之後,出現下列訊息: Place a board on input track. Press NEXT to Continue, or EXIT to Quit. Place a board on input track. (請將基板放到軌道輸入端) Press NEXT to Continue, or EXIT to Quit. (按NEXT繼續, 按EXIT離開)
十一、制作Mark 你按NEXT之後,出現下列訊息: ADD or DELETE targets to change the(新增或刪除,所指Mark點位置或變更目 current vision layout.前Mark點位置) Press EXIT when you are FINISHED. (當你已完成Teach vision按EXIT)
十三、Mark點的制作 你按ADD之後,出現下列訊息: Are you training synthetic fiducials? (你要選擇自設Mark點嗎?) SELECT for YES, NEXT for NO (按SELECT要;按NEXT不要) Are you training synthetic fiducials? SELECT for YES, NEXT for NO 按NEXT之後,出現下列視窗:
十四、Mark點的制作 按SELECT之後,出現下列視窗: JOG to Board Target(移動到PC板上Mark點) Press NEXT for contrast ON, EXIT to finish. (按NEXT調整對比,按EXIT完成)
十五、Mark點的制作 按EXIT之後,出現下列視窗: 按SELECT完成後,會出現做第二個Mark點的訊息 ※當做完第一個Mark點時,如果第二點與第一點形狀大小,都不一樣時 按SELECT;如果第二點與第一點形狀大小,都一樣時按NEXT,此訊息主要是減少定義搜尋範圍框時間) Press SELECT for Multi Model Teach or Press NEXT for Single Model Teach.
十六、Mark點的制作 按SELECT全部做完後,出現下列PC板上Mark點視窗: ADD or DELETE targets to change the(新增或刪除,所指Mark點位置或變更目 current vision layout.前Mark點位置) Press EXIT when you are FINISHED. (當你已完成Teach vision按EXIT)
十七、保存生產程式 輸入程式名稱