Download
1 / 33
340 likes | 396 Vues
Learn how to build and run the WRF model for Hurricane Sandy simulation with COAWST, including steps for Geogrid and Ungrib. User manual for reference.

E N D
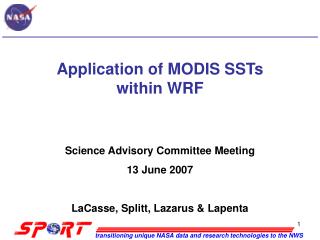
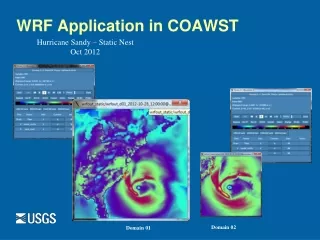
WRF Application in COAWST Hurricane Sandy – Static Nest Oct 2012 Domain 02 Domain 01
COAWST User Manual We use H Sandy application as an example for Chapter 8.
WRF Application: Hurricane Sandy • Main Steps: • Build WRF • Build WPS • Geogrid • Ungrib • Metgrid • Real.exe • Run wrf.exe [coawst.exe] • Visualize Output
1) Build WRF - sandy.h comments commands - Determine an application name, let's use SANDY - Therefore, the header file needs to be named: sandy.h - Create a file called sandy.h and add #define WRF_MODEL. - save the file in a folder, let's use Projects/Sandy
1) Build WRF - coawst.bash very complicated to allow flexibility, but just need to change a few key things. App name root dir to base other names on where are your project files where is the source code
1) Build WRF - coawst.bash very complicated to allow flexibility, but just need to change a few key things. where is the *.h file where *exe is placed Build dir
1) Build WRF – command prompt cd to where the coawst.bash file is located. at the command prompt type: ./coawst.bash follow the WRF prompts…. 3 – pick what is on your system ! When coupled: Always use dmpar (=distributed mem parallel). Do not use smpar (= shared mem parallel). 1 – basic nesting
1) Build WRF – coawstM = wrf.exe finished compiling WRF ls -ltr shows coawstM points to wrf.exe
2) Build WPS cd to WPS ./configure https://github.com/wrf-model/WPS The Grib Edition 2 compression requires three libraries external to the WPS source code: zlib, png, and jasper. It is recommended that users request support from their system administrators when installing these packages. Users can compile the code without these libraries by selecting the "NO GRIB2" options in the build. Select your compiler option
2) Build WPS ./compile When done, do an ls –ltr And see geogrid.exe, ungrib.exe, and metgrid.exe
3) Geogrid create a grid WPS/namelist.wps Set the &share and &geogrid options
3) Geogrid create a grid Get the geogrid data from this page: http://www2.mmm.ucar.edu/wrf/users/download/get_sources_wps_geog.html We chose the geog_high_res_mandatory.tar.gz. Copy this file to a directory and untar the file tar -xvf geog_high_res_mandatory.tar.gz Set the geog_data_path in the namelist.wps file to this directory.
3) Geogrid create a grid Link the Geogrid Table. > ls –ltr WPS/geogrid/*.TBL should return > geogrid/GEOGRID.TBL -> GEOGRID.TBL.ARW 3d) run geogrid >WPS ./geogrid.exe and get back a complete successful information. Geogrid Table
3) Geogrid create a grid Run geogrid >WPS ./geogrid.exe and get back a complete successful information. ls –ltr should show geo_em.d01.nc and geo_em.d02.nc files. Use ncview or some other viewer to check it out. Also look in geogrid.log.
4) Ungrib: convert grb to wps format NAM Data Get grib data for initial and boundary conditions. You can start here: http://www2.mmm.ucar.edu/wrf/users/download/free_data.html We used NAM 12 km data
4) Ungrib: convert grb to wps format NAM Data Put the grib data in a folder cd WPS link the NAM files to common names that WPS will recognize. > ./link_grid.csh /WPS/path_the _files_are_in/2012*.tm00 Do an ls -ltr and see all the GRIBFILE.AAA etc ….linking to all the nam data files
4) Ungrib: convert grb to wps format NAM Data link a Vtable to the NAM data with: >ln –sf ungrib/Variable_Tables/Vtable.NAM Vtable Run ungrib > ./ungrib.exe >& ungrib.out & Edit the .out file and see if there were any problems. do an ls and see files: NAM:2012-10-29_00 … NAM:2012-10-30_06
4) Ungrib: convert grb to wps format SST Data Go here for SST data: ftp://polar.ncep.noaa.gov/pub/history/sst for the times that you want, and put into a folder. We used: rtg_high_res/ rtg_sst_grb_hr_0.083.201210.gz and rtg_sst_grb_hr_0.083.201211.gz cd WPS remove links to nam gribfiles using rm GRIBFILE* Then link to the sst data using ./link_grib.csh path_the _files_are_in/rtg_sst_grb_hr*
4) Ungrib: convert grb to wps format SST Data link a Vtable using ln -sf ungrib/Variable_Tables/Vtable.SST Vtable WPS/namelist.wps and change &ungrib prefix = ‘NAM’ to prefix = ‘RTG’ Run ungrib for the SST data ./ungrib.exe >& ungrib_sst.out & edit the .out file and see that all went well. do an ls and see files: RTG:2012-10-28_00 up to RTG:2012-10-31_00
5) Metgrid: interp met data to grid > ls –ltr WPS/metgrid should show METGRID.TBL -> METGRID.TBL.ARW edit WPS/namelist.wps and change the fg_name to fg_name = ‘NAM’, ‘RTG’ run metgrid in WPS/ run ./metgrid.exe As it runs you see …. processing NAM, RTG, … When done check that the met files were made. Do an ls –ltr and see the met_em.d01** files. met_em.d01.2012-10-28_12:00:00.nc … met_em.d01.2012-10-30_12:00:00.nc met_em.d02.2012-10-28_12:00:00.nc … met_em.d02.2012-10-30_12:00:00.nc
6) real.exe to create Init and BC files. cd WRF/test/em_real edit the namelist.input Grid I set to = 1x1 serial
6) real.exe to create Init and BC files. cd WRF/test/em_real edit the namelist.input
6) real.exe to create Init and BC files. cd to WRF/test/em_real and link the met files to here. > ln –sf /raid1/jcwarner/Models/WRF/WPS/met_em.d01.2003-09* . run the real program run ./real.exe When done, check to see that it made wrfinput _d01 _d02, wrfbdy _d01, and wrflowinp _d01 _d02 netcdf files. wrflowinp_d01 wrfinput_d01
7) Run WRF wrf.exe [coawst.exe] Now we are ready to run WRF. We already compiled wrf back in step 1. coawstM points to wrf.exe This is the only time you will get a wrf.exe. All other builds I don’t let wrf.exe to be created. But you always should get a coawstM . Always point to coawstM.
7) Run WRF wrf.exe [coawst.exe] place all of your files at the root dir (upper level dir). The files are: - namelist.input - wrfbdy_d01 - wrflowinp_d01 - wrfinput_d01 - wrflowinp_d02 - wrfinput_d02
7) Run WRF wrf.exe [coawst.exe] edit namelist.input and set tiling: nproc_x = ____ nproc_y = ____
7) Run WRF wrf.exe [coawst.exe] - set your run time commands a) point to ./coawstM b) np = nproc_x*nproc_y from last slide - at command prompt we use ./run_nemo
8) Output SST PSFC You should get these 2 files
WRF Moving nest The last example we compiled WRF application for a parent and a static nest. We now look at creating a moving nest. The moving nest will start at the same location as the static nest. This may or may not be the best choice for your application. But this is just a test case to demonstrate the procedure. Parent Child
Build WRF – command prompt cd to where the coawst.bash file is located. at the command prompt type: ./coawst.bash follow the WRF prompts…. 15 – pick what is on your system ! Always use dmpar (=distributed mem parallel). Do not use smpar (= shapred mem parallel). 3 – vortex following
Edit namelist.input change to .true, .false. change to wrflow_d01 change to 360, 0 You can ignore 3rd column because we set max dom = 2
run wrf and output Run wrf as before (point to coawstM) Output for d02 should now move !! Moving nest Static nest