Download
1 / 43
430 likes | 457 Vues
Learn the necessary precautions and procedures for transporting highly contagious patients using ISOPOD, a specialized isolation chamber. Includes step-by-step instructions and safety guidelines.

E N D
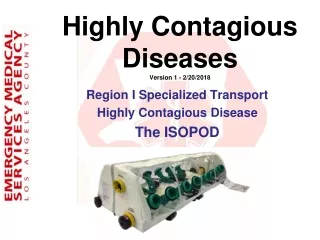
Highly Contagious DiseasesVersion 1 - 2/20/2018 Region I Specialized Transport Highly Contagious Disease The ISOPOD
Definitions • Highly contagious disease – a disease that spreads rapidly from person to person • HOW it spreads may be known or unknown • Southern California Regional Highly Contagious Disease Treatment Centers: • UCLA Ronald Reagan Medical Center • Kaiser Medical Center Los Angeles • Cedars Sinai Medical Center (also FEMA Region IX Biocontainment Center) • Highly Contagious patient MIGHT need to be transported: • From home to hospital • Between hospitals • Airport to hospital
All Transports will be Prearranged • Patients will ride in specific pre-designated ambulance vehicles • EMS care providers will wear full filtered air PPE • Patients may be transported in a Negative Pressure Individual Isolation System • The ISO-POD
General Protective Equipment for YOU • Respiratory protection • Suit • Gloves • Durable foot covers
Between You and the Patient • The Protection That You Will Be Provided With: Sentinel XL™ Clear Hood PAPR System NOTE: Use of this PPE is covered in a separate presentation
How It Works • The ISO-POD is an isolation chamber for the patient • Room air is drawn into the pod • Exhaust air is filtered • Negative pressure maintained
How It Works • Outside air is drawn in through HEPA filters • Air flows through the pod - over patient
How It Works • Patient is ‘sealed’ in negative pressure environment • Outside air is drawn IN through HEPA filters . . .
How It Works • Exhaust air (contaminated) is passed OUTSIDE through special filters • Located inside the pod • All contaminated air is kept near patient until filtered
How It Works • All Exhaled air is passed through HE/OV/AG filters • High Efficiency • Organic Vapor • Acid Gas
How It Works • Clean FILTERED AIR is exhausted at blower motor
How It Seals • Blower motor draws huge quantity of air INTO and through the pod • Pressure inside pod is less than outside
How It Seals • Blower motor draws huge quantity of air INTO the pod area • Inside air does not escape • Patient is not in a vacuum • Patient is NOT hermetically sealed
How It Seals • Contaminated inside air does not escape • Closed service ports exist • O2? • IV?
Placing Patient into ISO-POD • GOAL: Do not allow contaminates (body fluids) on outside of ISO-POD • Patient might be have significant drainage • Patient might be unable to assist with movement
Placing Patient into ISO-POD Open zipper entire length
Placing Patient into ISO-POD • Remove spine rods • Separate rib arches
Placing Patient into ISO-POD • Roll/push down vinyl closest side to patient Note: HEAD end & FOOT end
Placing Patient into ISO-POD • Roll down vinyl side closest to patient • Move (slide/lift) patient into ISO-POD
Placing Patient into ISO-POD • Move (slide/lift) patient into ISO-POD
Placing Patient into ISO-POD • Move (slide/lift) patient into ISO-POD
Placing Patient into ISO-POD • Move (slide/lift) patient into ISO-POD
Placing Patient into ISO-POD • Attach, place and secure RIBS and SPINE RODS
Placing Patient into ISO-POD • Attach, place and secure patient care accessories • Oxygen, IV, catheter, ECG monitor wires, B/P cuff • Thread through service port
Placing Patient into ISO-POD • Use of internal patient restraints (arm & chest) will require MD order and specific monitoring
Placing Patient into ISO-POD • Turn on blower
Placing Patient into ISO-POD • Close zipper
Life INSIDE the ISO-POD • Patient is now ‘sealed’ inside a confined space . . . CANNOT OPEN ISOPOD FROM INSIDE– MUST ENSURE BLOWER OPERATION TO PREVENT INJURY OR DEATH • Patient is isolated from human contact . .
Life INSIDE the ISO-POD • Patient movement is restricted . . . • Risk of claustrophobia and panic is high • Discuss use of anti anxiolytic medications with MD
Life INSIDE the ISO-POD • ISO-POD does not heat or cool inside air • Radiant energy (sunlight) can heat interior space • Patient’s body heat (fever?) can increase interior temperature • Observe for signs & symptoms of warming • Sweating, warm skin, c/o feeling hot • Fogging inside of ISO-POD may indicate lack of air flow • Weak battery, inoperative filters, 3-way valve not set properly
Life INSIDE the ISO-POD • ISO-POD blower battery must be fully charged. • ISO-POD blower battery can operate 6-8 hours on full charge. • ISO-POD blower battery can be plugged in to charging source during transport, but only if it was fully charged to begin. • I.E. using a partially charged ISO-POD blower battery, even if it is plugged in during transport may result in injury or death to patient.
Treatment INSIDE the ISO-POD? • Only limited treatment is even possible • IV insertions are unlikely • Needles are dangerous • Use of BVM very difficult • CPR compressions are impossible • Expensive Equipment might need to be destroyed
After The Transport • ISO-POD is designed to be reusable . . . • Will it be??? • Remove patient • Roll ISO-POD - Place in red bag
ISO-POD Set Up • ISO-POD should remain set up and stored inside the pre-designated specialized ambulance
ISO-POD Set Up • For comprehensive assembly instructions see the ISO-POD operator’s manual with every unit. This presentation does not cover hose/blower/valve assembly.
ISO-POD Set Up • Unroll ISO-POD • Insert head board • Fits in short pocket
ISO-POD Set Up • Insert (optional) backboard • Fits into longer pocket • Gives strength if ISO-POD is moved without gurney support
ISO-POD Set Up • Attach pod to gurney • Straps found on bottom
ISO-POD Set Up • Install inner and outer filters
ISO-POD Set Up • Connect arched rib supports • Attach round spine supports
ISO-POD Set Up • Connect hoses to pod and blower • Examine position of 3-way valve
ISO-POD Set Up • Test blower for function
ISO-POD Set Up • Zip pod closed until needed