Download
1 / 4
40 likes | 134 Vues
Create a portable referee light box with this DIY kit for sports events. Includes instructions and list of electric parts needed. Perfect for soccer, football, or any sport event.

E N D
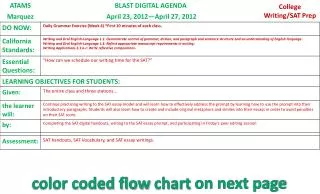
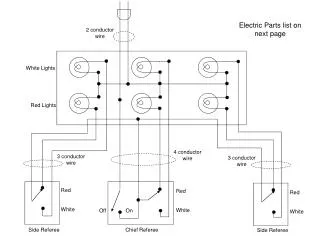
2 conductor wire White Lights Red Lights 4 conductor wire 3 conductor wire 3 conductor wire Red White Red White Red White Off On Side Referee Chief Referee Side Referee Electric Parts list on next page
Electric Parts list • 6 – 40 watt bulbs • 6 - sockets • 3 – single pole, double throw switches (SPDT - commonly called a 3-way switch) to select Red/White light • 1 – On/Off switch (SPST) for the chief referee’s Master On/Off switch • 100 ft - 3 conductor wire – wiring for the side referee’s switches (a 3-wire extension cord will work and is usually less expensive than buying wire by the foot) • 50 ft - 4 conductor wire – for the chief referee’s switches (see the link below) • http://shop.easternmarine.com/index.cfm?fuseaction=catalog.prodInfo&productID=8055&categoryID=209 • 10 ft - 2 conductor wire – power cord for the light set (an extension cord will work here too) • You will need some type of electric boxes for the switches and a stand or display for the lights. I made a box with translucent red and white plastic panels over the lights so I wouldn’t have to find red light bulbs. • http://www.professionalplastics.com/PLEXIGLASS-ACRYLICSHEET-EXTRUDED • The switches, light sockets, bulbs, 2 and 3 conductor wire should all be available at your local hardware or home improvement store – they are inexpensive and easy to replace. The only hard thing to find is the 4 conductor wire (I provided a link to something that should work on the web). Any electrician or competent do-it-yourselfer should be able to follow the schematic and do the wiring. • This system conforms to the IPF rules – all the lights come on at the same.
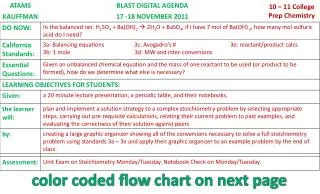
Light box – closed. A yardstick is placed in front of the box to show scale (it’s about 2 ft x 3 ft x 6 in when closed. The closed box stores all the cords & switches and protects the plastic light covers. There are plastic panels on both sides so you can see the lights from both sides of the display.
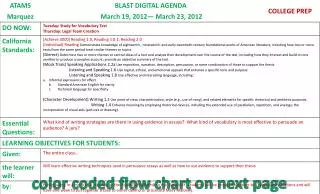
The section with the lights swings out and up then is secured with wing-nuts. A crosspiece at the bottom rotates 90-degrees and is tightened with a wing nut for stability – then close the cover to hide the wires. It’s about 5-feet tall.