Download
1 / 21

E N D
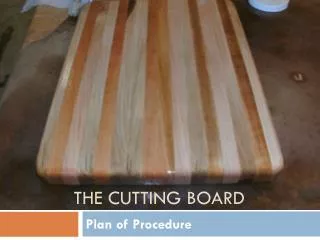
The Cutting Board Plan of Procedure
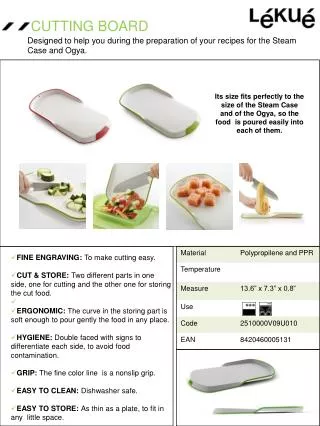
You need to create a blueprint to start. This is to give you the general idea of what the cutting board will look like and help you lay out a pattern for your cutting board. Please ask Mr. Shearer to use a cutting board as a reference to help you in your creation. Your blueprint should look similar to the above one, except for the isometric view (pink picture) is not needed. It should include the top, front, and right side views with dimensions for the size. The size of your cutting board is 18” x 12” x 1-1/4”. It can be made from three different types of hardwood; Cherry, Maple, and Ash. Whether you choose to use one or all of them, you need to have the colors documented on your blueprint. In the above photo, the pink is the Cherry, and the Brown is the Maple. Ash is a yellowish color. Be sure to also note that the pattern is symmetrical starting from the center and going out. See Mr. Shearer for a demonstration if you have questions! PA Standard: 3.4.10.D1: Refine a design by using prototypes and modeling to ensure quality, efficiency, and productivity of a final product Step #1: Blueprint
Previous Steps: Step:1 – Blueprint What steps do you think you need to take to get a cutting board from a rough cut piece of lumber and onto the store shelves? In this step, I want you to document the process you think it will take. Be sure to keep in mind how to square a board. Your plans do not have to go into great detail. The main purpose of this is to get you thinking about the process of taking a product from square one to finish. Once you have created a plan of procedure and a blueprint, show Mr. Shearer. I will give you my plan of procedure that I want you to follow. Compare it to yours. How close were you? Be sure to keep all the paperwork so it can be handed in for a grade, as it is part of your rubric. PA Standard: 3.4.10.C1: Apply the components of the technological design process. Step #2: Plan of Procedure
Previous Steps: • Step:1 – Blueprint • Step:2 – Plan of Procedure For this step you should partner up with somebody. You will use the miter saw to cross cut the material down to a more manageable size. In the photo above, you will see the three boards that were already cut down to 40 inch lengths. Each person will get half of each board. If a board is 6 inches wide, and the next step we are ripping them into 1-1/2 inch “sticks,” how many “sticks” will you get out of each board for each person? How many boards do you need to chop down to 40” lengths so each person has enough materials? These are some questions that you will need to ask yourself and figure out! **Safety test must be passed before you can run this machine** PA Standard: 3.4.10.C1: Apply the components of the technological design process. Step #3: Cut Lumber
Previous Steps: • Step:1 – Blueprint • Step:2 – Plan of Procedure • Step:3 – Cut Lumber In this step you will plane the boards down. You have two sizes that you should try to hit. The first one is 7/8 and the other one is 3/4. Depending on how your boards clean up will determine your finish thickness size. Make sure you are planing both sides to get the board faces parallel and start with the “mountain” side up to keep the board from rocking. Plane all the boards together and keep the thickness’ the same. Make sure you start with the thickest board and only take 1/16” in a pass (1/4 turn on the dial). *Safety test must be passed before you can run this machine** PA Standard: 3.4.10.C1: Apply the components of the technological design process. Step #4: Plane Boards
Previous Steps: • Step:1 – Blueprint • Step:2 – Plan of Procedure • Step:3 – Cut Lumber • Step:4 – Plane Boards In this step you will joint the best edge of each board. Since the planer planed the boards faces down parallel, this step will give us one perpendicular edge. Be sure to keep your fingers rolled up and away from the guard! Knuckles and thumbs out only, unlike the guy in this picture! **Safety test must be passed before you can run this machine** PA Standard: 3.4.10.C1: Apply the components of the technological design process. Step #5: Joint Edge
Previous Steps: • Step:1 – Blueprint • Step:2 – Plan of Procedure • Step:3 – Cut Lumber • Step:4 – Plane Boards • Step:5 – Joint Boards On this step you will rip cut the boards to 1-1/2 inches wide. This will serve as the thickness for your cutting boards. Make sure you have a long push stick ready that is no bigger than a 1” x 1” board and has a “V” cut in it so you can push the boards easily. This will keep your push stick and your hands in a safe zone! The small orange push sticks will NOT work! The piece on the left is a cut piece and the one on the right is the board ready to be cut. **Safety test must be passed before you can run this machine** PA Standard: 3.4.10.C1: Apply the components of the technological design process. Step #6: Rip Boards
Previous Steps: • Step:1 – Blueprint • Step:2 – Plan of Procedure • Step:3 – Cut Lumber • Step:4 – Plane Boards • Step:5 – Joint Boards • Step:6 – Rip Boards Much like you did previously when you started by cutting the boards to 40 inches, you will cross cut your “sticks” in half to 20 inches on the miter saw. This is where you and your partner can start doing individual work. Keep in mind he 20 inches is still a rough size number, as the cutting boards will finish at 18 inches. **Safety test must be passed before you can run this machine** PA Standard: 3.4.10.C1: Apply the components of the technological design process. Step #7: Miter Length
Previous Steps: • Step:1 – Blueprint • Step:2 – Plan of Procedure • Step:3 – Cut Lumber • Step:4 – Plane Boards • Step:5 – Joint Boards • Step:6 – Rip Boards • Step:7 – Miter Length This is one of the most critical stages. Inspect all the sides of the boards visually and mark them. Circle with a pen any pits, holes, roughed cut edges, knots, imperfections, and etc… Keep in mind that the top and bottom of the cutting board will be planed down, the ends will be cut, and faces of the “sticks” will be glued together. So, if they are minor, they can all go onto the bottom of side of your cutting board, where food will not gather in them on the end to get chopped off, or on the inside. The key is to keep them all on the same side! When you are done, refer back to the blueprint you made for your board layout. Make sure your board layout is symmetrical. It is easiest if you start in the center first and work your way out. Keep building your pattern out until you are around 12 inches. PA Standard: 3.4.10.C1: Apply the components of the technological design process. Step #8: Inspect Boards
Previous Steps: • Step:1 – Blueprint • Step:2 – Plan of Procedure • Step:3 – Cut Lumber • Step:4 – Plane Boards • Step:5 – Joint Boards • Step:6 – Rip Boards • Step:7 – Miter Length • Step:8 – Inspect/Layout In this step you will glue the boards. There are a few important things you should do on this step. One is to have three clamps ready. Also, have two “dummy boards on each clamp so the clamp marks will go onto them instead of your boards! When you glue, lay the boards down flat like a plate on the clamps and all together. Glue corner to corner and side to side, while being sure not to have a dry spot! Any air gaps where there is no glue is a chance for food to slip into a crack where you will get food poisoning. After they are all glued, roll the boards all the same direction and together. Make sure all the imperfections are still on the same side! Use two clamps under and one over, slowly tightening alternatively until all are tight. Do not smear the glue that comes out of the cracks. **Get a glue Demo for this step!** PA Standard: 3.4.10.C1: Apply the components of the technological design process. Step #9: Glue Boards
Previous Steps: • Step:1 – Blueprint • Step:2 – Plan of Procedure • Step:3 – Cut Lumber • Step:4 – Plane Boards • Step:5 – Joint Boards • Step:6 – Rip Boards • Step:7 – Miter Length • Step:8 – Inspect/Layout • Step:9 – Glue Boards In this step you will scrape off all the glue on both sides. There must be no glue or spots from the clamps as the glue is VERY hard and will chip the blades on the planer, which it is the next step! PA Standard: 3.4.10.C1: Apply the components of the technological design process. Step #10: Scrape Boards
Previous Steps: • Step:1 – Blueprint • Step:2 – Plan of Procedure • Step:3 – Cut Lumber • Step:4 – Plane Boards • Step:5 – Joint Boards • Step:6 – Rip Boards • Step:7 – Miter Length • Step:8 – Inspect/Layout • Step:9 – Glue Boards • Step:10 – Scrape Boards **Mr. Shearer will do this step for you!** In this step you will plane the boards downto size. You will put the flattest side down first and then flip flop it through the planer to remove any imperfections. **Mr. Shearer will do this step for you!** PA Standard: 3.4.10.C1: Apply the components of the technological design process. Step #11: Plane Boards
Previous Steps: • Step:1 – Blueprint • Step:2 – Plan of Procedure • Step:3 – Cut Lumber • Step:4 – Plane Boards • Step:5 – Joint Boards • Step:6 – Rip Boards • Step:7 – Miter Length • Step:8 – Inspect/Layout • Step:9 – Glue Boards • Step:10 – Scrape Boards • Step:11 – Plane Board This step in the process has a few steps. You will start by taking a skim cut on both edges of the edge of the cutting board to remove any waviness from the clamps. You can look and see where you are at for your 12” width and go for a round even number or just leave it as is since size is not critical for this project. **Safety test must be passed before you can run this machine** PA Standard: 3.4.10.C1: Apply the components of the technological design process. Step #12A: Size Board
Previous Steps: • Step:1 – Blueprint • Step:2 – Plan of Procedure • Step:3 – Cut Lumber • Step:4 – Plane Boards • Step:5 – Joint Boards • Step:6 – Rip Boards • Step:7 – Miter Length • Step:8 – Inspect/Layout • Step:9 – Glue Boards • Step:10 – Scrape Boards • Step:11 – Plane Board This the second step in the process for #12. Since you skimmed the sides to remove waviness, you can now use the miter gage on the table saw to cross cut the ends. If you have a bad end, just skim the one end for clean up and remove the excess from the other. Again, since the size of 18 inches is not critical, you can just skim for cleanup at a round number or shoot for the actual blueprint size. **Safety test must be passed before you can run this machine** PA Standard: 3.4.10.C1: Apply the components of the technological design process. Step #12B: Size Board
Previous Steps: • Step:2 – Plan of Procedure • Step:3 – Cut Lumber • Step:4 – Plane Boards • Step:5 – Joint Boards • Step:6 – Rip Boards • Step:7 – Miter Length • Step:8 – Inspect/Layout • Step:9 – Glue Boards • Step:10 – Scrape Boards • Step:11 – Plane Board • Step:12 – Size Board This the second step in the process for #12. Since you skimmed the sides to remove waviness, you can now use the miter gage on the table saw to cross cut the ends. If you have a bad end, just skim the one end for clean up and remove the excess from the other. Again, since the size of 18 inches is not critical, you can just skim for cleanup at a round number or shoot for the actual blueprint size. **Safety test must be passed before you can run this machine** PA Standard: 3.4.10.C1: Apply the components of the technological design process. Step #12B: Cross Cut
Previous Steps: • Step:2 – Plan of Procedure • Step:3 – Cut Lumber • Step:4 – Plane Boards • Step:5 – Joint Boards • Step:6 – Rip Boards • Step:7 – Miter Length • Step:8 – Inspect/Layout • Step:9 – Glue Boards • Step:10 – Scrape Boards • Step:11 – Plane Board • Step:12 – Size Board At this stage, find something round such as a large washer and trace it for each corner. When you are done, take it to the large belt sander and round the corners. **Safety test must be passed before you can run this machine** PA Standard: 3.4.10.C1: Apply the components of the technological design process. Step #13: Radius
Previous Steps: • Step:3 – Cut Lumber • Step:4 – Plane Boards • Step:5 – Joint Boards • Step:6 – Rip Boards • Step:7 – Miter Length • Step:8 – Inspect/Layout • Step:9 – Glue Boards • Step:10 – Scrape Boards • Step:11 – Plane Board • Step:12 – Size Board • Step:13 – Round corners You are down to the final stages now! Find the round over bit on the router and go around both sides of the cutting board. When you are done, start at the low number sand paper, such as 60 or 100 grit and work your way up to 300. Sand all over with the board until it is smooth. You can use the palm sander on the large surface to speed up the sanding. **Safety test must be passed before you can run this machine** PA Standard: 3.4.10.C1: Apply the components of the technological design process. Step #14: Router/Sand
Previous Steps: • Step:4 – Plane Boards • Step:5 – Joint Boards • Step:6 – Rip Boards • Step:7 – Miter Length • Step:8 – Inspect/Layout • Step:9 – Glue Boards • Step:10 – Scrape Boards • Step:11 – Plane Board • Step:12 – Size Board • Step:13 – Round corners • Step:14 – Router/Sand For the feet you will need the drill press, glue, Forstner bit, square and the feet plugs. Use the square to find a decent measurement where a hole would look good for the feet. Do the same for coming off the sides, however, make sure you are in the center of one of your boards and not in between. Create a crosshair/bullseye. Make sure you use these measurements for all four holes. Check to verify that these measurements look okay and then drill down about ¼ inch. Use a small dab of glue in the hole and then plug in the feet. **Safety test must be passed before you can run this machine** PA Standard: 3.4.10.C1: Apply the components of the technological design process. Step #15: Drill Feet
Previous Steps: • Step:5 – Joint Boards • Step:6 – Rip Boards • Step:7 – Miter Length • Step:8 – Inspect/Layout • Step:9 – Glue Boards • Step:10 – Scrape Boards • Step:11 – Plane Board • Step:12 – Size Board • Step:13 – Round corners • Step:14 – Router/Sand • Step:15 – Apply Oil For this steps you will verify one last time to your sand job and then start applying the mineral oil. Start on the feet side first so it can dry when you do the top. For every pass you make acrossed the board, apply a swipe on each end as it will soak up the oil the fastest! Apply a nice even layer and then let it sit. Whenever, a spot dries out, wipe some on from another spot. This step will take several applications and/or days! You need to do this “once a day for a week, once a week for a month, once a month for a year and then yearly after that.” PA Standard: 3.4.10.C1: Apply the components of the technological design process. Step #16: Apply Oil
Ash Ash Cherry Walnut Maple Cherry PA Standard: 3.4.10.C1: Apply the components of the technological design process. Different Looks
Cutting Board Plan of Procedures Dimensions: 18” x 12” x 1-1/4” +/- Materials: Cherry, Maple, Ash about 16 pieces @ 3/4” thick” or 14 pieces @ 7/8” thick 1. SketchBlue Print (3 views: top, front, side) Include your lumber pattern you would desire 2. Create a Plan of Procedure (think about it and try to create your own. Include Cost estimate!) 3. Cross cutboards to 40” long +/- (rough cutto make more manageable) -miter saw 4. Planeboards down to 7/8” (or 3/4” depending on clean up). Plane all materials together for size similarity -planer 5. Jointthe best edge of each board -jointer 6. Rip boards to 1-1/2” wide “sticks” (or 1-3/8”) -table saw **DEMO** 7. Cross cut the “sticks” to 20” long (1/2 for you, 1/2 for your partner) –miter saw 8. Inspect the boards (mark any imperfections, knots, holes, etc!) Mark end of boards with arrow to its side! 9. Lay-out the boards in a pattern on top of 2 claps and have a 3rd clamp ready. Make sure to keep the imperfections on the same side! Make sure you have a “dummy board to absorb clamp marks! Roll the boards onto their side and glue corner to corner and side to side! Leave nothing dry! Roll boards back together and clamp snugging 2 bottom clamps then upper, bottom, upper etc… **DEMO** 10. ScrapeALL the glue off the boards, even the black marks from the clamps. (Glue gets harder than wood and chips the planer blades!) 11. Plane cutting board to 1-1/4” +/- thick -planer 12. Square up the cutting board (all four sides) –table saw 13. Lay-out the corners and round them off –belt sander 14. Routerall the edges (round over bit) -router 15. Sand all over (120 & 220 grit) –palm sander 16. Lay-out holes for feet, drillwith Forstner bit, and install them (make sure hole is all on one board and not between them. About 1-1/4 inches from each edge) –drill press 17. ApplyMineral oil (MULTIPLE COATS!!) **DEMO** (one coat a day for a week, once a week for a month, once a month for a year, as needed) PA Standard: 3.4.10.C1: Apply the components of the technological design process. Review