This Presentation Contains Narration
This Presentation Contains Narration. To hear the narration, turn on your speakers or plug in headphones. If you would like to view this slideshow WITHOUT narration please do the following: Click on the ‘Slide Show’ tab in the ribbon .


This Presentation Contains Narration
E N D
Presentation Transcript
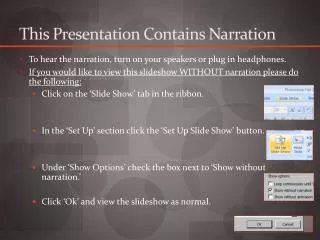
This Presentation Contains Narration • To hear the narration, turn on your speakers or plug in headphones. • If you would like to view this slideshow WITHOUT narration please do the following: • Click on the ‘Slide Show’ tab in the ribbon. • In the ‘Set Up’ section click the ‘Set Up Slide Show’ button. • Under ‘Show Options’ check the box next to ‘Show without narration.’ • Click ‘Ok’ and view the slideshow as normal.
Using Photoshopon PC (Windows) short course SECTION II OFFERED BY INSTRUCTIONAL COMPUTING UNIVERSITY OF MISSOURI – ST.LOUIS
Liquifying Images • After the image has been saved and opened in Photoshop, many changes can be made. • Under Filter -> Liquefy, changes can be made to someone’s face.
Forward Warp Tool, smudges the drawing. Pucker Tool, shrinks selection. Bloat Tool, blows up selection.
Drawing a Background and selecting layers • Make sure you open a new layer each time you want to make a change (Photoshop 1). • Start with the background • For a background of clouds, choose your color and go to Filter -> Render -> Clouds
Inserting part of an image • Once the clouds have been done, using the lasso tools , take part of an image and move it to the clouds. • Now we are going to blend the image with the back ground.
Blending the image in the background • On the right hand – bottom corner of Photoshop, different layers can be selected and edited. • Under Layers, the blending mode can be changed to Luminosity, which will cause the image to blend in the background.
Result • Once you apply the luminosity option it will make the image appear to be part of the background clouds.
Transformation • We can also change the perspective of the image. Have the image you pasted on the clouds selected and go to Edit -> Transform -> Perspective.
Using Transformation Before moving After moving
Applying Transformation • Once you have decided on your transformation. Click on the Checkmark shown on the image to the right.
Pattern Stamp Tool • The pattern stamp tool allows users to paint with a preset pattern or a user defined pattern. • To get to the pattern stamp tool. Right click on the stamp icon shown in the image to the right and select pattern stamp tool.
Creating a user defined pattern • Select the image in which you want to define as your pattern. (We will be using our clouds). • Go to Edit > Define Pattern • A dialog box will prompt asking what to call the pattern.
Our pattern • Once you define the pattern, if you go back to where we select the pattern you will notice our pattern we just defined. You can see it in the image on the right of this slide. • Note: the colors and size may vary for your patterns.
Painting and Drawing • Painting is as easy as choosing a color, selecting a digital paint brush, and dragging the brush over the “canvas” • First, choose a foreground color
Painting and Drawing • Next, you need to choose the type of brush to use • Note that toolbar buttons with arrows lead to more options. Just click and hold the button to see more options
Painting and Drawing • Then, choose the brush options and specify opacity • Opacity specifies how much the background shows through
Painting and Drawing • You can also draw specific shapes in Photoshop, including rectangles, ellipses, polygons and custom shapes • Simply select the shape you want to draw and then draw on the canvas Examples of Custom Shapes
Questions? If any further questions arise, please contact a lab consultant in any of the following Instructional Computing Labs. SSB 103 SSB 452 Benton Hall 232 Math TLC (UC 050) Ward E. Barnes Library Thomas Jefferson Research Commons
Additional Information • http://www.cetc.umsl.edu • The Microcomputer Program at the University of Missouri-St. Louis offers day and evening computer courses as part of the Chancellor's Certificate series. • http://www.umsl.edu/stg • The Online Student Technology Guide has answers to many computing questions. • http://help.umsl.edu • Online self-service solutions for UMSL Technology Issues