Create Your Own Handmade Visual Journal: Step-by-Step Guide
50 likes | 171 Vues
Join us for a creative workshop where you'll craft a unique handmade visual journal! Begin by designing your covers using an old Spanish book, and learn to decorate them with your own crafted papers. We’ll guide you through cutting, gluing, and assembling your journal, complete with eyelets and binder rings for an organized finish. By the end, you’ll have a personalized journal to fill with thoughts and visuals. Bring your imagination and enjoy hands-on creativity!

Create Your Own Handmade Visual Journal: Step-by-Step Guide
E N D
Presentation Transcript
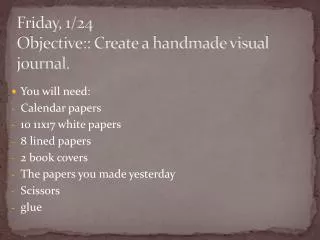
Friday, 1/24Objective:: Create a handmade visual journal. • You will need: • Calendar papers • 10 11x17 white papers • 8 lined papers • 2 book covers • The papers you made yesterday • Scissors • glue
To Do: Create the covers for your journal • You will need: • An old Spanish book • A ruler • X-acto knife • Scissors • Brush • Yes paste • One of your papers from yesterday • Demonstration Highlights: • Cut the front and back covers of the old book with an X-acto knife • Cut two pieces of decorated paper to the size of each cover leaving 1” border all around. • Apply paste to cover and glue your cover. • Glue a white piece of paper on the cover interior.
To Do: Drilling holes • You will need: • A stack of white papers • Paper clips • Ruler • A visit to the drilling station • Demonstration Highlights • Sandwich the white stack of papers in-between the covers. • Hold together with at least three paper clips. • Mark where the holes need to be drilled. • Bring your book to the drilling station for drilling.
To Do: Assembling the book • You will need: • 6 sets of eyelets (each set has one short and one long) • Eyelet setting tool • Three binder rings • Demonstration highlights • Place a set of eyelets into each hole and set them with the tool. • Slide each ring into the holes of the front cover, all the pages and the back cover.
Exit Ticket • Briefly describe how you met today’s goal. • If you have not met today’s goal explain why and come up with a plan to catch up.