Download
1 / 25
250 likes | 398 Vues
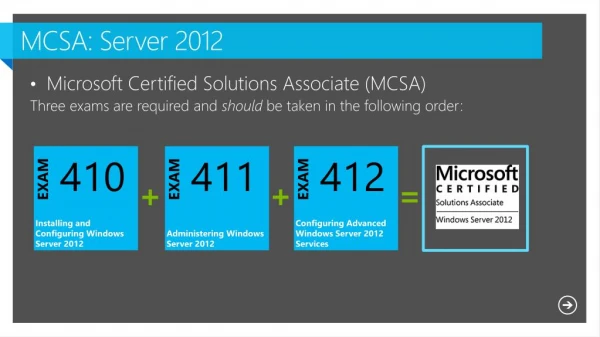
Microsoft ® Word 2010 Training. Create your first Word document II. Course contents. Overview: Moving along in Word Lesson : Includes seven instructional sections Suggested practice tasks Test Quick Reference Card. Overview: Moving along in Word.

E N D
Microsoft® Word 2010 Training Create your first Word document II
Course contents • Overview: Moving along in Word • Lesson: Includes seven instructional sections • Suggested practice tasks • Test • Quick Reference Card Create your first Word document II
Overview: Moving along in Word Welcome to the second installment of the “Create your first Word 2010 document” series for those who are new to Word. In this course, you’ll learn to move around in the document, use formatting marks, move text by using Cut and Paste, and change line spacing and alignment in Word 2010. Create your first Word document II
Course goals • Move around in the document. • Use formatting marks. • Move text around in the document. • Change line spacing and alignment. Create your first Word document II
Moving around in the document The cursor (the vertical line) is at the end of the second paragraph, after the word "assistance." To type anywhere else in the document, you need to move the cursor to that place. Move the cursor to another location by moving the pointer and then clicking, or by using the keyboard. Imagine, in this picture, that you want to type a new sentence in the first paragraph between “civilization” and “During”. Create your first Word document II
Moving around in the document With your mouse, move the cursor just to the left of “During,” and then click to insert the cursor. Then start typing. Or… Press the UP ARROW on your keyboard to move the cursor up one line at a time. Then press the LEFT ARROW to move the cursor left, one character at a time. Move the cursor to another location by moving the pointer and then clicking, or by using the keyboard. Here are a couple of ways to do that: Create your first Word document II
Use the scroll bar The scroll bar. But if your document is getting long, it may not be practical to have to continuously press the arrow keys to move up or down the document. Instead, use the scroll bar. Create your first Word document II
Use the scroll bar Here’s how it works: The scroll bar is on the right side of the window. To use it, click the scroll box, and then drag it up or down to move through a document without moving the cursor. Or click the single scroll arrows at either end of the scroll bar to move up or down. The scroll bar. Create your first Word document II
Go behind the scenes with formatting marks You can see what’s going on in your document by looking at the formatting marks that Word automatically inserts as you type. These marks are always in documents, but they are invisible to you until you display them. Formatting marks in a Word document. Imagine that you have typed a few paragraphs. The paragraphs seem very far apart, and the second paragraph starts farther to the right than the first paragraph. Create your first Word document II
Go behind the scenes with formatting marks Formatting marks in a Word document. For example, a dot appears every time you press the SPACEBAR, such as between words. One dot is one space; two dots are two spaces, and so on. Normally there should be one space between each word. Create your first Word document II
Go behind the scenes with formatting marks Formatting marks in a Word document. Word inserts a paragraph mark ( ) each time you press ENTER to start a new paragraph. In the picture, there are two paragraph marks between the two paragraphs, which means that ENTER was pressed twice. This creates extra space between paragraphs. Create your first Word document II
Go behind the scenes with formatting marks Formatting marks in a Word document. One arrow ( ) appears each time TAB is pressed. In the picture there is one arrow before the first paragraph and two arrows before the second paragraph, so TAB was pressed twice in the second paragraph. Create your first Word document II
Go behind the scenes with formatting marks Formatting marks in a Word document. To see formatting marks, go to the ribbon, at the top of the window. On the Home tab, in the Paragraph group, click the Show/Hide button ( ). Click the button again to hide formatting marks. Create your first Word document II
Move text by using Cut and Paste For instance, in the first paragraph, you decide that the fourth sentence should be the last sentence in the paragraph. Don’t delete and retype – use Cut and Paste. What if you need to move some text around in the document? You don’t need to delete it and type it again where you want it. Instead, just use Cut and Paste. Create your first Word document II
Move text by using Cut and Paste Don’t delete and retype – use Cut and Paste. Select the sentence you want to move, as shown in the picture. Move the cursor to the end of the paragraph, where you want the sentence to appear (after the dot formatting mark). On the ribbon, on the Home tab, Click Cut ( ). On the Home tab, in the Clipboard group, click Paste( ). Create your first Word document II
Undo! On the Quick Access Toolbar at the very top of the window, click the Undo button ( ). The Undo button on the Quick Access Toolbar. You’ve moved the sentence, but now that you look at it, you’re not happy with the change. Fortunately, you don’t have to go through the entire cut-and-paste process again to move the sentence back to its original place. Instead, use Undo. Create your first Word document II
Undo! Click the Undo button again to undo the previous action, which in this case was cutting the sentence from its original location. Now your sentence is back in its original location. The Undo button on the Quick Access Toolbar. This will undo the last action you took, which in this case was pasting the sentence in the new location. Create your first Word document II
Line spacing Changing line spacing in a document. You can adjust how much space is between lines of text. If you’d like more or less space between lines throughout a document, or in a selected area of text, such as in a letter address, it’s easy to change the spacing. Create your first Word document II
Line spacing To change line spacing for a single paragraph, you can just place the cursor inside the text; you don’t have to select the text. Changing line spacing in a document. To change the line spacing for an entire document, you need to select all the text in the document by pressing CTRL+A. Create your first Word document II
Line spacing A check mark in the list tells you what the current line spacing is. Click the new line spacing you want. Changing line spacing in a document. Then, on the Home tab, in the Paragraph group, click Line Spacing( ). Create your first Word document II
Align text left, center, or right Text can be left-aligned, which means the left edge of the text is flush with the left margin; right-aligned; centered; or justified, which means it’s aligned evenly along the left and right margins. The Align buttons. Horizontal alignment determines the appearance and orientation of the edges of the paragraphs. Create your first Word document II
Align text left, center, or right For example, in many documents, titles are centered in the middle of the page. The Align buttons. The most common alignment is left-aligned, but you can change it to whatever you want, for a single paragraph, a set of paragraphs, or the entire document. Create your first Word document II
Align text left, center, or right Select the text that you want to align, or press CTRL+A to select all the text in the document. Then, on the Home tab, in the Paragraph group, click Align Left( ) or Align Right( ), Center( ), or Justify( ). The Align buttons. Create your first Word document II
Suggestions for practice • Move around in the document. • Turn on formatting marks. • Use Cut and Paste to move text, and use Undo. • Change line spacing. • Align text. Online practice (requires Word 2010) Create your first Word document II
Quick Reference Card For a summary of the tasks covered in this course, view the Quick Reference Card. Create your first Word document II