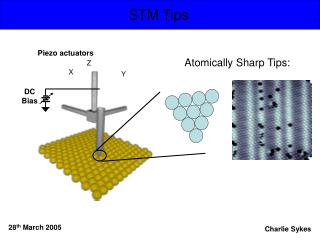
STM
STM. Scanning Tunneling Microscope How to use the STM Developed by Malory M. Peterson, Summer 2006 Nanotechnology Grant National Science Foundation #0532516. Getting Started. Start by connecting the controller up to the computer and opening the EasyScan2 software on the computer.


STM
E N D
Presentation Transcript
STM Scanning Tunneling Microscope How to use the STM Developed by Malory M. Peterson, Summer 2006 Nanotechnology Grant National Science Foundation #0532516
Getting Started • Start by connecting the controller up to the computer and opening the EasyScan2 software on the computer. • Prepare the tip (see “cutting a tip” at the end of this slide show). Using the small forceps, slide the tip under the holding bar and into the groove. • Using the large forceps, place the sample on the holder. Be very careful not to touch the sides of the holder. Hold it only by the black handle. • Place the holder in the cradle and slide the sample as close to the tip as you can get it, WITHOUT touching the tip. • If you touch the tip, the light on the controller will turn red, and this might result in a damaged tip. The same wire can be use for a new tip in most cases.
Approaching the Sample • Once the sample is as close to the tip as you can get it, open the positioning window on the computer. • Place the magnifying glass/cover over the sample. • While watching the tip, press “Advance” and move the sample even closer to the tip. • Once the tip is as close to the sample as you dare go, open the Z-controller window. • Set the tip voltage to 50mV, the loop gain to 1000, and the current to 1nA. • High currents can result in higher resolution, but at the risk of damaging the sample. • Click “Approach” and the automatic approach will move the tip until the above parameters are met.
Imaging • Open the imaging window and set the window to about 500nm. • Once the tip starts imaging, click “ok. • Watch the scan and make sure it is about what you are looking for. • The line graph at the bottom should be flat while imaging. • The color map should be smooth, with smooth color transitions. (Most “bad scans” are due to poor tip quality, inconsistency in the sample or vibrations. Any other reasons can be found in the STM manual on the cart) • Once a good scan is created click “stop” and continue on to “zooming in” • You can take a photo while you are imaging by clicking “photo” and the photo will be taken after the scan is complete. The photo can be saved or exported (changing file types) by using the “file” menu.
Zooming In • Once a clear 500nm (approximately) scan has been created, you can zoom in. • Find an area that is level. This is an area that is all the same color. • Click on the color map. Click on “zoom” • Drag the cursor until about 30-50 nm of the level area is boxed in. • Double click on the color map. • Since the scan area will be much smaller, the scan rate must be increased. Change the time/line to about 0.06 s. • After this scan is done, you can zoom in again on a small area to see the atoms (about a 2-4 nm area). This will allow you to pick the area on the 30-50 nm scan that you would like to image.
Finishing Up • Once you are done make sure you stopped your scan. • Go back to the positioning window. • Click “withdrawal” and the tip will be lifted off of the sample. • Click “retract” until the sample is far enough from the tip for you to get a hold of it without damaging the tip. • Close the software and put everything away. • Notes: • Tips can be reused and cut again. • The HOPG is layered and if the sample is very damaged, the top layer can be removed with a piece of tape. • Other settings can be tried for loop gain in order to get higher resolution on the atomic level.
Cutting a Tip • The tip can be damaged easily and must be handled with care, using the proper tools at all times. • In order to cut the platinum wire into a tip: • Hold the wire cutters at an angle to the wire. • Clamp down on the wire, but DO NOT CUT. • Apply a small mount of pressure to the wire, and pull along the axis of the wire until the top section comes off.
HOPG is layered If it is damaged a layer can be removed with tape. Layering can also be seen in the STM scans Images Left Black is the top layer and Green is the bottom layer. The six colored dots are the atoms in that level that make up the hexagonal pattern seen in the STM scans. Right The green hexagon traces the molecule that is visible in the STM scan. HOPG