Drawing In One-Point Perspective
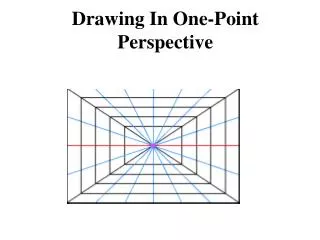
Drawing In One-Point Perspective. The Horizon Line. The red line is the Horizon Line. It represents the viewer's eye level. You can see the top of an object if it is below eye level, below the Horizon Line. If an object is above eye level, above the Horizon Line, you can not see its top.

Drawing In One-Point Perspective
E N D
Presentation Transcript
The Horizon Line • The red line is the Horizon Line. It represents the viewer's eye level. You can see the top of an object if it is below eye level, below the Horizon Line. If an object is above eye level, above the Horizon Line, you can not see its top.
Above The Horizon Line • The top side of this large file cabinet is not visible. It is above the Horizon Line. If the top side of an object is above the Horizon Line (above your eye level), you can not see it.
Below The Horizon Line • The top side of the small file cabinet is below the Horizon Line; therefore, you can see it. If the top side of an object is below the Horizon Line (below eye level), you should be able to see it.
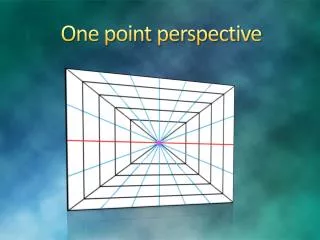
The Vanishing Point • The Horizon Line is the place where the ground and the sky seem to meet (red line). In one-point perspective the Vanishing Point, represented as a magenta dot in this picture, is always on the Horizon Line. As things get closer to the Vanishing Point they get smaller and smaller until they appear to vanish.
Left & Right Side of The Vanishing Point • The blue file cabinet is on the right side of the vanishing point; therefore we see the left side of the blue file cabinet. The right side of the blue file cabinet is hidden from our view. Is the right side of the grey file cabinet hidden? Why or why not? Why are the tops of both file cabinets hidden?
Context and Perspective • Look at the TVs in relation to the room they are in. Two of the TVs are drawn incorrectly. The front of all of the TVs face forward and are drawn correctly. Look at the sides, tops and bottoms of the TVs to find the ones that are drawn incorrectly. Why do they look wrong?
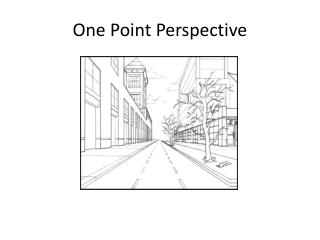
Orthogonals • The light blue lines that meet at the vanishing point are called orthogonals. They represent receding parallel lines. The rails and the outside edges of the road are examples of orthogonals. The yellow line in the center of the road is also an orthogonal. What other kinds of lines are in this drawing?
Horizontal Lines • The Horizon Line is horizontal, it goes from left to right and is parallel to the bottom edge of the picture. Like orthogonal lines, it is another kind of line that makes up a one-point perspective drawing. What is a third kind of line used in one-point perspective drawings?
Vertical Lines • Vertical lines go from the top of the page to bottom of the page and are perpendicular to the bottom edge of the picture. Along with orthogonal and horizontal lines they make up a one-point perspective drawing.
animation that shows how to start a perspective drawing of a room. The lines that make the x are called orthogonals, they meet at the Vanishing Point. The rectangle in the center shows the back wall.
X Marks the Vanishing Point • The lines that make the x are called orthogonals. To draw them place a long ruler from one corner of the page to the opposite corner. Draw your first line and then move your ruler to draw the second line. The lines meet in the center of the page. This is the Vanishing Point.
Starting the Room • To draw a room start with a vertical line to show where the back wall begins and the right side wall ends. If the line is closer to the vanishing point the room will appear deeper than if the line is closer to the edge of the paper.
The next line starts at the bottom of the vertical line and is parallel to the bottom of the picture. This line marks the place where the floor ends and the back wall begins.
The next line starts on the left side of the horizontal line that shows where the wall and floor meet. This vertical lne shows where the left side wall and back wall meet. It is parallel to the first vertical line.
The last line is a horizontal line that connects the vertical line on the right side of the back wall with the vertical line on the left side of the back wall. This line shows where the back wall and ceiling meet.
The room is now complete. The white area is the ceiling and the green area is the floor. The light blue areas are the side and back walls. Notice that the top and bottom of the side walls are orthogonals and the back wall is a rectangle.
The animation on the right shows how to draw a door in one-point perspective. To see a step-by-step explanation, click on the door. You may also click on the Next hyperlink below the drawing.
The first line that you will need to draw is a vertical line that starts at the floor and, since it is a door, goes almost to the ceiling. It is best to start with the side of the door that is near to you and near to the edge of the paper.
Next is the orthogonal line that starts at the top of the vertical line from the last screen and goes to the vanishing point. This line shows where the top of the door will be. Notice how the space between this line and the line showing the bottom of the wall appears to get smaller as we move closer to the vanishing point. Why?
The vertical line that shows the side of the door closest to the vanishing point is next. If you wanted the door to be wider you could draw a vertical line that is closer to the vanishing point. How could you make the door look less wide?
Erasing the part of the orthogonal that is not the top of the door is the next step. You can also add a door knob. Look at the height of the door and use that to help you decide where the door knob should be located.
If you would like to add a molding around the side of your door simply follow the steps used to make the door. The only difference is that the lines are drawn around the outside of the door. Be sure to make the side of the molding that is closer to the vanishing point less wide than the side of the molding closer to you. Why?
Some doors have small windows. Drawing a window is like drawing a door except most windows are not as tall as doors and windows usually do not go to the floor. Drawing a window in one-point perspective is next.
Windows • The animation on the right shows how to draw a window in one-point perspective. To see a step-by-step explanation, click on the window. You may also click on the Next hyperlink below the drawing.
It is best to start a window by first drawing the vertical line that shows the near side of the window. This vertical line will set the height of the window. The bottom of the line will be the bottom of the window and the top of the line will be the top of the window.
The next step is to add the orthogonal. These two lines go from the ends of the vertical line to the vanishing point and show the top and bottom of the window. Notice how the height of the window appears to get smaller as it gets closer to the vanishing point.
The animation on the right shows that you can make your window as wide as you like. Notice how the window gets wider as the vertical line that shows the far side of the window gets closer to the vanishing point. When the second vertical line is close to the first, the window appears narrow.
To find the center of the window draw diagonal lines from one corner of the window to the opposite corner as shown on the right. This will help determine where the line is that separates the top and bottom windows.
The orthogonal line between the top and bottom of the window shows the middle of the window. To draw this line use the vanishing point and the center of the X that shows the middle of the window. Notice the vertical line that starts at the center of the X and goes to the top of the window.
When the orthogonal and the X lines are erased we have a basic window drawn in one-point perspective.
Just as a molding was added to the door, you can add a molding to your window. Simply follow the steps used to make this window, but draw your lines just outside of the window. See the animation on the right.
Rug • The animation on the right shows how to draw a rug in one-point perspective. To see a step-by-step explanation, click on the rug. You may also click on the Next hyperlink below the drawing.
A rug is unlike the door or window drawn in the previous sections because it is drawn on the floor, not the wall. Therefore, to start the rug it is best to draw a horizontal line on the floor that shows the side of the rug closest to you. Remember that the door and window were started with vertical lines on the wall.
The orthogonal show where the sides of the rug are. They start at the ends of the horizontal line that is the front of the rug. If we wanted a narrower rug, we should have started with a shorter horizontal line.
The horizontal line close to the back wall is the end of the rug. You can make a smaller rug by drawing a horizontal line closer to the front of the rug. The lines showing the front and back of the rug are parallel.
When the orthogonal are erased the rug is complete. How would you find the center of the rug? Remember how we found the center of the window?
The animation on the right shows how you could make a smaller rug by moving the orthogonal closer to the center of the front of the rug.
Skylight • The animation on the right shows how to draw a skylight in one-point perspective. To see a step-by-step explanation, click on the skylight. You may also click on the Next hyperlink below the drawing.
A skylight is started the same way as a rug is, with a horizontal line showing the side closest to you. Since the skylight is on the ceiling, the horizontal line is drawn on the ceiling.
The next step is to draw the two orthogonal that show the left and right sides of the skylight.
We now have the front and two sides of the skylight. We need the line that shows the back of the skylight. That line is a horizontal line that is parallel to the line that shows the front of the skylight.
When the parts of the orthogonal that are not the skylight are erased the drawing looks a little like a rectangular light fixture or even a rug on the ceiling.
We can make the skylight look more realistic by showing the depth of the ceiling.We do this by drawing two vertical lines of equal height in each of the far corners of the skylight. It almost looks like the start of a step.
The next horizontal line completes the inside back wall of the skylight. This line shows the part of the skylight that meets the roof. It is directly above the line that shows the back of the skylight; it is also parallel to it.