Introducing the Cisco IP Communicator
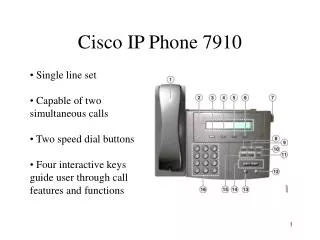
Introducing the Cisco IP Communicator. Views. There are 3 modes or skins: Default Mode Compact Mode Screen only view. Basic Features. 17. Voicemail message indicator This will light up if you have a message in your voicemail box It will flash when you receive a call 3. Line Buttons


Introducing the Cisco IP Communicator
E N D
Presentation Transcript
Views • There are 3 modes or skins: • Default Mode • Compact Mode • Screen only view
Basic Features 17. Voicemail message indicator This will light up if you have a message in your voicemail box It will flash when you receive a call 3. Line Buttons 16. Soft Buttons Refers to the 4 buttons. The functions of these buttons change depending on the operation the phone is performing. 13. Navigation Button This up/down button is used to scroll the phone display whenever a multi-choice menu is presented. 4. Messages Press this button to access your voicemail box 7. Settings These are individual phones settings that the user can change e.g. contrast and ring type 9. Volume You can adjust the handset, speaker and ringer volume 10. Speaker Allows you to conduct hands free 2-way conversations 11. Mute You can mute the caller; the caller cannot hear you but you can hear them 12. Headset To be used in conjunction with a headset
Audio Features Changing the Handset, Speaker and Headset Volume • During a call, press the Volume (9) button to increase (+) or decrease (-) the volume of your Handset, Speaker or Headset • To save the volume setting, press the Save (16) soft button Adjusting the Ringer Volume • While phone is not in use, press the (+) and (-) Volume (9) buttons to adjust the volume to the desired level • The ringer volume is automatically saved Changing the Ringer type • Press the Settings (7) button • Use the Navigation Button (13) to scroll to Ring Type • Press the Select (16) soft button • Use the Navigation Button (13) to select Default Ring and press the Select (16) soft button • You will see a selection of ring types (26 in total) • Press the Play (16) soft button to hear sample rings • Press the Select (16) soft button and then OK (16) to choose the ring type • Press Exit (16) and the Save (16) soft button Mute a Call • During a call, press the Mute (11) button (this will allow you to hear your caller but your caller cannot hear you) • Press the Mute (11) button again to disable the mute function NOTE: When using the Mute (11) function with the Speaker (10), lifting the handset will disable the Mute function
Call Handling Placing a Call(Dial ‘0’ to get a line out) (15) You can make a call with the IP Phone in any of the following ways:- • Clicking a Line (3) button • Clicking the Speaker (10) button • Clicking the New Call (16) soft button Answering a Call You can answer a call on the IP Phone in any of the following ways:- • Clicking the Answer (16) soft button • Clicking the Speaker (10) button • Clicking the Line (3) button NOTE: There is a distinctive ring for internal and external calls Ending a Call You can end the current call by:- • Clicking the End Call (16) soft button • Clicking the Speaker (10) button • Pressing the Escape key on the Keyboard Placing a Call on Hold You can put a call on hold by:- • During a call, press the Hold (16) soft button (the held call will flash on the screen) • To return to the call, press the Resume (16) soft button NOTE: You can answer other calls while a call is on hold using the methods above. Use the Navigation button to scroll between held calls. You will get a reminder a call is on hold via a ‘half ring’ every 30 seconds until the call is answered
Call Handling Call Pickup Allows you to answer a call that comes in on a phone other than your own. When you hear an incoming call ringing on another phone, you can redirect the call to your phone by using the call pickup feature. There are two types of call pickups available on Cisco IP Phones:- • Pickup allows users to pick up any incoming call If you hear another phone ringing, lift the handset and press the PickUp (16) soft button and then the extension number of the ringing phone. The call will be diverted to your phone. • Group Pickup (If this feature has been configured for you) allows users to pick up incoming calls from multiple groups. If you hear another phone ringing in a pre-configured pickup group; lift the handset and press the GPickUp (16) soft button, then dial the relevant group number. The call will be diverted to your phone. The standard if there is only one group is 1.
Call Handling Transferring Calls You can transfer a call to another phone either as a ‘Blind’ or a ‘Consultative’ transfer • During a call, press the Trnsfer (16) soft button. This places the first call on hold • Dial the number to which you want to transfer the call to. Then perform the relevant next step:- • When you hear ringing, press Trnsfer (16) again. This is called a blind transfer, the caller is now ringing at the other phone. OR • Alternatively wait until the called party answers, announce the call and then press Trnsfer (16). This is called a consultative transfer as the caller is not put through until the new destination agrees. • If the called party declines to take the call, have them hang up (or press the End Call (16) soft button) then press the Resume (16) soft button to return to the original call
Call Handling Making a Conference Call To turn a call into a conference call (3 callers) (NOTE - first two parties are a normal call):- • During a call, press the Confrn (16) soft button. This will give you dial tone and place the other party on hold • Place a call to another person you want to include • When the call connects, press Confrn (16) again to add this person to the conference call • The other party can decline to accept the conference call, you can press Resume (16) to go back to the original caller. Conference Call Tips • To end a conference call, just hang up and this disconnects all parties • To place a conference call on hold, press the Hold (16) soft button (the other parties can talk among themselves but they cannot hear you) • To mute the conference parties so they cannot hear you but you can hear them, press the Mute (11) button • To place a conference call on speakerphone, press the Speaker (10) button
Call Handling Parking a Call You can either put a call on hold where the call is at your phone, or you can Park a call, where the call is back on the phone system. This means that you don’t have to return to your phone to action the call. • During a call, press the Park (16) soft button. This will give you a Park # (651 for example) and place the other party on hold • You can find the person to take the call and ask them to get the parked call by dialling the Park # (eg 651) from any phone. • Successive Parked calls will get successive Park #’s • If you Park a call you will get a reminder every 30 seconds via a ‘half ring’ until the call is answered.
Call Handling Call Forward All Calls Allows you to forward all your calls to another destination. To set Call Forwarding: • Click the CFwdALL soft button. You will hear a confirmation beep. • Dial the number to which you want to forward all your calls Dial the number exactly as you would if you were placing a call to that number (dial ‘0’ to get a line out if it is an outside number) • Press the # button or End Call (16) soft button The phone display (1) will be updated to show that the call is forwarded and the number it is forwarded to. To cancel Call Forwarding: • Press the CFwdALL (16) soft button again NOTE: To Call Forward to Voicemail, press the CFwdALL soft button and then the Mailbox extension or button. Press End Call to save the change.
More Help.. • You can check out these sources: • http://www.comscentre.com/customers.html • http://www.comscentre.com/customer/ipcbook.pdf • http://www.cisco.com/en/US/docs/voice_ip_comm/cipc/1_1/english/administration/guide/CADovr.html • Push the services (8) button on your phone for details on how to contact us at Comscentre. • support@comscentre.com • 1300 134 680