Cisco IP Phone
260 likes | 635 Vues
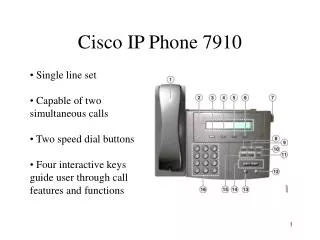
Cisco IP Phone. Onslow County Schools VoIP Training. Description of Phones . Cisco 7911. Soft keys. Display. Volume. Scroll. Hold. Menu. Description of Phones . Cisco 7942/7962. Display. Line Buttons. Soft keys. Features. Volume. Scroll. Description of Phones. Display:

Cisco IP Phone
E N D
Presentation Transcript
Cisco IP Phone Onslow County Schools VoIP Training
Description of Phones Cisco 7911 Soft keys Display Volume Scroll Hold Menu
Description of Phones Cisco 7942/7962 Display Line Buttons Soft keys Features Volume Scroll
Description of Phones • Display: • The Display area is where you will see your extension. • Line Buttons: (for 7942, and 7962) • Use these buttons to select which line on the phone to use. Every user has anywhere from 1 to 6 lines. • Soft Keys: • These keys change their function according to what you are doing on the phone. Their function is identified in the LCD Display directly above the key. • Scroll: • Use this button to scroll between various menus, fields and screens. • Features: • Use these buttons to access various menus and/or voicemail.
School Extension List • Each school has a two digit prefix for their 5 digit extension. Replace the xx with the two digit prefix for the school to get their 5 digit extension. • Example: OCBOE’s two digit prefix is 20 • IT Helpdesk is xx555 • 5 digit extension is 20555
School 2 Digit Prefix List • Location Prefix • OCBOE 20 • BFES 23 • BCES 24 • CEES 26 • DES 27 • HCES 30 • JCES 32 • MES 35 • NWES 38 • PWES 41 • QCES 42 • RPS 43 • RES 44 • Location Prefix • SRES 46 • SDES 47 • SWES 48 • SSES 52 • SBES 53 • TECC 56 • DMS 28 • HCMS 31 • JCMS 33 • NBMS 36 • NPMS 39 • SWMS 49 • SBMS 54 • Location Prefix • TMS 57 • DHS 29 • JHS 34 • NHS 37 • RHS 45 • SWHS 50 • SBHS 55 • WOHS 58 • Bus Garage 21 • OCLC 40 • CFES 25 • MVES 22 • STES 51
3 Digit Suffix • Front Desk xx000 • Principal xx001 • Asst. Principal(s) xx002 – xx004 • Data Manager xx005 • Media Center xx006 • Secretary xx007 • Cafeteria xx008 • Nurse xx009 • Guidance Dept Head xx010 • Guidance Dept xx011 – xx014 • Social Worker xx015 • Bus Coordinator xx016 • Classrooms xx(Room Number) • If a school has phones in classrooms then the phone number for the phone will be xx plus the 3 digit room number. • Example: room 100 = xx100
Using the Phone • Dialing Numbers • To dial 5 digit Extensions just dial the 5 digit number. • To make calls Outside the District, you must first dial the number 9 and then the rest of the phone number. • To make Long Distance Calls you must first dial 9 1 and then the rest of the phone number. • To make International Calls first dial 9 0 1 1 and then the rest of the phone number. • IMPORTANT: If you accidentally dial 911 stay on the line and tell them you dialed it on accident! • Long distance and international calling is not available unless approved by a department head.
Using the Phone • 7911 • The 7911 phone has almost all of the features that the 7942 and 7962 phones have. The difference is you have to press the menu button and use the scroll button to select: settings, messages, directories, etc. • Example: in order to go to the settings, press the Menu button then scroll to settings and press the select soft key.
Ring Volume • To change the ring volume, follow these steps: • Press the Volume button on the phone to the desired ring volume. • This will change the ring volume for all future calls.
Features • Directories • There are four Directories on the phone. • Missed Calls • Received Calls • Placed Calls • Corporate Directory • The Missed, Received, and Placed Calls directories can be cleared, however the Corporate Directory can never be cleared by a staff member.
Features • Corporate Directory • The Corporate Directory lists all staff members in the District and their 5 Digit Extension. • To use the directory to find a personal phone number, follow these steps: • Press the Directories button on the phone. • Using the scroll button select the Corporate Directory. • Using the number pad and the corresponding letters on the numbers, enter either a partial or full first name, or last name of the person you are looking for in the system. • Then press the Search Soft Key button on the phone.
Features • Corporate Directory • Your results will then be displayed and you can use the Scroll button to scroll through the names. • Once you have highlighted the name of the person you wish to call, you can pick up the handset of the phone. • The phone will automatically dial the number for you.
Features • Corporate Directory • If you want to find every number at a school enter in the 2 digit extension in the number: field and press search.
Features • Conversation Volume • To change the volume of the conversation you are having while on the phone, follow these steps: • Press the volume button on the phone to the desired volume level. • To save the volume level for all future calls, press the Save Soft Key button after you have reached the desired volume level.
Call Transfer • To Transfer a call while on the phone, follow these steps: • Press the (Transfer) Soft Key. • Using the number pad on the phone, enter the 5 digit extension of the person to whom the call should be transferred. • Press the (Transfer) Soft Key again. • If you do not press the transfer key the second time, the phone call will not reach the intended person, instead you will be connected to the person whose extension you dialed.
Conference Calls • To make a Conference Call please follow these steps: • Call the first party involved in the conference call. • While on the line with the first party, press the More Soft Key button on the phone. • Then press the CONFRN Soft Key button on the phone. • You will then hear dial tone. • Dial the phone number of the second party involved in the conference call. • Once the second party is connected, press the CONFRN Soft Key button. • All three lines will now be connected and able to talk together.
Voice Mail • Not all staff members have access to voicemail. • If a person doesn’t have voicemail, and they aren’t available to answer the phone, the call will be sent to the receptionist for him/her to take a message.
Voice Mail • To access voicemail then press the messages button on your phone. • If it is the first time you are accessing your voice mail account, your password will be “612345”. • Follow all prompts and don’t hang up until it says you’re finished. If you hang up early it will not save your settings.
Call Park • Call Park allows you to place a call on hold, so it can be retrieved from another phone. • While in an active phone call: Press the “more” soft key, then the “Park” soft key. • The call will be placed on hold, and you will be prompted with “Call park At ###”. • The ### will be a number. • To Retrieve the call enter the number that showed up for “call park At ###” and press dial from any Cisco phone.
MCID (Malicious Caller ID) • MCID – pressing the “MCID” soft key will flag the call as “malicious” and make information about the call be readily available. • Press the “MCID” soft key while on the phone. • NOTE: Still follow all previous steps regarding threatening phone calls, including calling the police immediately after the phone call ends.
QRT (Quality Reporting Tool) • QRT – the QRT or Quality Report Tool collects streaming data about the phone call. • Pressing this button during statically, or “Robot” sounding phone calls can help locate the source of the interference. • To use, press “more” 2 times and then the “QRT” soft key. • Follow this with an email to the IT department with your phone number, time of call and that you pressed the QRT key.
Troubleshooting • If you are having any problems with your phone check these things before opening a work order. • Make sure the cable plugged into “SW” goes to the wall network jack not a PC. • Computers are plugged into the “PC” Port. • Press ( settings **#** ) this will reset your phone. • If the screen isn’t powered on check the power cable.