Introduction to Programming RIS 2.0 RCX Code
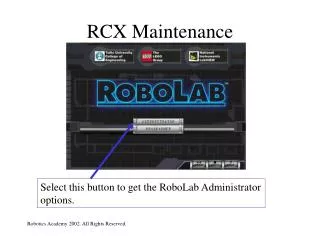
Introduction to Programming RIS 2.0 RCX Code. Starting the RCX Programming Environment. Double Click on the RCX icon Once the program is loaded, create a new user, or select an existing one Click on “Program” Click on “Freestyle”. Starting the RCX Programming Environment.

Introduction to Programming RIS 2.0 RCX Code
E N D
Presentation Transcript
Introduction to Programming RIS 2.0 RCX Code robofest 2005
Starting the RCX Programming Environment • Double Click on the RCX icon • Once the program is loaded, create a new user, or select an existing one • Click on “Program” • Click on “Freestyle” robofest 2005
Starting the RCX Programming Environment robofest 2005
Mission 1: Drive Forward (with Timer) • Go Forward for 5 seconds • Stop robofest 2005
Saving your work • Go to File • Click on Save • Type in File Name. i.e. “First Mission” robofest 2005
Downloading and Running • 5 different programs can be loaded onto the RCX at once • Select which slot you want to use by clicking on “Settings” and selecting one of the 5 slots • Make sure that the robot’s IR port is facing towards the IR tower, and click “Download” • When the download is finished, you will hear a beep • You can now run the program by pressing the grey “Prgm” button on the RCX to select the slot you programmed • And press the green “Run” button robofest 2005
Driving in Reverse • Use the “Set Direction” block under “Small Blocks” robofest 2005
After changing the directions, turn on the motors for 3 seconds robofest 2005
Turning • Set the direction of one motor to “Forward” and the direction of the other motor to “Back” robofest 2005
Repeat For • Play a beep 3 times • Uses the “Repeat For” block. • “Repeat For” specifies the number of times a certain action is to be performed. • i.e. Repeat Beep For 3 Times robofest 2005
Repeat For robofest 2005
Light Sensor • Mounted to the front of the robot, facing the ground • Allows detection of lines, white or black, as well as detecting lamps, lasers, and other light sources • Use the “View” button on the robot to view the light sensor value over the black line. Remember or write down this value. robofest 2005
Using the light sensor • Select “Wait Until” from the “Wait” column • Select “Light” and click “Next” • Select Input Port # to which the light sensor is connected. Press “Next”. • Select “Bright” if looking for white line, “Dark” if looking for black line. Press “Next”. robofest 2005
Click on “Manual” and enter a value for the line. Usually it’s the value from using the “View” button – 5 for a white line, or the value from using the “View” button + 5 for a black line robofest 2005
Mission 2: Detect Edge • When the light sensor detects an edge, beep three times robofest 2005
Mission 3: Detect Light and Beep • When the light sensor detects a bright light source, beep • Repeat forever robofest 2005
Mission 4: Drive Forward and Stop • Go forward until the edge of the board/table • Stop robofest 2005
Mission 4 Solution robofest 2005
Touch Sensor • Touch sensor is attached to the bumper • When the bumper is pressed the touch sensor is activated robofest 2005
Using the Touch Sensor • Turn on the motors • Select the “Wait Until” block from the “Wait” column or “Repeat Until” from the ”Repeat” column • Make sure “Touch” is selected and press “Next” • Choose Input Port # to which the touch sensor is connected, and press “Next” • Make sure “Press” is selected, which will allow the robot to react when the touch sensor is pressed. Press “Next” again. • Press “Done” • Turn off the motors robofest 2005
Mission 5: Touch Sensor • If the touch sensor is pressed once, turn on the left motor • If the touch sensor is pressed twice, turn off the left motor, and turn on the right motor • If the touch sensor is pressed three times, turn on both motors • If the touch sensor is pressed four times turn both motors off • Repeat Forever robofest 2005
Mission 6: Yes or No Statements • If the Light Sensor is detecting the edge then play Beep #1 • Otherwise play Beep #2 • Repeat Forever robofest 2005
Mission 7: Right-Handed Line Follow with Touch Sensor • If light sensor sees black - turn right, otherwise – turn left • Repeat the process until the bumper is hit • Stop robofest 2005
Mission 7: Right-Handed Line Follow with Touch Sensor robofest 2005
Mission 8: Line Follow and Stop • Follow the black line, until robot reaches edge of the board • Stop robofest 2005
Mission 8: Line Follow and Stop robofest 2005
Mission 9: Left-Handed Line Follow • If light sensor sees black - turn left, otherwise – turn right • Repeat the process until the bumper is hit • Stop robofest 2005
Mission 9: Left-Handed Line Follow robofest 2005
Mission 10: Sensor Stacking • Stack touch sensor on top of light sensor • Follow the line, when touch sensor is activated stop. When the stacked touch sensor is pressed the value on Port 2 will read 100. When the touch sensor is not pressed the value for the light sensor will be read. robofest 2005
Mission 10: Sensor Stacking robofest 2005
Sensor Stacking With Tasks robofest 2005
Mission 11: Line Counter with Variables • Go forward • Count each line as the robot crosses it • When the robot crosses the 3rd line, stop. • Uses variables to count number of lines robofest 2005
Mission 11: Line Counter with Variables robofest 2005
Mission 12: Proximity Sensor (simple method*) • Use the IR Transmitter and Light sensor to create a Proximity Sensor • Constantly generate IR messages, and use the Light Sensor to detect the reflected IR beam (*) There is another better method to check fluctuations of the light intensity robofest 2005
Mission 13: IR Communications • One RCX is sending a message, the other is receiving it • Confirm that the message has been received by beeping robofest 2005
Transmitter Solution robofest 2005
Receiver Solution robofest 2005
This PowerPoint will be posted online at http://www.robofest.net/resources.htm robofest 2005