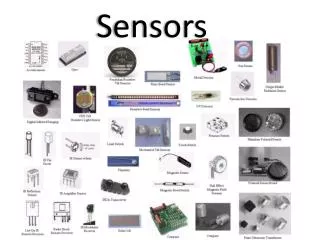
Sensors
Sensors. Brad Miller Associate Director, WPI Robotics Resource Center. Why Use Sensors?. Robot Internal State Banner sensors Limit switches Potentiometers on arms Accelerometers for tilt angle Gyros for direction Encoders for speed Robot position (usually) field relative

Sensors
E N D
Presentation Transcript
Sensors Brad MillerAssociate Director, WPI Robotics Resource Center
Why Use Sensors? • Robot Internal State • Banner sensors • Limit switches • Potentiometers on arms • Accelerometers for tilt angle • Gyros for direction • Encoders for speed • Robot position (usually) field relative • Rangefinders (ultrasonic or infrared) • Encoders for distance
This Stuff is Easy! • People seem to think autonomous operations is only for advanced teams • Hard to program • Hard to connect sensors • Hard to understand • It’s NOT HARD – the FLL 7th graders can do it, their robots are all autonomous • You just need the right tools!
Wiring Sensors • Connects to robot via 3 pin PWM connector • PWM shells, connectors and crimp tool are available from Jameco and DigiKey • Same for digital and analog I/O • All FRC connectors should be female • Vex connectors are male
What is sensing? Sensing is converting a quantity that you want to measure into a useable signal (usually electronic). Perception is the interpretation or under- standing of these signals. Example: Sensing: Sound waves -> vibrating eardrums -> signals to brain Perception: Understanding that I am talking to you about sensors.
One Use of Sensors • Control your motors so they go at the speed and distance you ask them to • How do we know how fast the motor is really going? • How do we know how far the robot really went? • How do we know when the angle of the arm is what we asked it to be?
Controlling the Robot • Open loop control has no feedback • Set the speed and “hope” that the motors go the requested speed and/or distance. • Closed loop control (with feedback) • Use sensors to measure what’s going on then do something about it! • Apply correction to the input • Desired speed is higher – Increase motor power • Desired speed is lower – Decrease motor power
Simple feedback – On-Off • On-Off (“Bang-Bang”) controller • Thermostats have a set (desired) temperature • House too cold – turn on furnace • House too warm – turn off furnace • Very of “jerky” response • Hysteresis helps (dead band)
Proportional Control • The speed of the robot (in this case) is proportional to the error signal • R(t) = Kp * (Ddes(t) – Dact(t)) • The difference between the desired value and the actual value is called the error function • The constant Kp sets the response time • Higher Kp (controller gain) means faster response, but too high and oscillations and overshoot • Lower Kp and the system is slow and mushy
Potentiometers • Directly provides an angle of a piece of the robot • You should always use potentiometers on anything that rotates or slides • Limit switches can provide stops, but not position • Examples • Robot arm joint position • Lift (elevator) position
Potentiometers • Variable resistor used to indicate position of something • Single turn (about 270 degrees) or multi-turn for elevators • Always use linear pots – not logarithmic volume controls • Connect to the power, ground, and signal
Encoders • A sensor of mechanical motion that translates motion such as speed, direction or shaft angle into an electrical signal • Types of encoder outputs • Standard • Quadrature • Other outputs: Grey Code, Binary
Encoders • Usually optical and measure changes in rotating disk • Standard encoders have one output and can’t sense direction • Quadrature encoders have multiple outputs for direction
Characteristics • Resolution – Cycles/revolution • Typically 32, 64, 128, or greater • Trade resolution for processing requirements • Types of outputs • Absolute: binary and gray code • Incremental: single channel (tachometer), quadrature • Optionally provide index output • Maximum rotational speed
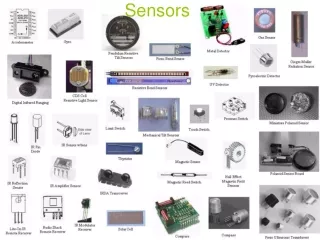
Methods of Measurement • Mechanical touch sensors • Simple to build but you need to be in contact • The bumper sensor is a good example • Light sensors • Infrared sensors measure reflected light amplitude, angle, time of flight (TOF), or contrast • Sonar • Bounce sound off target and time
Mechanical Sensors • Just switches: • Commercial switches like limit switches and bump sensors • Can be as simple as whiskers • Generally only tell you a single distance • Connect to a digital input on robot controller – we’re either in contact (1) or not in contact (0)
Limit Switches • Can detect a fixed position • Useful for knowing which position a mechanism is in • Pneumatic pistons with the reed switches • Measuring the position • Polling – can easily miss the transition • Interrupts – better, but maybe more complex • Interrupt watchers (easyC and WPILib) • Banner sensors are optical version of limit switch
Sonar Sensor • Using the sensor • Start the sensor to begin, and stop it when finished • Read the range whenever it’s needed
How WPILib Computes Distance • Speed of sound (in air): about 343 m/s or 1125 ft/s • Distance to object is 1/2 the round trip time • EasyC does the work for us – but does not give distance directly – that’s our job • Two connections, interrupt port and digital output Output port Interrupt port
Sharp IR Rangefinders • Very inexpensive • Easy to use • Very cool!
Triangulation • IR emitting diode is located at the focal point (F0), producing parallel rays of output
Triangulation 5 • PSD is located at the back focal plane (f)
Sharp: Limitations • Back side of curve can give confusing readings – can be disastrous – easy to deal with • Need to deal with nonlinear output
Cross Firing Detectors • Get around the minimum distance
Beam Pattern • Wider beam pattern using two crossing detectors • Can be used with a servo to sweep an area • Widest portion of beam is about 16cm
Choices of Sharp IR Sensors * detector continuously reads (always on)
Gyros • Measure rate of rotation • Integrate to get the angle • Initialize before using sensor • Connects to analog port • Easy to get robots driving straight or on predetermined headings using proportional control • Be careful of specs – especially the range (maximum degrees/sec) • Parts usually come from Analog Devices
Gyro Programming • With easyC or WPILib • InitializeGyro – runs calibration • StartGyro – starts background readings • GetGyroAngle – returns angle in 0.1 degrees • StopGyro – stops background readings • Works with various models of gyros including kit parts – 80, 150, 300 degrees/sec
Sample Gyro Program • #include "BuiltIns.h" • void main(void) • { • InitGyro(1); • StartGyro(1); • TwoWheelDrive(1, 2); • while (1) • { • int error; • int heading = GetGyroAngle(1); • error = heading - 0; • Drive(60, - error / 2); • } • } • Program always drives straight (0 degrees) • Proportional control: Kp = 0.5 • Replace 0 with 900 for 90 degree turn, then drive
FIRST Infrared Remote Sensor • Detects which of 4 IR Remote buttons is pressed • You program the sensor for a set of remote codes • Put in program mode and teach it each code • It then detects those codes by setting one of 4 wires to 5v for 100ms. Maybe a good candidate for interrupt watchers • Be careful if polling • 7-15v power supply
Sample IR Receiver Program • #include "BuiltIns.h" • #define LEFT 5 • #define RIGHT 6 • #define FORWARD 8 • #define BACKWARD 7 • void main(void) • { • TwoWheelDrive(1, 2); • while (1) • { • if (GetDigitalInput(FORWARD)) • Drive(127, 0); • else if (GetDigitalInput(BACKWARD)) • Drive (-127, 0); • else if (GetDigitalInput(LEFT)) • Drive(0, 127); • else if (GetDigitalInput(RIGHT)) • Drive(0, -127); • } • }
Programming Sensors • Programming tools • MPLab – Microchip tools that ship in the kit • Eclipse – Very popular open source programming environment • easyC – supplied in the kit from Intelitek • Represents the softest entry into the world of programming
Libraries and Frameworks • Raw IFI code base • Very basic – a set of starter files • You’re responsible for all sensor code, interrupts, timers, etc. • Kevin Watson’s code • Complete source code base that you augment to add your code • WPILib • Modular high level library that has “drivers” for all sensors, timing, interrupts • easyC is based on WPILib
Program Structure • Basically you write three functions: • void Initialize(void) // init sensors here • void Autonomous(void) // autonomous code • void OperatorControl(void) // operator code • The library does all the rest of the work for you