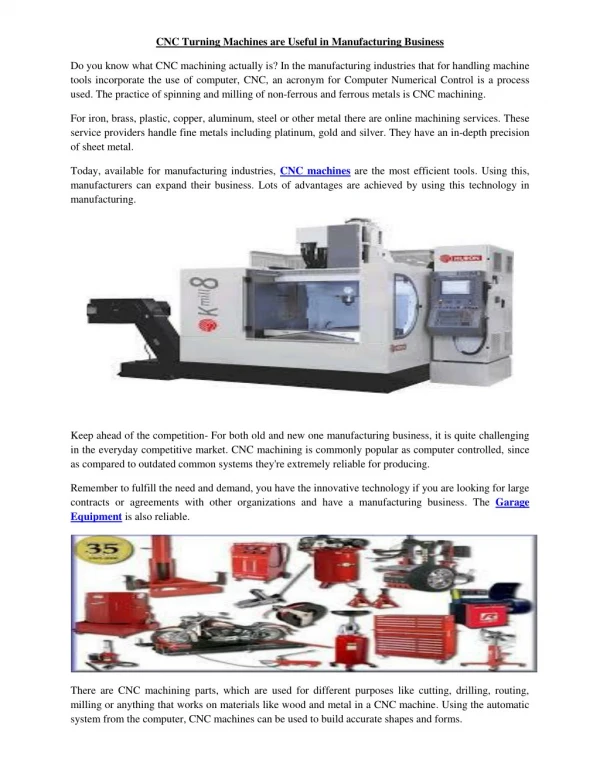
CNC Turning
CNC Turning. Module 2: Introduction to MTS TopTurn and G & M codes. Watch the following video. Module objectives. 1. Demonstrate familiarity with the MTS Simulator. 2. Create a setup sheet. 3. Identify the different parts that compose the NC program.


CNC Turning
E N D
Presentation Transcript
CNC Turning Module 2: Introduction to MTS TopTurn and G & M codes
Module objectives • 1. Demonstrate familiarity with the MTS Simulator. • 2. Create a setup sheet. • 3. Identify the different parts that compose the NC program. • 4. Identify the difference between rapid positioning and feed rate positioning. • 4. Utilize both G-codes and M-codes. • 5. Demonstrate the ability to write a simple NC part program.
CNC Machine Simulator: A simulator is used to create NC programs, simulating them and checking their quality. These programs can be transferred and executed on the real CNC machine to produce the work part. The simulator that we are going to deal with throughout the term is called the MTS Simulator.
How to start the software? To start the MTS simulator: • Click on windows “start” button in the task bar. • Point on “all programs”. • Point on “MTS TopCAM 7.4”. • Click on “TOPCAM”. • Or click on the “MTS TopCAM” shortcut on the desktop.
How to start the software? The start-up menu shown in Fig. 2.1 will offer you the following software modules for selection: TOPCAM, TOPTURN and TOPMILL. TOPTURN is used for turning programming. However, TOPMILL is used for milling programming. As Turning is introduced in this course so you will choose TOPTURN to start turning.
How to start the software? The next window that appears is to select the controller. The controller is the link between the software (NC program) and the hardware (CNC machine). From the controllers list, choose the “FANUC 21 TB Code-C EMCO@EMCO TURN55 R1 T8VDI10” since it is the one used by the EMCO CNC Turning Machine available in the lab, then click on “start turning” as shown in Fig.2.2.
How to start the software? MTS TOPTURN simulator will start. The main areas of the screen are shown on Fig. 2.3.
How to change the display? You have two main ways to display the simulator Graphic display Modes Display mode Icons
How to create a setup sheet In order to set the machine, a setup sheet is created. The setup means to enter the information of the tools, workpiece dimensions, material used, holding devices and the position of zero point.
Example 1 Prepare a “Setup sheet” with the following information: • Workpiece length: 60 mm • Workpiece diameter: 40 mm • Workpiece material: Aluminum/Almg1 • The chucking depth: 14 mm (Chucking depth is the length of the • workpiece that inserted into the chuck) • Workpart zero location: “Right side – center of the workpart surface • Tool position: position 4 (The turret of the machine can hold many • tools, so this is the position of the tool on the turret.) • Tool to be used: • Tool type: Corner Tool Left, • Tool Name: CCMT 060202_SCACR 0808 B06_B 3.10 1213.
2. Write the File name: The file name is “Setup1”, then click “Open” as shown below
3. Click on tab 1: “General information” and then enter the “program number” starting with “O” letter. In this example you can write “O1”.
4. Click on tab 2: “Workpiece”, the “Workpiece type” list box, the cylinder is the default. Click the list box arrow to see the different shapes available in the software then select.“Cylinder” for the workpiece type. The next step is to fill in the information for the length, Diameter, and material type. a. Length L: “60” b. Diameter D: “40” c. For material selection click on the folder in the field of “Material”
d. Select “Non ferrous folder” or click on the green “N” to select the required material as shown below
f. Click on “Almg1”, then Click select and quit . Figure below
5. Click on tab 3: “Workpiece clamping” to fill in the clamping device information as shown in Figure below • Clamping device type: “Lathe chuck” • Lathe chuck: “KSF 74 – 3AsB” (depend on the type and size of the workpiece) • Chuck jaws: Step jaw\HB 3–B09 x L14_7_4xH20_14_7 (depend on the type and size of the workpiece) • Chucking depth: “14”
6. Click on tab 4: “Zero register” to fill in the information related to the workpiece Zero point as shown in Figure below Specification of zero offset value relative to: • “Right side – center of the workpart surface” • G54 Z: “0” X:”0”
7. Click on tab 5: “Tool system” in order to select the tools that will be used in the program. 8. Click “Edit” as shown in Figure below for tool selection .
a. From the drop down menu “File” to open a new file as shown in Figure below
b. A message appears asking the following question “Remove all tools from the tool equipment?” , Select “yes” if you want to select a new tool set as shown in Figure below.
c. Double click on position 4 as the selected tool should be placed in position No. 4 as shown in Figure below
d. Double click on ”Corner tool left” to select the type of the tool mentioned in the setup sheet as shown in Figure below
e. Click on the correct tool name “CCMT 060202_SCACR 0808 B06_B 3.10 1213”, then, save it by clicking . The right column under the tool name shows the properties and dimensions of the tool as shown in Figure below
To check the prepared setup sheet, click on“editor” Or press “F4” or select “NC editor from the main menu” Check and edit the setup sheet
On the main screen try the following icons which allow you to edit the tool equipment: • Click on “setup mode” to activate the tool equipment icon. • Setup mode is used to make the machine setup (clamping • devices, tools … etc). • Click on “tool equipment” to see the tools mounted on the turret. • Click on “quit” to exit from the tool equipment. • On the bottom menu press “Esc” or “F10” to return to the main menu.
Click “Esc” or “F10” • Click “Yes” • Open the MTS again as explained earlier, (Click Start Turning) • To open your setup again click on “Open NC Program” • (Open NC Program is to open new or existing NC program) • Select “setup1” then click “open” • Click on “editor” twice to see your setup again. • Press “Accept Quit” from the editor menu at the bottom. • On the bottom menu press “Esc” or “F10” to return to the main menu. • Click “Esc” or “F10”.
Practical Task 1 Page 18
Practical Task 1 : Use MTS software to do the following setup. Give your setup the name “Example 2” Setup sheet” information (Parameters): • Workpiece length: 67 mm • Workpiece diameter:40 mm • Workpiece material: Brass\CuZn 30 • The chucking depth: 14 mm • Workpiece zero location: “Right side – center of the workpart • surface” • Tool position: position 6 • Tool to be used: • Tool type: Corner Tool Left, • Tool Name: CCMT 060204_SCGCR 0808 B 06_B3-10 1213