Step-by-Step Drilling Instructions for CFRP/Titanium Keel Assembly
280 likes | 415 Vues
This guide provides detailed step-by-step instructions for drilling operations in the keel assembly of a lightweight craft. It includes setups for various drill sizes and configurations across multiple IDs. The process entails the use of color-coded setups (GREEN, RED, WHITE, PINK, BLACK) for different materials (CFRP/Ti) and requires drilling in marked locations with specified quantities. Follow the sequence carefully to ensure proper assembly and installation of full-size index pins at designated locations, which are crucial for the structural integrity of the assembly.

Step-by-Step Drilling Instructions for CFRP/Titanium Keel Assembly
E N D
Presentation Transcript
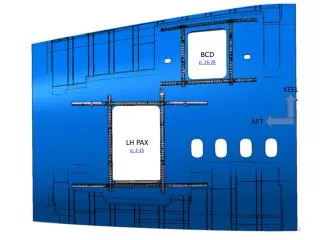
BCD • p. 16-28 KEEL AFT LH PAX p. 2-15
LH PAX (VIEW LOOKING INWARD) KEEL AFT 1794 1744
P1 2 • Step 1: Use GREEN Setup (5/16” CFRP/Ti w/CSK) • Drill Qty 4 Locations (ID 1) • Drill Qty 6 Locations (ID 2) • Drill Qty 4 Locations (ID 3) • Drill Qty 2 Locations (ID 4) • INSTALL FULL SIZE INDEX PIN(s) in Location(s) Drilled in ID 1 • Drill Qty 2 Locations (ID 5) • Step 2: Use RED Setup (5/16” CFRP/Ti Drill Only) • Drill Qty 2 Locations (ID 6) • Step 3: Use WHITE Setup (3/8” CFRP/Ti w/CSK ) • Drill Qty 2 Locations (ID 7) • Drill Qty 4 Locations (ID 8) • Drill Qty 3 Locations (ID 9) • Drill Qty 3 Locations (ID 10) • Drill Qty 2 Locations (ID 11) • Drill Qty 1 Location (ID 12) • Step 4: Use PINK Setup (3/8” CFRP/Ti Drill Only) • Drill Qty 3 Locations (ID 13) • Step 5: Use BLACK Setup (1/4” CFRP/Ti w/CSK) • Drill Qty 2 Locations (ID 14) 3 LH PAX 1 2 5 6 1 2 2 3 1744 1794 3 4 4 6 8 7 KEEL 9 8 10 13 AFT 11 13 12 13 11 10 10 9 9 8 8 7 2 3 2 1 5 1 14 14
P2 10 17 • Step 1: Use GREEN Setup (5/16” CFRP/Ti w/CSK) • Drill Qty 3 Locations (ID 1) • Drill Qty 4 Locations (ID 2) • Drill Qty 2 Locations (ID 3) • Drill Qty 2 Locations (ID 4) • Drill Qty 1 Locations (ID 5) • Drill Qty 2 Locations (ID 6) • Drill Qty 2 Locations (ID 7) • Drill Qty 2 Locations (ID 8) • Drill Qty 2 Locations (ID 9) • INSTALL FULL SIZE INDEX PIN(s) in Location(s) Drilled in ID 1 • Drill Qty 2 Locations (ID 10) • Step 2: Use WHITE Setup (3/8” CFRP/Ti w/CSK ) • Drill Qty 3 Locations (ID 11) • Drill Qty 4 Locations (ID 12) • Step 3: GREEN Setup (5/16” CFRP/Ti w/CSK) • Drill Qty 2 Locations (ID 13) • Drill Qty 1 Locations (ID 14) • Drill Qty 2 Locations (ID 15) • Drill Qty 1 Locations (ID 16) • Step 4: Use RED Setup (5/16” CFRP/Ti Drill Only) • Drill Qty 5 Locations (ID 17) LH PAX 2 1 3 2 4 3 17 4 1744 1794 6 5 7 6 8 7 KEEL 9 8 17 9 12 11 AFT 12 11 2 1 17 10 2 1 12 11 13 12 17 13 15 14 15 16
P3 15 14 • Step 1: Use WHITE Setup (3/8” CFRP/Ti w/CSK) • Drill Qty 5 Locations (ID 1) • Drill Qty 6 Locations (ID 2) • Drill Qty 4 Locations (ID 3) • Drill Qty 2 Locations (ID 4) • Drill Qty 2 Locations (ID 5) • Step 2: Use GREEN Setup (5/16” CFRP/Ti w/CSK) • Drill Qty 3 Locations (ID 6) • Drill Qty 2 Locations (ID 7) • Drill Qty 1 Location (ID 8) • Step 3: Use WHITE Setup (3/8” CFRP/Ti w/CSK) • INSTALL FULL SIZE INDEX PIN(s) in Location(s) Drilled in ID 1 • Drill Qty 2 Locations (ID 9) • Step 4: Use PINK Setup (3/8” CFRP/Ti Drill Only) • Drill Qty 3 Locations (ID 10) • Step 5: Use BLACK Setup (1/4” CFRP/Ti w/CSK) • INSTALL APPROPRIATE CENTRIX PIN AT (ID 13) • Drill Qty 1 Location (ID 11) • Drill Qty 2 Locations (ID 12) • Drill Qty 2 Location (ID 13) • Drill Qty 2 Locations (ID 14) • Drill Qty 1 Location (ID 15) LH PAX 14 13 12 13 11 12 1744 1794 8 7 6 7 3 2 KEEL 2 1 9 1 2 1 AFT 2 3 Complete ID 1-8, THEN do P9 Entirely and Resume P3 at ID 9 10 3 5 4 5 4 10 3 10 2 1 2 9 1 6 6
P12 15 15 LH PAX • Step 1: Use WHITE Setup (3/8” CFRP/Ti w/CSK) • Drill Qty 3 Locations (ID 1) • Drill Qty 3 Locations (ID 2) • Drill Qty 1 Location (ID 3) • Step 2: Use GREEN Setup (5/16” CFRP/Ti w/CSK) • Drill Qty 5 Locations (ID 4) • Drill Qty 6 Locations (ID 5) • Drill Qty 4 Locations (ID 6) • Drill Qty 3 Locations (ID 7) • Drill Qty 1 Location (ID 8) • INSTALL FULL SIZE INDEX PIN(s) in Location(s) Drilled in ID 4 and ID 1 • Drill Qty 1 Locations (ID 9) • Step 3: Use WHITE Setup (3/8” CFRP/Ti w/CSK) • Drill Qty 3 Locations (ID 10) • Drill Qty 1 Location (ID 11) • Drill Qty 1 Location (ID 12) • Step 4: Use RED Setup (5/16” CFRP/Ti Drill Only) • Drill Qty 4 Locations (ID 14) • Step 5: Use BLACK Setup (1/4” CFRP/Ti w/CSK) • Drill Qty 2 Locations (ID 15) 6 5 5 4 3 2 2 1744 1794 1 1 10 2 1 KEEL 5 4 14 5 7 AFT 6 11 10 12 10 14 7 14 6 4 5 9 4 4 5 14 6 8 7
P5 2 1 LH PAX 1 • Step 1: Use GREEN Setup (5/16” CFRP/Ti w/CSK) • Drill Qty 5 Locations (ID 1) • Drill Qty 4 Locations (ID 2) • Drill Qty 3 Locations (ID 3) • Drill Qty 4 Locations (ID 4) • Drill Qty 4 Locations (ID 5) • Drill Qty 4 Locations (ID 6) • Drill Qty 3 Locations (ID 7) • Drill Qty 3 Locations (ID 8) • Drill Qty 3 Locations (ID 9) • Drill Qty 1 Location (ID 10) • INSTALL FULL SIZE INDEX PIN(s) in Location(s) Drilled in ID 1 • Drill Qty 2 Locations (ID 11) • Step 2: Use RED Setup (5/16” CFRP/Ti Drill ONLY) • Drill Qty 4 Locations (ID 12) 11 12 1 3 2 4 1744 1794 3 5 4 6 5 KEEL 7 6 12 7 9 8 AFT 10 9 9 8 8 7 12 6 6 5 5 4 4 3 12 2 11 1 1 2
P4 12 • Step 1: Use WHITE Setup (3/8” CFRP/Ti w/CSK ) • Step 2: Use GREEN Setup (5/16” CFRP/Ti w/CSK) • Drill Qty 4 Locations (ID 9) • Drill Qty 3 Locations (ID 10) • Drill Qty 2 Locations (ID 11) • Drill Qty 2 Locations (ID 12) • INSTALL FULL SIZE INDEX PIN(s) in Location(s) Drilled by ID 9 and ID 1 • Drill Qty 1 Locations (ID 13) • Step 3: Use WHITE Setup (3/8” CFRP/Ti w/CSK ) • Drill Qty 1 Location (ID 14) • Step 4: Use BLACK Setup (1/4” CFRP/Ti w/CSK) • Drill Qty 2 Locations (ID 15) • Step 5: Use RED Setup (5/16” CFRP/Ti Drill Only) • Drill Qty 2 Locations (ID 16) • Step 6: Use PINK Setup (3/8” CFRP/Ti Drill Only) • Drill Qty 3 Locations (ID 17) 11 LH PAX 16 • Drill Qty 3 Locations (ID 1) • Drill Qty 3 Locations (ID 2) • Drill Qty 2 Locations (ID 3) • Drill Qty 1 Location (ID 4) • Drill Qty 1 Location (ID 5) • Drill Qty 1 Location (ID 6) • Drill Qty 2 Locations (ID 7) • Drill Qty 1 Location (ID 8) 10 13 9 9 10 1744 10 1794 11 16 12 KEEL 8 7 7 6 AFT 17 5 17 4 17 3 3 2 2 1 1 14 2 1 9 9 15 15
Prior Work Required P10 LH PAX • Step 1: Verify Prior Work Completed • Ensure P12 (Lower Aft Edge) Operations Complete w/ Adjacent Clamp at Location A • Step 2:Use YELLOW Setup (5/16” CFRP/CFRP w/CSK) • Drill Qty 1 Location (ID 1) • Step 3: Install ST-XXXX-XX Adj Clamp Load Washer Between ID 1 and ID 2 • Step 4:Use YELLOW Setup (5/16” CFRP/CFRP w/CSK) • Step 5: Install ST-XXXX-XX Adj Clamp Load Washer Between ID 11 and ID 12 • Step 6: Use BLACK Setup (1/4” CFRP/Ti w/ CSK) • Drill Qty 1 Location (ID 12) • Drill Qty 2 Locations (ID 13) • Step 7: Use BLUE Setup (1/4”CFRP w/CSK ) • Drill Qty 2 Locations (ID 14) • Drill Qty 2 Locations (ID 15) • Drill Qty 2 Locations (ID 16) • Drill Qty 2 Locations (ID 17) • Drill Qty 2 Locations (ID 18) • Drill Qty 2 Locations (ID 19) • Drill Qty 1 Location (ID 20) • Drill Qty 1 Location (ID 21) • Step 8 : Drill per Appendix G • Drill Qty 1 Location (ID22) 1744 1794 KEEL AFT • Drill Qty 2 Locations (ID 2) • Drill Qty 2 Locations (ID 3) • Drill Qty 2 Locations (ID 4) • Drill Qty 1 Location (ID 5) • Drill Qty 1 Location (ID 6) • Drill Qty 1 Location (ID 7) • Drill Qty 1 Location (ID 8) • Drill Qty 1 Location (ID 9) • Drill Qty 1 Location (ID 10) • Drill Qty 1 Location (ID 11) 1 2 3 A 4 13 12 2 3 4 19 5 17 6 15 7 8 22 9 10 15 11 17 19 18 21 16 13 14 14 16 18 20
P11 LH PAX • Step 1:Use YELLOW Setup (5/16” CFRP/CFRP w/CSK) • Drill Qty 2 Locations (ID 1) • Step 2: Install 2 ST-XXXX-XX Adj Clamp Load Washers Between ID 1 and ID 2 • Step 3: Use YELLOW Setup (5/16” CFRP/CFRP w/CSK) Drill in the following sequence. • Drill Qty 2 Locations (ID 2) • Drill Qty 6 Locations (ID 3) • Drill Qty 6 Locations (ID 4) • Drill Qty 6 Locations (ID 5) • Drill Qty 5 Locations (ID 6) • Drill Qty 6 Locations (ID 7) • Drill Qty 7 Locations (ID 8) • Drill Qty 4 Locations (ID 9) • Drill Qty 3 Locations (ID 10) • Step 4: Install ST-XXXX-XX Adj Clamp Load Washer Between ID 7 and ID 11 • Step 5: Use GREEN Setup (5/16” CFRP/Ti w/ CSK) • Drill Qty 1 Location (ID 11) • Drill Qty 1 Location (ID 12) • Step 6: Use PURPLE Setup (5/16” CFRP/CFRP Drill Only) • Drill Qty 8 Locations (ID 13) • Step 7 : Drill per Appendix G • Drill Qty 2 Locations (ID 14) 1744 1794 KEEL AFT 13 10 9 8 7 13 13 14 1 3 4 5 13 8 10 12 9 8 8 7 7 13 6 5 5 4 3 4 3 1 2 14 3 13 4 6 5 13 6 8 7 9 11 8 13 7 6 5 4 3 2 3 4 5 6 7 8 9 10
Prior Work Required P9 LH PAX • Step 1: Verify Prior Work Completed • Ensure P3 (Lower Fwd Edge) Operations Complete w/ Adjacent Clamp at Location A • Step 2: Use YELLOW Setup (5/16” CFRP/CFRP w/CSK) • Drill Qty 1 Location (ID 1) • Drill Qty 1 Location (ID 2) • Drill Qty 1 Location (ID 3) • Drill Qty 1 Location (ID 4) • Step 3: Install ST-XXXX-XX Adj Clamp Load Washer Between ID 4 and ID 5 • Step 4: Use YELLOW Setup (5/16” CFRP/CFRP w/CSK) • Drill Qty 1 Location (ID 5) • Drill Qty 2 Locations (ID 6) • Drill Qty 2 Locations (ID 7) • Drill Qty 2 Locations (ID 8) • Drill Qty 1 Location (ID 9) • Drill Qty 1 Location (ID 10) • Drill Qty 1 Location (ID 11) • Drill Qty 1 Location (ID 12) • Step 5: Use BLUE Setup (1/4”CFRP/CFRP w/CSK ) • Ensure Pin Installed at Pre-existing Thru Hole (ID 25) • Drill Qty 2 Locations (ID 13) • Drill Qty 2 Locations (ID 14) • Drill Qty 2 Locations (ID 15) • Drill Qty 2 Locations (ID 16) • Drill Qty 2 Locations (ID 17) • Continued… 1744 1794 KEEL AFT 17 15 13 15 13 17 4 16 3 14 2 25 1 14 16 12 A 11 10 9 8 7 6 5 6 7 8
P9 (…Continued) • Step 5: Use BLUE Setup (1/4” CFRP/CFRP w/CSK ) • Drill Qty 2 Locations (ID 18) • Drill Qty 1 Location (ID 19) • Drill Qty 1 Location (ID 20) • Drill Qty 1 Location (ID 21) • Step 6: Install ST-XXXX-XX Adj Clamp Load Washer Between ID 18 and ID 22 • Step 7: Use BLACK Setup (1/4” CFRP/Ti w/ CSK) • Drill Qty 1 Location (ID 22) • Drill Qty 2 Locations (ID 23) • Step 8 : Drill per Appendix G • Drill Qty 1 Locations (ID 24) • Drill Qty 1 Locations (ID 25) LH PAX 1744 1794 KEEL AFT 21 19 23 22 20 18 24 25 23 18
Prior Work Required P7 • Step 1: Verify Prior Work Completed • Ensure P4 (Upper Aft Edge) Operations Complete w/ Adjacent Clamp at Location A • Step 2: Use YELLOW Setup (5/16” CFRP/CFRP w/CSK) • Drill Qty 1 Location (ID 1) • Drill Qty 1 Location (ID 2) • Drill Qty 1 Location (ID 3) • Step 3: Install ST-XXXX-XX Adj Clamp Load Washer Between ID 3 and ID 4 • Step 4: Use YELLOW Setup (5/16” CFRP/CFRP w/CSK) • Drill Qty 1 Locations (ID 4) • Drill Qty 2 Locations (ID 5) • Drill Qty 2 Locations (ID 6) • Drill Qty 1 Location (ID 7) • Drill Qty 1 Location (ID 8) • Drill Qty 1 Location (ID 9) • Drill Qty 1 Location (ID 10) • Step 5: Use BLUE Setup (1/4” CFRP w/CSK ) • Drill Qty 1 Location (ID11) • INSTALL FULL SIZE INDEX PIN(s) in Location(s) Drilled in ID 11 • Step 6: Install ST-XXXX-XX Adj Clamp Load Washer Between ID 25 and ID 12 • Step 7: Use BLUE Setup (1/4” • CFRP/CFRP w/CSK ) • Drill Qty 1 Location (ID 12) • Drill Qty 1 Location (ID 13) • Drill Qty 1 Location (ID 14) • Drill Qty 1 Location (ID 15) • Drill Qty 1 Location (ID 16) • Drill Qty 1 Location (ID 17) • Drill Qty 1 Location (ID 18) • Drill Qty 1 Location (ID 19) • Drill Qty 1 Location (ID 20) • Drill Qty 1 Location (ID 21) • Drill Qty 1 Location (ID 22) • Drill Qty 1 Location (ID 23) • Drill Qty 1 Location (ID 24) • Step 8 : Drill per Appendix G • Drill Qty 1 Locations (ID 25) LH PAX 1744 1794 KEEL AFT 6 5 4 15 13 25 A 17 19 21 23 5 6 7 8 9 10 11 14 12 16 18 20 22 24 1 2 3
P8 LH PAX • Step 1: Use YELLOW Setup (5/16” CFRP/CFRP w/CSK) • Drill Qty 4 Locations for (ID 1) • Step 2: Install 2 ST-XXXX-XX Adj Clamp Load Washers Between ID 1 and ID 2 • Step 3: Use YELLOW Setup (5/16” CFRP/CFRP w/CSK) • Drill Qty 2 Locations (ID 2) • Drill Qty 8 Locations (ID 3) • Step 4: Use PURPLE Setup (5/16” CFRP/CFRP Drill Only) • Drill Qty 4 Locations (ID 4) • Step 5: Use YELLOW Setup (5/16” CFRP/CFRP w/CSK) • Drill Qty 8 Locations (ID 5) • Drill Qty 6 Locations (ID 6) • Drill Qty 6 Locations (ID 7) • Drill Qty 5 Locations (ID 8) • Step 6: Use PURPLE Setup (5/16” CFRP/CFRP Drill Only) • Drill Qty 4 Locations (ID 9) • Step 7: Use YELLOW Setup (5/16” CFRP/CFRP w/CSK) • Drill Qty 7 Locations (ID 10) • Drill Qty 6 Locations (ID 11) • Drill Qty 2 Locations (ID 12) • Step 8 : Drill per Appendix G • Drill Qty 2 Locations (ID 13) 1744 1794 KEEL AFT 11 10 9 5 4 3 2 3 4 5 6 7 8 9 10 11 11 10 9 7 6 5 4 3 2 3 4 5 9 10 11 12 10 8 7 6 5 3 1 13 1 3 5 6 7 8 10 11 12 11 10 8 7 6 5 3 1 13 1 3 5 6 7 8
P6 LH PAX • Step 1: Use YELLOW Setup (5/16” CFRP/CFRP w/CSK) • Drill Qty 1 Location (ID 1) • Drill Qty 1 Location (ID 2) • Step 2: Install ST-XXXX-XX Adj Clamp Load Washer Between ID 2 and ID 3 • Step 3: Use YELLOW Setup (5/16” CFRP/CFRP w/CSK) • Drill Qty 1 Locations (ID 3) • Drill Qty 2 Locations (ID 4) • Drill Qty 2 Locations (ID 5) • Drill Qty 1 Location (ID 6) • Drill Qty 1 Location (ID 7) • Drill Qty 1 Location (ID 8) • Drill Qty 1 Location (ID 9) • Drill Qty 1 Location (ID 10) • Drill Qty 1 Location (ID 11) • Step 5: Use BLUE Setup (1/4” CFRP w/CSK ) • Drill Qty 2 Locations (ID12) • Drill Qty 2 Locations (ID 13) • Drill Qty 2 Locations (ID 14) • Drill Qty 1 Location (ID 15) • Drill Qty 1 Location (ID 16) • Drill Qty 1 Location (ID 17) • Drill Qty 1 Location (ID 18) • Drill Qty 1 Location (ID 19) • Drill Qty 1 Location (ID 20) • Drill Qty 1 Location (ID 21) • Drill Qty 1 Location (ID 22) • Drill Qty 1 Location (ID 23) • Drill Qty 1 Location (ID 24) • Drill Qty 1 Location (ID 25) • Step 8 : Drill per Appendix G • Drill Qty 1 Location (ID 26) • Drill Qty 1 Location (ID 27) 1744 1794 KEEL AFT 24 22 20 18 16 14 12 12 10 11 9 8 7 6 5 4 3 4 5 25 23 21 19 17 15 13 27 14 13 2 1 26
BCD (VIEW LOOKING INWARD) KEEL AFT
P9 • Step 1: Use GREEN Setup (5/16” CFRP/Ti w/CSK) • Drill Qty 4 Locations (ID 1) • Drill Qty 6 Locations (ID 2) • Drill Qty 6 Locations (ID 3) • Drill Qty 4 Locations (ID 4) • Drill Qty 4 Locations (ID 5) • Drill Qty 2 Locations (ID 6) • INSTALL FULL SIZE INDEX PIN(s) in Location(s) Drilled in ID 1 • Drill Qty 1 Locations (ID 7) • Step 2: Use RED Setup (5/16” CFRP/Ti Drill Only) • Drill Qty 4 Locations (ID 8) 2 BCD 1 8 8 8 8 1 2 1719 1670 2 3 3 KEEL 4 4 5 5 6 AFT 6 5 5 4 4 3 3 2 2 1 3 7 1 3 2
P5 1 2 BCD 6 1 1 2 2 3 • Step 1: Use GREEN Setup (5/16” CFRP/Ti w/CSK) • Drill Qty 6 Locations (ID 1) • Drill Qty 7 Locations (ID 2) • Drill Qty 6 Locations (ID 3) • Drill Qty 4 Locations (ID 4) • Drill Qty 2 Locations (ID 5) • INSTALL FULL SIZE INDEX PIN(s) in Location(s) Drilled in ID 1 • Drill Qty 2 Locations (ID 6) 1719 1670 3 4 4 KEEL 5 4 5 AFT 3 4 2 3 1 2 1 6 2 1 3 2 3
P4 • Step 1: Use GREEN Setup (5/16” CFRP/Ti w/CSK) • Drill Qty 4 Locations (ID 1) • Drill Qty 5 Locations (ID 2) • Drill Qty 4 Locations (ID 3) • Drill Qty 4 Locations (ID 4) • Drill Qty 3 Locations (ID 5) • Drill Qty 2 Locations (ID 6) • INSTALL FULL SIZE INDEX PIN(s) in Location(s) Drilled in ID 1 • Drill Qty 1 Locations (ID 7) • Step 2: Use RED Setup (5/16” CFRP/Ti Drill ONLY) • Drill Qty 2 Locations (ID 8) • Drill Qty 2 Locations (ID 9) • Step 3: Use GREEN Setup (5/16” CFRP/Ti w/CSK) • Drill Qty 2 Locations (ID 11) 1 BCD 2 1 7 2 1 1719 1670 3 2 4 3 KEEL 5 4 6 AFT 5 6 4 5 3 4 2 3 1 2 9 8 9 8 11 11
P3 • Step 1: Use GREEN Setup (5/16” CFRP/Ti w/CSK) • Drill Qty 4 Locations (ID 1) • Drill Qty 5 Locations (ID 2) • Drill Qty 4 Locations (ID 3) • Drill Qty 4 Locations (ID 4) • Drill Qty 4 Locations (ID 5) • Drill Qty 4 Locations (ID 6) • Drill Qty 2 Locations (ID 7) • INSTALL FULL SIZE INDEX PIN(s) in Location(s) Drilled in ID 1 • Drill Qty 1 Locations (ID 8) • Step 2: Use RED Setup (5/16” CFRP/Ti Drill ONLY) • Drill Qty 4 Locations (ID 9) 2 1 BCD 9 9 9 9 1 2 2 1719 1670 3 3 4 KEEL 4 5 5 6 AFT 6 7 7 6 6 5 5 4 4 3 3 2 2 1 1 8
P2 • Step 1: Use GREEN Setup (5/16” CFRP/Ti w/CSK) • Drill Qty 5 Locations (ID 1) • Drill Qty 6 Locations (ID 2) • Drill Qty 6 Locations (ID 3) • Drill Qty 5 Locations (ID 4) • Drill Qty 3 Locations (ID 5) • Drill Qty 2 Locations (ID 6) • INSTALL FULL SIZE INDEX PIN(s) in Location(s) Drilled in ID 1 • Drill Qty 2 Locations (ID 7) BCD 1 7 2 1 3 2 4 3 1719 1670 5 4 KEEL 6 5 6 5 5 AFT 4 4 3 3 2 2 1 1 7 2 1 3 2 4 3
P1 BCD 1 14 • Step 1: Use GREEN Setup (5/16” CFRP/Ti w/CSK) • Drill Qty 3 Locations (ID 1) • Drill Qty 3 Locations (ID 2) • Drill Qty 2 Locations (ID 3) • Drill Qty 2 Locations (ID 4) • Drill Qty 2 Locations (ID 5) • Drill Qty 2 Locations (ID 6) • Drill Qty 2 Locations (ID 7) • Drill Qty 2 Locations (ID 8) • Drill Qty 2 Locations (ID 9) • Drill Qty 2 Locations (ID 10) • Drill Qty 2 Locations (ID 11) • Drill Qty 2 Locations (ID 12) • Drill Qty 1 Locations (ID 13) • INSTALL FULL SIZE INDEX PIN(s) in Location(s) Drilled in ID 1 • Drill Qty 1 Locations (ID 14) • Step 2: Use RED Setup (5/16” CFRP/Ti Drill Only) • Drill Qty 4 Locations (ID 15) 2 1 3 2 4 3 1719 1670 4 5 KEEL 6 5 7 6 8 7 AFT 9 8 9 10 10 11 11 12 12 13 15 15 15 15 2 1
P11 • Step 1: Use YELLOW Setup (5/16” CFRP/CFRP w/CSK) • Drill Qty 1 Locations (ID 1) • Step 2: Install ST-XXXX-XX Adjacent Clamp Load Washer Between ID 1 and ID 2 • Step 3: Use YELLOW Setup (5/16” CFRP/CFRP w/CSK) • Drill Qty 1 Locations (ID 2) • INSTALL FULL SIZE INDEX PIN(s) in Location(s) Drilled in ID 1 • Drill Qty 3 Locations (ID 3) • Drill Qty 2 Locations (ID 4) • Drill Qty 2 Locations (ID 5) • Drill Qty 2 Locations (ID 6) • Drill Qty 2 Locations (ID 7) • Drill Qty 2 Locations (ID 8) • Drill Qty 2 Locations (ID 9) • Drill Qty 2 Locations (ID 10) • Drill Qty 2 Locations (ID 11) • Drill Qty 2 Locations (ID 12) • Drill Qty 2 Locations (ID 13) • Step 4 : Drill per Appendix G • Drill Qty 1 Location (ID 14) BCD 1719 1670 KEEL AFT 10 11 12 13 14 1 9 4 6 8 3 5 7 10 11 12 13 5 9 4 6 8 2 3 3 7
P12 Prior Work Required • Step 1: Verify Prior Operations • Ensure P9 (Lower-Aft BCD Edge Frame) Operation Complete w/ Adjacent Clamp at Location A • Step 2: Use YELLOW Setup (5/16” CFRP/CFRP w/CSK) • Drill Qty 1 Locations (ID 1) • Step 3: Install ST-XXXX-XX Adjacent Clamp Load Washer Between ID 1 and ID 2 • Step 4: Use YELLOW Setup (5/16” CFRP/CFRP w/CSK) BCD 1719 1670 KEEL • Drill Qty 2 Locations (ID 22) • Drill Qty 2 Locations (ID 23) • Drill Qty 2 Locations (ID 24) • Drill Qty 2 Locations (ID 25) • Drill Qty 2 Locations (ID 26) • Drill Qty 2 Locations (ID 27) • Drill Qty 2 Locations (ID 28) • Drill Qty 2 Locations (ID 29) • Drill Qty 1 Locations (ID 30) • Drill Qty 2 Locations (ID 12) • Drill Qty 2 Locations (ID 13) • Drill Qty 2 Locations (ID 14) • Drill Qty 2 Locations (ID 15) • Drill Qty 2 Locations (ID 16) • Drill Qty 2 Locations (ID 17) • Drill Qty 2 Locations (ID 18) • Drill Qty 2 Locations (ID 19) • Drill Qty 2 Locations (ID 20) • Drill Qty 2 Locations (ID 21) • Drill Qty 2 Locations (ID 2) • Drill Qty 2 Locations (ID 3) • Drill Qty 2 Locations (ID 4) • Drill Qty 2 Locations (ID 5) • Drill Qty 2 Locations (ID 6) • Drill Qty 2 Locations (ID 7) • Drill Qty 2 Locations (ID 8) • Drill Qty 2 Locations (ID 9) • Drill Qty 2 Locations (ID 10) • Drill Qty 2 Locations (ID 11) AFT 4 1 2 3 5 6 7 8 9 10 11 12 13 14 15 16 17 18 19 20 21 22 23 24 25 26 27 28 29 A 6 7 8 9 2 3 4 5 10 11 12 13 14 15 16 17 18 19 20 21 22 23 24 25 26 27 28 29 30
P10 • Step 1: Use YELLOW Setup (5/16” CFRP/CFRP w/CSK) • Drill Qty 3 Locations (ID 1) • Step 2: Install ST-XXXX-XX Adjacent Clamp Load Washer • Between ID 1 and ID 2 • Step 3: Use YELLOW Setup (5/16” CFRP/CFRP w/CSK) • Drill Qty 2 Locations (ID 2) • Drill Qty 3 Locations (ID 3) • Drill Qty 3 Locations (ID 4) • Drill Qty 3 Locations (ID 5) • Step 4: Install ST-XXXX-XX Adjacent Clamp Load Washer Between ID 5 and ID 6 • Step 5: Use YELLOW Setup (5/16” CFRP/CFRP w/CSK) • Drill Qty 4 Locations (ID 6) • Drill Qty 5 Locations (ID 7) • Drill Qty 3 Locations (ID 8) • Drill Qty 2 Locations (ID 9) • Step 6 : Drill per Appendix G • Drill Qty 1 Location (ID 10) BCD 1719 1670 KEEL AFT 1 2 3 4 5 6 7 7 6 4 3 1 10 1 5 9 8 7 7 8 9 8 7 6 6 5 4 3 2
P8 BCD • Step 1: Use YELLOW Setup (5/16” CFRP/CFRP w/CSK) • Drill Qty 3 Locations (ID 1) • Step 2: Install ST-XXXX-XX Adjacent Clamp Load Washer Between ID 1 and ID 2 • Step 3: Use YELLOW Setup (5/16” CFRP/CFRP w/CSK) • Drill Qty 5 Locations (ID 2) • Drill Qty 6 Locations (ID 3) • Drill Qty 5 Locations (ID 4) • Drill Qty 4 Locations (ID 5) • Drill Qty 1 Locations (ID 6) • Step 4 : Drill per Appendix G • Drill Qty 2 Locations (ID 7) 1719 1670 KEEL AFT 3 2 3 4 5 6 5 4 3 2 3 4 5 2 7 3 5 3 2 7 1 2 4 4 1 1
P6 • Step 1: Use YELLOW Setup (5/16” CFRP w/CSK) • Drill Qty 4 Locations (ID 1) • Drill Qty 6 Locations (ID 2) • Drill Qty 6 Locations (ID 3) • Drill Qty 6 Locations (ID 4) • Drill Qty 5 Locations (ID 5) • Drill Qty 4 Locations (ID 6) • Drill Qty 4 Locations (ID 7) • Drill Qty 4 Locations (ID 8) • Drill Qty 3 Locations (ID 9) • Drill Qty 4 Locations (ID 10) • Drill Qty 4 Locations (ID 11) • Drill Qty 3 Locations (ID 12) • Drill Qty 1 Locations (ID 13) • Step 2: Use GREEN Setup (5/16” CFRP/Ti w/CSK) • Drill Qty 1 Locations (ID 14) • Step 3 : Drill per Appendix G • Drill Qty 1 Location (ID 15) BCD 1719 1670 KEEL AFT 8 9 1 2 3 4 6 7 9 8 7 6 3 1 15 1 2 3 4 10 2 5 11 11 5 4 12 10 27 2 3 4 5 7 8 5 6 4 9 10 11 8 7 6 2 3 12 3 2 5 4 1 13 12 11 14 10
P7 BCD • Step 1: Use YELLOW Setup (5/16” CFRP/CFRP w/CSK) • Drill Qty 3 Locations (ID 1) • Step 2: Install 2 ST-XXXX-XX Adjacent Clamp Load Washer Between ID 1 and ID 2 • Step 3: Use YELLOW Setup (5/16” CFRP/CFRP w/CSK) • Drill Qty 4 Locations (ID 2) • Drill Qty 4 Locations (ID 3) • Drill Qty 4 Locations (ID 4) • Drill Qty 4 Locations (ID 5) • Drill Qty 4 Locations (ID 6) • Drill Qty 3 Locations (ID 7) • Drill Qty 2 Locations (ID 8) • Drill Qty 1 Locations (ID 9) • Step 4 : Drill per Appendix G • Drill Qty 1 Location (ID 10) 1719 1670 KEEL AFT 2 3 4 5 6 7 8 9 8 7 6 5 4 3 2 5 6 7 6 5 4 3 4 1 2 3 2 1 10 1