VLSI Design Full-custom IC Design Flow
890 likes | 2.57k Vues
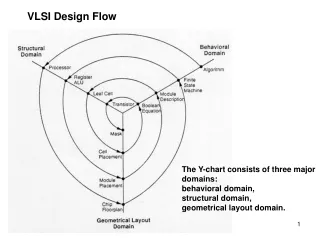
VLSI Design Full-custom IC Design Flow. Introduction to VLSI Circuits and Systems 積體電路概論. 賴秉樑 Dept. of Electronic Engineering National Chin-Yi University of Technology Fall 2007. Outline. Schematic with Composer of ICFB (Cadence) Pre-simulation using Hspice

VLSI Design Full-custom IC Design Flow
E N D
Presentation Transcript
VLSI DesignFull-custom IC Design Flow Introduction to VLSI Circuits and Systems積體電路概論 賴秉樑 Dept. of Electronic Engineering National Chin-Yi University of Technology Fall 2007
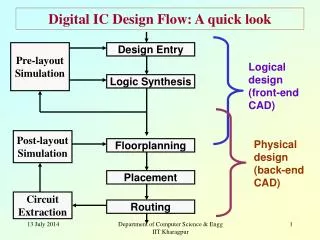
Outline • Schematic with Composer of ICFB (Cadence) • Pre-simulation using Hspice • Layout with Virtuoso or Laker • Verification using Calibre or Dracula • DRC • LVS • PEX • Post-simulation using Hspice
Custom IC Design We offer the technology files of the following, and copy it to your home directory
Environment • Operation System: Solaris 8 (Sun Blade 2500) • Account is personal student’s identity number, ex. g955168 • Using X-win32 or ReflectionX to remote WorkStation
Console 登入的Shell is C-shell 1. 目前source license的軟體 家目錄 2. 可修改於home dir/.cshrc
ICFB • Under home directory Mkdir work_tsmc035 (自設一個工作目錄) • Under work_tsmc035 directory→ icfb & Under your design directory Cadence 的ICFB控制視窗
Merge Display File to Virtuoso • 加入後 Schematic & Layout view 才能正常顯示顏色與圖層 • Key Step: Tools Display Resource Manger… (1) ../technology/display.drf (2) Add (3) ./work_tsmc035/display.drf
建立新的製程 Library • 不同的製程需新建不同製程技術的library • Step 1: Select File New Library • Step 2: Name tsmc035_techfile (user-define) • Step 3: ASCII Technology File ../technology/035ms.tf Step 1 Step 2 Step 3
建立新的 Design Library • Step 4: Select File New Library • Step 5: Name basic_logic (usr-define) • Step 6: Technology Library tsmc035_techfile Step 4 Step 6 Step 5
Create a Cellview under Design Library • 建立一個cell inv (inverter) • Step 7: Select File New Cellview
Step 8: 呼叫 analogLib 建立基本的instance PMOS: pmos4 NMOS: nmos4 加入 instance (hot key ‘i’)
加入 input and output (hot key ‘p’) 完成inverter設計 (pmos, nmos, vdd, gnd and wire-connection)
Generating Netlist using CDL • Step 9: File Export CDL Netlist 的副檔名為 name.sp
Modify the inv.sp and Create a another inv_sim.sp Delete NM NCH PM PCH
Pre-sim. using Hspice • 進行 Hspice 時,netlist 與 Spice Model file mm0355v.l要在同一個目錄下 • Console soclab02% hspice inv_sim.sp 路徑要注意!
確定 hspice job concluded soclab02% awaves & • Step 10: Open Step 10 Ctrl+a 可將波形視窗分割
Waveform with Awaves **檢查Pre-sim. 的結果與功能正常後才進行layout**
Layout with Virtuoso Editor • Step 1: Link Calibre into Virtuoso (load(“/usr/mentor/Calibre_ss/cur/lib/calibre.skl”) • Step 2: File New Cellview Under the same library and cell name Step 1 Step 2 Select Virtuoso, and View Name is layout
Virtuoso Layout Window Make sure linking Calibre success! LSW: 供可選擇之layer,如無法正常顯示顏色,請重做Display resource manger (Merge display.drf)
N-Well COMS Inverter The cross-section view and layout of a CMOS(n-well) inverter
Minimum NIMP extension of N+ Diffusion 0.25 um Minimum N-Well width 1.7 um Minimum Metal1 extension of Contact 0.15 um Minimum POLY1 extension of Diffusion 0.4 um Contact size 0.4 * 0.4 um Minimum Contact to Contact spacing 0.4 um Minimum N-Well extension of P+ Diffusion 1.2 um Minimum Diffusion extension of Contact is 0.15 um Minimum Metal1 width 0.5 um Minimum clearance from Contact on Diffusion region to a Poly gate 0.3 um Minimum Diffusion width 0.3 um Minimum PIMP extension of P+ Diffusion 0.25 um Minimum Poly1 width 0.35 um
Layout Verification with Calibre DRC/LVS/PEX
Calibre DRC (5/1) • Step 1: File Export Stream 須先轉成Layout的GDSII的格式 Step 1
Calibre DRC (2/5) • Step 2: Calibre Run DRC Calibre DRC window
Calibre DRC (3/5) • Step 3: Rules 將TSMC035的calibre DRC rules file加入
Calibre DRC (4/5) • Step 4:Inputs Layout Files inv.gds (路徑要注意) 可直接由layout view來執行,但電路假如很大,則需較久時間,一般disalbe
Calibre DRC (5/5) • Step 5:Run DRC No error! 但可忽略的design rule error 可查閱 “可允許之DRC錯誤-假錯-申請者常犯錯誤”
Calibre LVS (1/6) • Step 1:修改inv.sp檔局部的netlist成LVS可過的形式
Calibre LVS (2/6) • Step 2: Calibre Run LVS
Calibre LVS (3/5) • Step 3: Rules 將TSMC035的calibre LVS rules file加入
Calibre LVS (4/6) • Step 4:Inputs Layout Files inv.gds (路徑要注意)
Calibre LVS (5/6) • Step 4:Inputs Netlist Files inv.sp (路徑要注意) 可直接由schematic view來執行,但電路假如很大,則需較久時間,一般disalbe
Calibre PEX (1/8) • Step 1:修改inv.sp檔局部的netlist成PEX可過的形式
Calibre PEX (7/8) 進行RC值萃取
Modify inv_pex.sp inv_pex.sp.inv.pxi & inv_pex.sp.pex為存放PEX萃取出後的RC參數值
inv_pex.sp.inv.pxi & inv_pex.sp.pex為存放PEX萃取出後的RC參數值