5 Ways to Enhance Brand Management with Adobe Illustrator
270 likes | 405 Vues
Discover effective strategies to elevate your personal brand using Adobe Illustrator. Whether you're aiming to impress potential employers, classmates, or friends, mastering Illustrator can help you create stunning visuals that reflect your creativity. This presentation covers essential features of the program, from starting a new file to adding effects and creating patterns. Learn how to bring your artistic vision to life and manage your brand more effectively with these simple yet powerful techniques that will set you apart.

5 Ways to Enhance Brand Management with Adobe Illustrator
E N D
Presentation Transcript
5 Ways to improve brand management using adobe illustrator PRIYANKA SHANKAR 2
why is this useful? • Have you ever wanted to better market yourself to potential employers/students/friends??? • Do you want to improve your brand management skills by expanding upon already creative things you’ve made by making them even greater? • How useful do you think it would be to have the ability to create and edit artistic drawings that make the most unartistic images COME TO LIFE? • If you answered yes to any of the questions above, then your answer lies within Adobe Illustrator. If you answered no, there’s still a chance that after viewing this presentation, you can find some way to apply these skills to some design you might have that just needs that slight edge to impress your co-workers/classmates/friends combined!!! 1
Getting Started • Before we even get to the technical stuff, it’s important to know the basic operating features of this program. What do I mean by that? • I’m referring to: • Creating a new file • Knowing where the palette is • Understanding what the template is
Getting Started…part 2 • Step 1: Open Adobe Illustrator • Step 2: Go to File at the top right and click ‘New.’ • Step 2: You’ll see a picture as shown on the right. Choose the measurements you want and add a title. This is the canvas for your new work..
Getting started…part 3 • Step 3: This is what your initial canvas should look like. The different tools you have are on either side of the sheet.
5 tHINGS… • These next few slides will cover 5 basic functions of Illustrator. We’ll start off with something minor that won’t take long and then explore some more detailed applications.
# 1 – Adding effects to an Image in adobe illustrator • For this tutorial, I chose this particular drawing of the head of one of my favorite comic book characters – Archie Andrews. You guys can use the same drawing or any other drawing that you find or have saved on your computer. • We’re going to go through the steps of inserting the picture into Ai and then editing it. • Step 1: Go to File and click on Place and then insert the picture into Ai from wherever it was saved. It should appear on the right as shown in the picture here. 3
# 1 - continued • With Ai, you can resize images without changing the quality. If you want to resize your image, merely use your cursor to extend it by clicking on the side. You’ll notice that the resolution doesn’t change. • If you want to add different effects to it, go to the top menu bar and click on effect. There are various things you can do.
# 1 - Continued • There are many effects you can apply. Choose whichever one you like. For this one, I chose one of the Photoshop effects. Once you choose one, a separate screen will come up . It’s shown on the following page.
# 1 - continued • You can choose a variety of effects to add to whatever picture you choose. The one shown here is a ‘mosaic title’ effect.
# 2 – Create various patterns • There are so many different kinds of patterns you can create and apply to objects in Adobe Illustrator. This tutorial will just show the basics of doing that (creating patterns then inserting it somewhere). After that, it’s is possible to expand upon this tool and use it to create intricate designs, etc. • STEP 1: We’re going to start with a basic ellipse within an ellipse within an ellipse. Find the ellipse tool and then create three. An example is on the next slide.
# 2 – Create various patterns • Something like this can be created. • Try to dark the center in the middle using the paintbrush tool on the left side. Choose whatever color you wish. You can change the colors using the panel on the right side.
# 2 - cONTiNUED • Now it’s time to make a pattern out of this. Select the creation. Go to the top menu and click on pattern - make.
# 2 - cONTiNUED • You’ll see this screen saying that a pattern ‘swatches’ tab has been added. You’ll use this tab to save your patterns and then apply them to other objects! Something like this will show you up. You can continue to the edit the pattern by editing the original creation in the center. The others will also receive the edits. You can name and save the pattern using the pattern options box on the side.
# 2 - continued • I named my pattern ‘watching eyes.’ You can also adjust the distance between the drawings and other things using the pattern options box. For example, you can change the ‘Tile Type’ and make them hex by column. You can add your pattern to other objects using the swatches tab.
# 3 – Cutting out shapes • This tutorial shows you how to cut out shapes from a banner/picture/image where you may want to add/subtract something.. For this example, I’ll be using this banner of flowers. 4
# 3 - continued • ‘Place’ the item in the canvas as shown in Tutorial # 1. Add shapes as shown in Tutorial # 2 below the picture. An image depicting this is shown below.
# 3 - continued • After this, drag the shapes on top of the picture where you would like to cut holes. • Then go to the Window menu and click on ‘Pathfinder.’
# 3 - continued • When you click on Pathfinder, you’ll see the option box to the right. • Click on the Minus Back function highlighted on the right. • The shapes of the starts should be taken out of your picture. • The final result is below this.
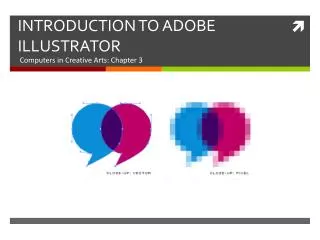
# 4 –VECTOR PICTURE CONVERSION • Vectors make highly pixelated objects seem more smooth and refined. In this example, we’re going to be taking a picture of an apple (shown here) that is clearly a digital picture of an actual apple and refining it. • ‘Place’ the picture in the canvas as shown in Tutorial # 1. Resize it as you’d like. Go the to bar above t he picture and where it says Image Trace, click the arrow and click on ‘High Fidelity Photo.’ 5
# 4 - continued • It will take a few moments, but you should end up with a smoother image. Click Expand next to Image Trace afterwards and you should be done.
# - 5 – HOW TO CREATE A PERFECT HEART • For this FINAL and LAST example, I’m going to be using someone else’s tutorial, JPR Tips and Tricks, (http://www.youtube.com/watch?v=UIFbYBdj3Cc) to show you guys how to create a PERFECT heart using Adobe Illustrator. • This tutorial includes creating a grid. To do that, right click on the line segment shown on the bottom left. Clicking on the arrow gives a separate box on the bottom right to control different properties of the line segment function. The grid function is the fourth from the right. 6
# 5 - continued • Move your cursor around the top right corner of the canvas until you see the world intersect. Click that with your mouse to see a new box where you can input your grid size.
# 5 - continued • A grid should form then. Click on View at the Top and then go to ‘Make Guides.’ • Start drawing your heart with the line segment. You can press F and hold down shift while holding your mouse to flip the direction of the line segment. The video explains it really well
# 5 - CONTINUED • You can duplicate one side of the heart to copy it onto the other. Once you’re doing, you can color fill it will palettes on the right. It’s also possible to add gradients using the gradient tool on the bottom left. Overall, it’s easier to draw exact shapes in Adobe Illustrator than in some other programs. It’s another example of how Adobe Illustrator can be very useful.
Hope you enjoyed!!! • Ta-da! You’ve learned a few tricks to using Adobe Illustrator. • Hopefully they’ll prove useful to you in the future.
Sites referenced • http://www.userlogos.org/files/logos/macleod.mac/ai_1_u.png • http://www.vapartners.ca/wp-content/uploads/2012/10/Branding-Wordle1.png • http://www.mightycrusaders.net/a_images/archie7.jpg • http://www.vbcshafter.com/wp-content/uploads/2013/03/Flowers-Shafter.jpg • http://upload.wikimedia.org/wikipedia/commons/0/07/Honeycrisp-Apple.jpg • http://www.youtube.com/watch?v=UIFbYBdj3Cc • http://www.youtube.com/watch?v=t81lerH7ICs