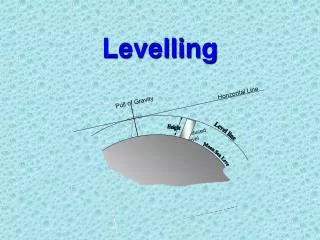
Levelling
Levelling. is the general term applied to any of the various processes by which elevations of points or differences in elevation are determined. Furthermore , it can be defined as the process of measuring, by direct or indirect methods, vertical distances in order to determine elevations.

Levelling
E N D
Presentation Transcript
Levelling is the general term applied to any of the various processes by which elevations of points or differences in elevation are determined. Furthermore, it can be defined as the process of measuring, by direct or indirect methods, vertical distances in order to determine elevations.
Uses of Levelling • In the context of measurements, levelling is used for the following purposes: • Referencing of Points: To determine and check the vertical stability of the points with respect to reference points (benchmarks) in its immediate vicinity.
Cont… • Connection to GPS Reference Points: To determine its regional stability and to separate sea level rise from vertical crustal motion, the point should be connected via GPS to reference stations fixed in a global co-ordinate system.
Cont… • Connection to National Levelling Network: Mean sea level is used to define vertical datums for national surveying and mapping, hence the point must be connected to the national levelling network. • Connection to the network will also allow all points to be connected to each other, providing information on spatial variations in mean sea level
Levelling Terminologies • Datum: This is an imaginary level surface to which all elevations are measured or referred to. The sea level is often used as the datum. • Elevation is the vertical distance from a datum (usually mean sea level) to a point or object.
Cont… • Bench Mark (BM) is a relatively permanent object, natural or artificial, having a marked point whose elevations above or below an adopted datum is known or assumed. • Back sight (BS) – is the first sight (reading) taken after the level has been set up.
Cont… • Fore sight (FS) – last sight (reading) taken before moving the level. It is also a sight taken to a point whose height is required to carry on the line of levels • Intermediate Sight (IS) – other staff readings taken between BS and FS (medium readings)
Cont… • Change Point (CP) – the staff position at which a FS and then BS readings are taken • Reduced Level: This is also called reduced height and is the calculated elevation of a Place above or below sea level.
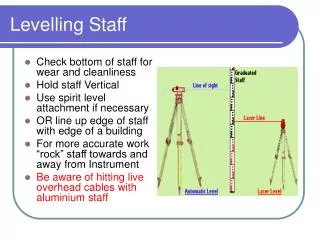
Equipments used in levelling • The levelling rod or Levelling staff (a suitably graduated staff for reading vertical heights). so this is a graduated wooden staff for reading vertical heights. • Telescope – it is used for sighting the levelling staff and obtaining angles • Tripod stand –it is used to fix the telescope
Cont… • Level- The level is an instrument used to accurately determine the difference in elevation between two points on the earth’s surface. Examples include water level and surveyor’s level (Dumpy level) (device to gives a truly horizontal line).
Cont… • Chain/Tape (to enable the points leveled to be located relative to each other on a map) • Pegs- for marking permanent points • Ranging poles for fixing or marking stations
Principles of Leveling 1. The principle of leveling is based on the fact that if a level is placed between 2 points A and B. measurements obtained on a staff placed on these two points would mean the difference in height between the two points.
Cont… • This is because the readings are made from the same position along the same line of sight • In this case, the difference is 4m (5-1). Lower readings are usually made at higher grounds while higher figures are made at lower grounds.
Cont.. • If the distances between the two points are long, it means the reading of the staff will not be done once but in stages. If A is 200m above sea level, B will be 200 + 4 = 204m.
Cont… • 2. If the level is set between points A and B, the difference in height is 2m (i.e. 3-1m). • The Height of point B is then 200 + 2 (202) as B is in a higher elevation than A. One can remove the level and place it in between B and C.
Cont… • The new height of the staff is now 2m at B and 5m at C. making it a difference of 3m. If means that the height of point C will be height of B (202m) – dif in height = 202 – 3m = 199m.
BOOKING AND CALCULATION OF REDUCED LEVELS Two methods are used to book and calculate the reduced level during levelling exercise also they are known as methods of levelling There are two methods of levelling namely; • Rise and fall method • Height of collimation methods (height of instruments)
RISE AND FALL METHOD • The rise and fall method uses differences in level between two consecutive points to obtain the rise or fall in elevation at that point. Consider the diagram below
PROCEDURES • Set up the leveling instrument at level position 1. • Hold the staff on the datum (RL+50 m) and make a reading. This will be a back sight because it is a first staff reading after the levelling instrument has been setup.
Cont… • Move a staff to A and take a reading. This will be intermediate sight. • Move the staff to B and take reading. This also will be an intermediate sight. • Move the staff to C and take reading. This will be another intermediate sight.
Cont… • Move a staff to D and take a reading. This will be a fore sight; because after this reading the level will be moved ( a change plate should be placed on the ground to maintain the same level).
Cont… • The distance between the points should be measured and recorded in the field book (see table 1) • Set up the level at level position 2 and leave the staff at D on the change plate. Turn the staff so that it faces the level and take a reading. This will be back sight.
Cont… • Move the staff to E and take reading. This will be an intermediate sight • Move the staff to F and take reading. This will be foresight because after taking this reading the level will be moved.
Cont… • Now move the level to levelling position 3 and leave the staff at F on the change plate. Now repeat the steps described 8 and 10 until you finish at point J.
N.B • If the first reading is greater than second reading it indicates rise. • If the first reading is small than second reading it indicates fall. • After reaching to the fore sight in finding rise and fall start the reading from back sight again. • In order to get the reduced level for rise we plus while for fall we minus.
TO PROVE THE BOOKING • Sum of Back sight – sum of fore sight = sum of rise – sum of fall = last reduced level minus first reduced level • 10.124 – 5.402 = 7.501 – 2.779 = 54.722 – 50.00 • 4.722 = 4.722 = 4.722 • Hence proved and balanced
HEIGHT OF COLLIMATION METHOD • Booking is the same as the rise and fall method for back-, intermediate- and foresights. There are no rise or fall columns, but instead a height of collimation column
Cont… • The first back sight reading (staff on datum, benchmark or RL) is added to the first RL giving the height of collimation. • The next staff reading is entered in the appropriate column but on a new line. The RL for the station is found by subtracting the staff reading from the height of collimation
Cont… • The height of collimation changes only when the level is moved to a new position. The new height of collimation is found by adding the back sight to the RL at the change point. Please note there is no check on the accuracy of intermediate RL's and errors could go undetected .
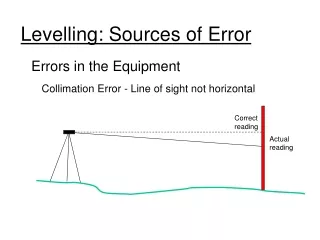
Common Sources of Errors • Level rod not vertical • Level rod/staff not fully extended or incorrect length • Level instrument not level • Unstable ground • Environmental factor ie. Wind and heat
Suggestions for good levelling • Check the bubble level before and after each reading • Take as little time as possible to read between fore sight and back sight • Try to keep the distance to the BS and FS equal
Cont… • Anchor tripod legs firmly • Level rod must be vertical • Level instrument must be level
THE END • MAY THE ALMIGHTY GOD BLESS YOU ALL • MAY I WISH YOU GOOD PREPARATION TO YOUR INCOMING EXAMINATIONS. • ………….BYE BYE…………………….