Exploring Edward Weston’s Sea Creatures: Drawing and Techniques Inspired by Nature
210 likes | 337 Vues
Dive into the world of Edward Weston and discover his innovative photography techniques that transform shells into extraordinary art. This project invites you to observe and sketch sea creatures, focusing on outlines and textures, while incorporating tonal shading inspired by Weston’s style. Learn to use wax resist methods, combining crayon and watercolor to create vibrant layers reminiscent of Ernst Haeckel’s illustrations. Conclude with your own imaginary sea creature creation, integrating textures and details that reflect your artistic vision.

Exploring Edward Weston’s Sea Creatures: Drawing and Techniques Inspired by Nature
E N D
Presentation Transcript
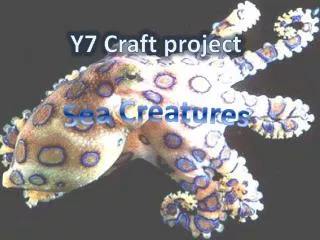
Y7 Craft project Sea Creatures
Edward Weston • What has Edward Weston done to his photographs and the way he has positioned his shells to make them look like something different? • Why do you think he has done this?
Pencil drawing of a shell • Take your time to set up your shell. Consider the angle at which you will draw it. Think about how Edward Weston posed his shells • Before you start to draw, look carefully at what you are drawing. How will you ensure you get your drawing right? • Concentrate on the outline first. Sketch lightly. Good observation IS KEY to good drawing! • Think about ‘gestural mark-making’ – big sweeping gestures you make with your whole arm/hand, rather than just drawing the shell bit by bit. Your gestures should mimic the curves of the shell to help you get the shapes right.
Adding tone Shading should curve in the direction that your shell curves. Aim to include at least light + medium + dark shading in your drawing for a good level. Tip: Avoid heavy outlines, this will make your drawing look flat, rely on shading and texture to show shape.
Texture Look at the textures on the shell, if in doubt, run your finger over the texture. Think about how you can represent that. You might like to ‘reverse draw’, by rubbing into your shading with an eraser, to add ‘highlights’ (very white areas), or show texture. Aim for at least TWO textures in your drawing for a good level. You can make your shell look darker by putting your textural marks close together, or very light by just suggesting a little bit of texture here and there.
Haeckel’s Sea Creatures • Haeckel was a zoologist, an accomplished artist and illustrator who published his works in the book ‘Art-forms Of Nature’
Wax Resist using Haeckel’s Work • Choose one of the animals/plants/shells from Haeckel’s illustrations and produce a careful pencil outline. • Choose strong colours of wax crayon and apply in suitable places, leaving some ‘gaps’ to be filled with watercolour. • DON’T crayon it all in or it won’t work! You are aiming for a subtle effect. Start with light colours in your first layer. • Using subtle washes of watercolour (add lots of water so your paint is translucent) go over the crayon. • The wax should resist the watercolour. • If you want stronger contrasts, dry your work with the hairdryer and you can work over different areas with different colours. • Aim for at least 3 layers of wax and watercolour to really bring out the different shades and bright colours of Haeckel’s illustrations.
Homework • Find a clear picture of a real sea creature/plant and print it off. It should be at least A5 and clear to see. • You will be drawing it in biro • next lesson, try to find one with good contrast (light and shade) and some texture
Biro study • Rough out the approximate shape of your sea creature. Keep your sketching light so you can rub out. • Adjust the shape as you go, until you are happy with it. • Start adding tone and texture to suggest form with your biro, start lightly, remember you cannot rub it out. ‘You can put it on, but not take it off!’ • Use directional mark making to show the shape of the creature e.g. If it curves, so should your pencil marks. • Think how you can use different marks to add texture where you animal isn’t totally smooth e.g. Squiggles, bumps, jagged marks, circles, spirals. • What else could you do to make texture?
Imaginary Animals – The Bestiary • Why might people have drawn imaginary beasts? • What inspired them?
Imaginary Animals • Michael Barnes, ‘Bestiary’
Max Ernst – ‘Frottage’ (rubbings of textures) • Homework: • Collect different textures around your home by producing rubbings. Bring them in next lesson. • You will be making an imaginary sea-creature from them. Get as many interesting ones as possible. • What could you use?
Collaging your frottage textures • Think about how you can use the different textures you have gathered. What do the textures remind you of? Think about how you could rotate them so that they look differently if you can’t think of anything! • Think about how Max Ernst used his textures in ‘Palermo’. Think about how you will put your imaginary creature together BEFORE starting to cut and stick! • Play about with the shapes you cut out BEFORE you stick them down. When you are happy with your animal, draw into it with pencil to add detail and tonal shading to add depth/weight to it. • When you have finished, you can draw it’s habitat (where it lives) • Give it a name and write a short explanation about your imaginary creature.
This is an example of the final outcome you will be making. • Consider this when designing your imaginary sea-creature. • The outline will be in gutta pen and the colour will be added using subtle watercolour tones. You can add texture and detail to it with stitching and beads.
Designing your imaginary animal for your fabric painting • Use the images of Haeckel’s sea creatures and the imaginary animals to help you. You need to have a design which is a solid shape, so that it can be cut out of fabric and stitched together. • You will be painting it on fabric with watercolours and embellishing it (decorating) it with beads and stitching, so it can be as simple or as complicated as you like. • Your design needs to be either A5, or A4 if you feel confident taking on a larger size piece of work.
Steps 1 & 2 • First pencil out your design carefully. You don’t want the outline too complicated, because you will have to go round it with a gutta pen, which are not always easy to control. Choose a simple shape if you lack control. You can always add detail to it later with paint and sequins/thread. • Add colour using watercolour. Build up the colours from the lightest to the darkest. Remember you can blot with a paper towel, but don’t scrub at it. Avoid scrubbing with your paint brush. Try to work in some bright colours to show your inspiration from Haeckel’s work.
Transferring your design to fabric • Using a fineliner, add black outlines and detail to your design. This should give your image a very graphic/solid feel. It will also make it easier for your to trace the design onto tracing paper. • Trace the design, just the basic outline, not the detaiil, you will add this later. • Tack your tracing paper onto one piece of fabric with pins. Cut around it with sewing scissors. Leave about 2cms around the edge of your tracing. This will give you the basic outline of your creature.
Adding Gutta • Using your tracing as a guide, start to add gutta to your design. Squeeze it very gently and move your whole hand as you squeeze the tube. You only need a thin line to make it look good. Take your time and don’t rush. • When you have the outline add the detail. Don’t brush the design with your hand or you will smudge it. • When you finish, put it on the drying rack. Make sure it is not touching anything else, or it will stick/smudge.
Adding colour • When the gutta is dry, start adding colour with watercolour paints. Build up the colours staring with the lightest first. You may need to use more than you think, because the fabric will absorb lots of the pigment. You can always add more. • Dry with the hairdryer. You can add beads, sequins and stitching if you have finished. • Pin the second piece of cotton behind, adding a layer of wadding and backstitch together. Cut to shape with scissors, taking care not to cut your stitching.