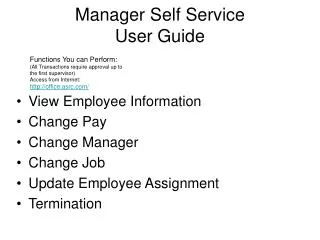
Manager Tutorial Manager Self-Service
Accessible via HRMS, view job/personal data, manage personnel, and performance reviews for JMU managers. Detailed steps for navigating the system provided.

Manager Tutorial Manager Self-Service
E N D
Presentation Transcript
Accessible via the Human Resource Management System for all JMU managers Gain visibility into direct reports’ job and personal data such as emergency contacts, training, compensation, and leave balances for those employees eligible to accrue leave Supports managers in their day-to-day personnel management and during performance review time Features a hierarchy drill down enabling the manager’s manager to view data for all direct reports in the corresponding hierarchy Manager Self-Service Overview Manager Self-Service
Manager Self-Service – Navigate to login page • Open an internet browser such as Internet Explorer or Firefox • On the JMU home page, click the Other Sites drop down arrow and select Faculty/Staff • 3. Under the Login heading, click IS Applications Manager Self-Service
Manager Self-Service – Navigate to login page • You will land on the Information Systems Applications page. • Select Human Resource Management System from the Human Resources column to open the login page. Manager Self-Service
Manager Self-Service – Login page Enter your JMU e-ID and password Click Sign In to enter HRMS Manager Self-Service
Manager Self-Service – HRMS Menu After logging in, you will see the Menu. One of your options on the menu should be Manager Self-Service. Click on Manager Self-Service Manager Self-Service
Manager Self-Service – HRMS Menu A new window opens to show “Job and Personal Information.” A second menu opens displaying three links: View Employee Personal Info (to view individual employee’s data), Employee Data Summary (to view summary data of all employees), and Approve/Deny Leave Requests (to act on employee leave requests). Manager Self-Service
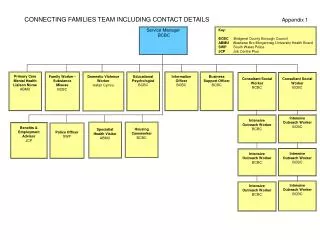
Manager Self-Service – View Employees This page is the starting point for accessing individual employee’s personal information. For this example, the manager is Betsy Ross and these are her direct reports. Full-time employees Manager Self-Service
Manager Self-Service – View Employees Choose an employee by clicking one of the SELECT buttons. We will use James Madison as our example employee throughout this part of the tutorial. The plus sign icon indicates that this employee also has direct reports. Click the icon to drill down and view your indirect reports’ personal information. If you see incorrect or missing employee data, use this link to report the details to HR. See the next slide. Manager Self-Service
Manager Self-Service – Report Missing Data The email form is pre-populated with the manager’s email address in the “from” field, Human Resources email address in the “to” field, and a defaulted subject line. To notify HR of incorrect or missing data, enter details in the Message text box and click Send Notification. You may also ‘cc’ or ‘bcc’ yourself or others. Manager Self-Service
Manager Self-Service – Employee Information After selecting an employee and clicking the Continue button the Employee Information page displays, giving you several informational links. Drill down on each link to view the corresponding information for the selected employee, James Madison. The following slides illustrate the content of each link. The “Leave” link appears only for those employees who are eligible to accrue leave or who have elected the Virginia Sickness and Disability Program (VSDP). Therefore, you may or may not see the “Leave” link on this page. Manager Self-Service
Manager Self-Service – Home/Email Address After selecting Home Address or Email Addresses from the Employee Information page, the pages below display. Employees can update their home address via MyMadison any time. As they make changes to their data, it will update Manager Self-Service as well Manager Self-Service
Manager Self-Service – Phone Numbers After selecting Phone Numbers from the Employee Information page, the page below displays. Employees can update their phone numbers via MyMadison. Use Manager Self-Service to make sure you have the most current phone numbers for your employees. Manager Self-Service
Manager Self-Service – Emergency Contacts After selecting Emergency Contacts from the Employee Information page, the listing of contacts displays. Employees can update their emergency contacts via MyMadison. By clicking on the hyperlink, you can view additional details about the emergency contact person. Manager Self-Service
Manager Self-Service – Birthday After selecting Birthday from the Employee Information page, the birth month and day displays. Manager Self-Service
Manager Self-Service – Memberships After selecting Memberships from the Employee Information page, the list of organizations to which the selected employee belongs displays. This information is entered via MyMadison by the employee. By clicking on the hyperlink, you can view additional details about the organization. Manager Self-Service
Manager Self-Service – Leave for A&P Faculty After selecting Leave from the Employee Information page, the leave balances page displays. This page may look different depending on the employee class. The example below is for an exempt A&P faculty member who has elected VSDP. The first 15 of all transactions are displayed. Click View All to display all transactions at the same time. Or use the arrow buttons to navigate between transaction pages. Manager Self-Service
Manager Self-Service – Leave for Classified The leave for a Classified employee shows details of each leave transaction. Manager Self-Service is a good way to help your employees manage their leave, including compensatory and overtime leave, if they are non-exempt and are eligible to accrue these leave types. The grid with the red arrow icon tells you that you can export the data on this table. Click on the icon and you will be prompted to Open, Save or Cancel. If the page won’t open, try holding down the “Ctrl” key while clicking on the icon. The first 15 of all transactions are displayed. Click View All to display all transactions at the same time. Or use the arrow buttons to navigate between transaction pages. Manager Self-Service
Manager Self-Service – Honors and Awards After selecting Honors and Awards from the Employee Information page, the list of honors and awards that this employee has received displays. This information is entered via MyMadison by the employee. By clicking on the hyperlink, you can view additional details about the award. Manager Self-Service
Manager Self-Service – Languages After selecting Languages from the Employee Information page, the list of languages that the employee can speak, read, and/or write displays. Employees self-enter this information via MyMadison. By clicking on the hyperlink, you can view additional details about the language. Manager Self-Service
Manager Self-Service – Training After selecting Training from the Employee Information page, you will be prompted to enter a date range for which to view an employee’s training events. You may include future dates if you wish to see those courses your employee is enrolled in the coming months. James Madison You can type in the date or use the calendar by clicking on the calendar icon. If you enter the date incorrectly, the system will give you an error message. Click OK to the message, then re-enter the date and click Continue. Manager Self-Service
Manager Self-Service – Training After selecting Continue, all training events that fall in the date range you entered should display. The list includes internally- and externally-offered trainings that were dropped, cancelled, waitlisted, enrolled or completed. Externally-offered trainings are self-reported via MyMadison by the employee. The hours are the duration of the course. The total number of hours that the employee has Completed or is Enrolled to take is at the bottom. This number may be helpful as you evaluate the status of your employee’s training goals for the performance year. Click Return to Training Summary Dates to enter a different date range or to navigate to the Employee Information page. Manager Self-Service
Manager Self-Service – Training After selecting Continue, all training events that fall in the date range you entered should display. The list includes internal and externally-offered trainings as well as those courses that were dropped, cancelled, waitlisted or completed. Each training course may have additional details available by clicking on the link of the Course Name. Click OK to return to the training list. If the course is “External” or non-JMU, details may be limited. Manager Self-Service
Manager Self-Service – Licenses & Certificates After selecting Licenses and Certificates from the Employee Information page, the licenses and certificates that the employee has self-entered via MyMadison will display. By clicking on the hyperlink, you can view additional details about the license/certificate. Manager Self-Service
Manager Self-Service – Compensation History After selecting Compensation History from the Employee Information page, the employee’s history of salary-related transactions displays. The default date range includes all data up to today’s date, though you have the option to query a different date range. In this example, James Madison was transferred in 2010 at $30,000 and has received three merit increases and two adjustment to arrive at his current salary of $38,391. You can drill down on the date hyperlinks for additional details. Manager Self-Service
Manager Self-Service – Compensation History Drilling down on the date hyperlink for a salary transaction, the salary change details display. Details of the transaction The Compensation Ratio shows you the relationship of the employee’s current salary to the midpoint of the salary range. The closer to 1.00 this is, the closer the employee’s salary is to the midpoint. Manager Self-Service
Manager Self-Service – Other Information FLSA (Fair Labor Standards Act) Status is determines whether an employee is eligible for overtime pay. Non-exempt are eligible for overtime pay. Those who are classified as Exempt are not eligible for overtime pay. The Review Rating appears only for Classified employees who receive a performance review. The review rating shows you the date of the rating and the rating. Manager Self-Service
Manager Self-Service – Employee Data Summary Back to the Main Menu, the Employee Data Summary is the “at a glance” aggregate information (leave balances and training) for your full-time direct reports and indirect reports (if applicable). Click Employee Leave Balances to view summary balances for your direct reports who accrue leave or have elected VSDP. Click Aggregate Training Hours to query training hours over a specified time period for your direct reports. Indirect reports are visible only through the Personal Employee Info pages. Manager Self-Service
Manager Self-Service – Employee Leave Balances As the manager of five direct reports, Betsy Ross sees all five on the leave balances summary page as all are classified employees enrolled in VSDP. The totals are accurate as of the previous pay period. Manager Self-Service
Manager Self-Service – Aggregate Training Hours Just as with the individual training summary, the aggregate training summary prompts you for a date range before displaying training hour totals for each employee for each status (Enrolled, Completed, Waitlisted, and No Show). This aggregate view enables the manager to view or download the total hours of training for her direct reports. Betsy Ross can see that her employees completed 17.5 hours of training and are enrolled for 0 hours for the given date range. Manager Self-Service
Manager Self-Service – View All and Export to Excel From the Leave and Training pages, you have the option to “View All” to expand the defaulted list of 15 and to Export to Excel if you need to create a report or reference the data offline. View all transactions Export to Excel icon Manager Self-Service
Manager Self-Service – Approve/Deny Leave Requests Back to the Main Menu, Approve/Deny Leave Requests allows you to act upon leave requests submitted by your reports. A supervisor may either access pending leave requests through HRMS or by clicking on the link in the notification email that is received on the date the employee takes the leave. Manager Self-Service
Manager Self-Service – Approve/Deny Leave Requests This page is the starting point for accessing pending leave requests for direct reports.For this example, the employee is George Washington and has submitted a leave request for 16.00 hours of Family/Personal leave. Click the drop down arrow to act on the leave request and either Approve or Deny. To approve all pending transactions, click the Approve All button and Save. Click the View Employee Leave Balances hyperlink to review how much leave your employee has available to take. HRMS will allow an employee to key a leave request even if the employee does not have appropriate leave to cover the time off. Manager Self-Service
Manager Self-Service – Approve/Deny Leave Requests If a leave request is approved, the employee will see the leave transaction on the transaction screen in MyMadison. If a leave request is denied, the employee will receive the below email: Manager Self-Service
Manager Self-Service – Sign Out of HRMS From any page in HRMS, to exit the system, click Sign out in the upper right corner. Manager Self-Service