Digital Camera Concepts
Digital Camera Concepts. Multimedia Mr. Wilhelmi. Concepts. The underlying principles that apply regardless of the camera you are using. Includes such things as how sharpness and exposure affect your images and the way they are perceived by viewers.

Digital Camera Concepts
E N D
Presentation Transcript
Digital Camera Concepts Multimedia Mr. Wilhelmi
Concepts • The underlying principles that apply regardless of the camera you are using. • Includes such things as how sharpness and exposure affect your images and the way they are perceived by viewers. • Understanding concepts answers the "why" kinds of questions you might have about photography.
Procedures • Those things specific to one kind of camera, and explain step-by-step how you set your camera’s controls to capture an image just the way you want to. • Understanding procedures gives you the answers to the "how" kinds of questions you might have.
Digital Cameras • All digital cameras capture light reflected from objects and records it digitally on tape, disk, or microchips. • The scene your camera sees will always be rendered to a finite number of individual picture elements (pixels). • Various objects or subjects in your photo will occupy a given set of pixels.
Composing a Shot • Think about the subject and how important it is to the environment in which it appears. • If you’re taking a shot of your pet the background is not important. Move in closer. • If your goal is to portray your pet in an action scene, the background becomes very important and needs to be included.
Rule of Thirds • Mentally superimpose a tic-tac-toe box over the image in the viewfinder. • Move the camera until one of the image's important parts line up at one of the four points where the lines cross. • Creates a visual sense of visual motion.
Rule of Thirds • The subjects eyes should be in the middle third horizontally. • Vertically you should place their eyes in the top third.
Nose Room • Leave enough room between a person's face and the edge of the frame when they are looking to one side or the other. • Also applies to objects - a car, truck or anything that has a definable front and back, make sure its "nose" is not slammed tight against the frame.
Camera Angle High Angle Shot • Adds Interest • Audience is superior in perspective
Camera Angle Low Angle Shot • Adds Interest • Audience is inferior in perspective
Camera Angle Chest High Shot • Good for Interviews • Neutral perspective
Framing • Use an object to frame the subject, such as a tree or a door frame.
Sharpness • Extremely sharp photographs reveal a richness of detail. • The sharpness of different parts of an image helps direct the viewer who tends to look first at the most sharply focused part of the picture. • Sharpness itself can be part of the message of the photograph.
Holding the camera correctly, bracing it, and breathing correctly can also reduce camera motion. • Use the optical viewfinder to take photos because you can brace the camera against your face instead of holding it out at shaky arms’ length. • Just before taking a shot, inhale deeply, then exhale and hold your breath while smoothly depressing the shutter-release button. • When holding the camera for both horizontal and vertical photographs use your right finger to press the shutter-release button and your left hand to support the camera.
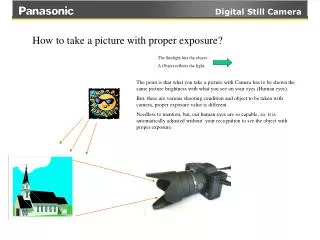
Most digital cameras have a two-stage shutter-release button. When you press it down halfway, it sets focus, exposure and white balance. • Focus determines which parts of the picture will be sharpest. • Exposure is the amount of light in a scene. • White balance is what makes white objects in the scene look white in the photo.
Panning • Moving the camera in the same direction as a moving subject produces an image where the subject is relatively sharp against a blurred background. • Your movement should be smooth and controlled to get a good pan, so begin to pan the camera before the subject enters your viewfinder. • Smoothly depress the shutter release as you follow the motion of the subject, keeping it in the same position in the viewfinder. • Follow through as you would in golf or tennis
Color • Your viewer's attention is drawn to the most colorful areas of the scene. • Bright and/or colorful objects have a dramatic effect on the composition of your shots. • They have additional "visual weight" compared to the darker areas of your image.
Color Balance and Time of Day • A color of light called "daylight" occurs between 10 A.M. and 2 P.M. • Colors appear clear, bright, and accurately rendered in the photo. • Before and after midday the light has a more reddish cast than at midday. • This reddish cast is a wonderful light to photograph in.
Sunsets and Sunrises • The colors in the sky are often richest in the half hour before the sun rises and the half hour after it sets. • If you want the sun in the photo, it’s best if it is softened and partly obscured by a mist or haze.
Instead of shooting into the sun at sunrise or sunset, shoot with it behind you to capture rich, warm colors of scenes bathed in the sun’s light.
The Moon • When full, adds a lot to an image. • The best time to capture the moon is when it’s near the horizon. Because it is close to foreground objects at that time, it looks much larger than when it’s higher in the sky.
Weather • Rain, snow, fog, and mist can add interest to your pictures.
Night • Light sources (street lights, automobile lights, neon signs, or fires) or brightly lit areas (illuminated buildings or areas under street lights) will dominate pictures at night because they stand out strongly against darker backgrounds. • Plan to use these bright areas as the dominant part of your picture.
Light: Its Direction • The direction that light is coming from relative to your camera’s position is important because it affects the shadows that will be visible in your picture. • Four main types of lighting are: front-lighting side-lighting backlighting top-lighting
Front-lighting • Light that falls on the subject more or less from the camera’s position. • Decreases visible shadows and so minimizes surface details such as skin texture. • Tends to minimize the apparent roundness or volume of the subject.
Side-lighting • Light that falls mainly on one side of the subject. • Increases the sense of texture and volume because such cross-lighting casts shadows visible from the camera’s position that emphasize surface details.
Back-lighting • Light that comes from behind the subject. • Puts the side of the subject that is facing the camera in shade.
Top-lighting • Light that comes from more or less overhead. • Can occur outdoors at noon or indoors in public buildings or other places where ceiling lights predominate. • Tends to cast shadows in eye-sockets and illuminate the top of the nose brightly.
Illusion of Depth • We see the world in three dimensions -- height, width and depth. • Film and video can only record and and reproduce height and width. • Shoot from an angle so you see at least two sides in your viewfinder. • Fool your viewer into thinking the flat image they are seeing has depth -- that it resembles three dimensional reality.
Compression • To make large image files smaller and more manageable, digital cameras store images in the various source formats. • A trade-off between compression and image quality.
Compression • Less compression, sometimes called Fine mode, gives you better images so you can make larger prints, but you can't store as many images. • More compression, in modes such as Normal or Basic, lets you store more images and makes the images better for making smaller prints, posting on a Web page, or sending as e-mail attachments. The only problem is that your prints won't be quite as good.
Source Formats Photos are stored on the camera’s storage device in one of three formats: • JPEG (Joint Photographic Experts Group) allows you to vary the amount of compression. • TIFF (Tag Image File Format) popular for desktop publishing applications. • CCD RAW contains everything captured by the camera.