Safety in the Shop
510 likes | 766 Vues
Safety in the Shop. Ag Mech 2011. Objectives. After completion of this unit, the student should be able to: Recognize and report hazardous situations . Develop a proper attitude toward use of safety glasses and coveralls . Develop a proper attitude toward work and avoid unsafe practices .

Safety in the Shop
E N D
Presentation Transcript
Safety in the Shop Ag Mech 2011
Objectives After completion of this unit, the student should be able to: Recognize and report hazardous situations. Develop a proper attitude toward use of safety glasses and coveralls. Develop a proper attitude toward work and avoid unsafe practices. Practice all shop and equipment safety regulations. Use a fire extinguisher properly. Make and keep a folder containing Material Safety Data Sheets.
You may ask why? Its to keep YOU, ME and those around safe
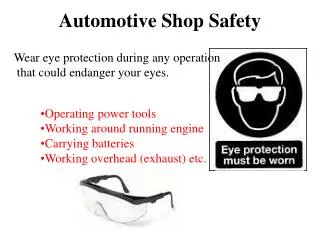
Wearing Safety Glasses Is not an option in the shop any more.
Color marking system Red is used to signify danger. Red tape or paint should be placed around all equipment or areas that are to be identified as items of danger or emergency. Orange is used to mark off areas where machine hazards are likely. This color is designated to mark off a safe working distance or an area in the flight path of moving parts.
Color marking system Yellowis the color used to designate caution. Yellow and black stripes are often used to mark stairs and other stationary objects where a hazard may occur. Greenindicates the presence of safety equipment, safety areas, or first aid kits. Purple is used to signify radioactivity. This is not a problem in most agricultural mechanics shops, but some chemicals may be used where radioactive isotopes are present
Color marking system Grayis used to signify all work areas and usable machinery. Most shop floors are also painted gray because it is a restful color and it contrasts well with all other safety colors. Whiteor white and black stripes are used to mark traffic pathways within the shop. Blueis used as a background color if information is to be provided. Signs such as 'Out of Order' are written in white lettering on a blue background.
Color marking system Grayis used to signify all work areas and usable machinery. Most shop floors are also painted gray because it is a restful color and it contrasts well with all other safety colors. Whiteor white and black stripes are used to mark traffic pathways within the shop. Blueis used as a background color if information is to be provided. Signs such as 'Out of Order' are written in white lettering on a blue background.
Protective Clothing What should be warn in the shop.
36% of all accidents in the shop occur to the arms and hands • 10% occur to the head • 25% of all injuries occur to the body. • Proper use of protective clothing and gear can minimize or prevent these injuries, and that is why you don’t get a choice! Will reduce the amount of injuries in the shop.
Safety goggles or glasses should be worn in the shop at all times.
Headgear is used to: • restrain long hair • Woolen hats, headbands, and hairnets are acceptable to prevent long hair from coming in contact with moving parts, chemicals, or an open flame • protect the head from falling objectsby wearing a hardhat. Headgear
Protective clothing: • Is used to keep the body safe from injuries. Such clothing should: • Fit properly • Have no loose cuffs strings, or ties that may get caught in machinery. • Be fire resistant and be tough enough to protect the body from scrapes and abrasions. • Several types of protective clothing are available. Clothing
Coveralls • Popular because they cover the entire body as well as the legs and arms. • Pockets are also an advantage of coveralls. • Care should be taken to prevent any loose strings or cuffs on the coveralls. • All buttons and zippers should have a protective flap and care should be taken to prevent ripped pockets from getting caught in moving machinery. • Aprons • The leather apron prevents sparks from reaching the body. • The disadvantage of aprons is that they require a string to tie them on, which is a hazard when working around moving parts. Aprons protect the body well, but do not provide protection to the arms and legs.
Shop coats • Are a good medium between coveralls and aprons. • They protect both the body and arms and still have pockets to hold small tools. • Zippers and buttons should have a protective flap to prevent electric shock or catching in moving parts. • The shop coat is also the easiest body protection to put on and is often cheaper than coveralls
Proper footwear • Is also important when working in the shop. • Open toed footwear must NEVER be worn in the shop. • Leather shoes with steel reinforced toes provide excellent protection. • Leather is fire resistant and tough enough to resist the impact of many falling objects. Footwear
Proper footwear • Is also important when working in the shop. • Open toed footwear must NEVER be worn in the shop. • Leather shoes with steel reinforced toes provide excellent protection. • Leather is fire resistant and tough enough to resist the impact of many falling objects. • Rubber boots • Required when working in water or when using pesticides. • These boots are also ideal when doing concrete work due to their resistance to water and the ease with which they can be cleaned Footwear
Gloves can be both protective devices and hazards in the shop. • Gloves are used to keep the hands warm and to protect them from: • Abrasion • Heat • chemicals. • Gloves are excellent protection when using tools that emit flying debris, such as grinders and chainsaws. • Caution should be taken when wearing gloves around moving parts. • Gloves can easily be pulled into the machines and serious injury can result. • It is not advisable to wear gloves where the hands will come in close contact with the moving parts of a machine
Ear plugs or earmuffs • Are ideal when working around noisy machinery. • Some machines, such as planers, emit a very high pitched sound that can damage the inner ear if protection is not worn. • Masks and respirators • Should be worn when using machines that produce large amounts of dust. • Should be worn when applying chemicals this also requires the use of a respirator.
Fire Causes of Fires in the Shop Fire occurs only when three factors are combined. These are fuel, oxygen, and heat. The absence of any one of these factors will prevent a fire. Fuelconsists of any combustible material. Any common material in the shop from old rags to grease and oil can act as the combustible. All combustible materials must be properly stored to prevent the dangers of fire. Heatis required to ignite the combustible. Heat can be provided from many sources in the shop including open flames, electric sparks, or high friction heat. Oxygenmust be present in order for fuels to burn. The absence of oxygen will prevent a fire or put one out. A puncture to the container with all three factors present can cause a serious explosion.
Fire Preventing Fires in the Shop The absence of any one of the factors described above will prevent a fire from starting, or put one out if it has already started. There are many safety precautions that can be taken in the shop to prevent the combination of fuel, heat, and oxygen. Store fuels only in approved containers. These containers should be made of: metal and ideally equipped with doors that seal automatically in the presence of fire. Store fuels in a separate area from other flammable materials such as wood and paper
Fire Preventing Fires in the Shop Keep the shop environment at a cool temperature with all areas being well below the combustion temperature of all materials. Most chemicals and liquid fuels will have data which label the combustion temperature and safe storage temperature range. Use fires only in areas that are designated safe for that purpose. (Forge, cutting torch, etc.)
Fire Extinguishing Fires in the Shop Fires are extinguished by removing any one of the three factors. Different types of fires require different methods to extinguish them. Fires are categorized according to the type of fuel they burn. These classes of fires must be known in order to correctly extinguish all types of fires in the shop. Class A Class B Class C Class D
Class A-Ordinary combustibles. These fires burn fuels such as wood, paper, and trash; they do not involve any liquid fuel or electricity. Such fires can easily be contained by smothering them, using water to cool them, or by removing the unburned fuel and letting the fire burn itself out. Class B- Those that utilize flammable liquids for fuel. These fires are more difficult to extinguish and can be much more dangerous than class A fires Class C- Involve electrical equipment. This type of fire not only has the risk of burning and smoke inhalation, but also of electrocution Class D- Involve combustible metals. Very few metals will burn. Burning metals are very difficult to put out and require a Class D fire extinguisher in order to quench them.
The fire classifications Are based on how cheaply and easily the fires can be extinguished. Class A fires can be extinguished safely using water. Water is the cheapest and easiest fire retardant to apply. In some situations, such as in electrical fires, water is not safe to use due to the chance of electrocution.
Fire extinguishers vary as do the types of fires. Each fire extinguisher is labeled with the types of fires it can put out. Symbols are used to indicate each type of fire extinguisher. The green triangle is used to designate fire extinguishers that can put out ordinary combustible fires. A red square is designates Class B fires which involve flammable liquids. Electrical equipment fires can be extinguished with a fire extinguisher labeled with a C surrounded by a blue circle. Combustible metal fires are extinguished by a fire extinguisher that has a yellow star symbol with a D in the center.
Fire extinguishers have a variety of different ingredients, depending on their capabilities. Extinguishers containing water that are powered by pump or gas pressure can be used on Class A fires only. Carbon dioxide gas extinguishers are useful on both Class B and Class C fires. Dry chemical extinguishers can be used on Class A, B, and C fires. Fire extinguishers that emit foam are to be used on Class A and Class B fires only. Class D fire extinguishers contain special chemicals that can extinguish combustible metal fires
Fire extinguishers should not be used on humans and animals unless absolutely necessary. A blanket is used to smother fires on humans and animals. Using a fire extinguisher involves three easy steps. Locate the fire extinguisher and remove it from its holder. Hold the fire extinguisher upright and pull the ring pin. Start back ten feet from the flames and aim the nozzle at the BASE of the fire. Squeeze the lever and sweep the nozzle in a side-to-side motion across the base of the fire.
Each fire extinguisher should be checked at least once a month to assure that it will be usable in case of an emergency Regardless of the safety precautions taken by the instructor, accidents continue to occur in the shop. Most of these accidents can be prevented if each student develops safe working habits
Many simple shop rules can lead toward the development of a sense of the importance of safe shop procedures. NO horseplay in the shop. Shop work requires the undivided attention of the worker if a task is to be performed safely for everyone in the shop. 'Playing around' distracts from this safe attention. Report any hazard to the instructor immediately. Many accidents occur because students believe that the instructor already knows about a hazard. Read the safety signs on equipment before using it and warning labels on all chemicals or materials to be used. Know the placement of safety equipment, and the school's safety procedures. All shop safety regulations will be enforced at all times.
Many simple shop rules can lead toward the development of a sense of the importance of safe shop procedures. NO horseplay in the shop. Shop work requires the undivided attention of the worker if a task is to be performed safely for everyone in the shop. 'Playing around' distracts from this safe attention. Report any hazard to the instructor immediately. Many accidents occur because students believe that the instructor already knows about a hazard. Read the safety signs on equipment before using it and warning labels on all chemicals or materials to be used. Know the placement of safety equipment, and the school's safety procedures. All shop safety regulations will be enforced at all times.
Use proper shade lenses - shade 5 to 7 • Assume that all metal is Hot in this area • Always chain cylinders to cart, bench, or walls • Keep oil and grease away from oxygen cylinders and equipment. Oil or grease burns violently in the presence of oxygen. • Test connection for leaks frequently with soap and water • Keep area clear of combustible materials • Stand on one side of gauges when opening cylinder values ACETYLENE WELDER
Never use a match to light the torch • Do not walk with a lighted torch or lay down a lighted torch. An unattended lighted torch may cause burns. • Never open acetylene valve more than 1 to 1 ½ turns and leave the shut-off wrench in position at all times in case the tank must be turned off quickly • Welding or cutting galvanized metal will produce poisonous fumes • Before welding a container that may have held a flammable material, it should be steam cleaned and filled with water ACETYLENE WELDER
Use proper shade lenses – shade 10 to 12 • Wear protective clothing • Assume that all metal in the area is Hot until you have tested it • There is a possibility of being shocked if you are wet, standing on wet floors, or if the welder has loose connections • Make sure the welding area is free of combustible material • Make sure exhaust fan is running before starting to weld ARC WELDER
Welding galvanized metal or surfaces painted with lead base paints produces poisonous fumes • Warn persons nearby before striking arc • Before welding containers which may have held combustible materials, steam clean them and fill with water • Wear eye protection while chipping • Do not throw electrode stubs on floor because of slipping hazard ARC WELDER
Wear eye protection • Use sharp drill bits only • Clamp your work - loose metal can cause serious injury • Remove chuck key before drilling • Place work on wood to prevent damage to table • Use proper speed: • Slow speeds for large drills • Fast speeds for small drills DRILL PRESS
Place long end of piece being drilled to your left so that if it happens to slip, it will not strike operator • Do not wear gloves, loose fitting clothing or jewelry • Never grab metal spirals - they may cause serious cuts • Do not allow anyone around you while drilling • If you have long hair, wear a hat or tie the hair back • Use slower feed when breaking through material DRILL PRESS
Wear eye protection • Tool rests should be as close as possible to grinding stones without touching them • After installing a new wheel, stand to one side and let the grinder run a full minute before using it • Do not grind on the side of the wheel. Side pressure may cause the wheel to break. • Keep fingers away from wheel. Use pliers for holding small pieces. • Keep stones dressed and trued. A shiny surface indicates a dull wheel. Vibration indicates out-of-roundness. • Do not use a stone that is worn down to ½ of its original diameter BENCH GRINDER
Make sure the jack is capable of lifting the load • Check lift points carefully to avoid damage to the item being lifted and to the jack • When working under lifted objects, support the objects with jack stands and lower the jack. • Never work under anything which is supported only by the jack. • Never leave an object supported only by a jack HYDRAULIC JACK
Wear dry gloves and coveralls while operating this machine. More splatter or molten metal will be experienced than with ordinary arc welders. • Electrode should be touched to work very lightly before starting to weld. Excess pressure may cause electrode to coil inside of cable. • Do not touch electrode to bare skin. Since electrode is not coated, it may cause shock. • Be sure gas is turned on before starting to weld MIG WELDER
Do not lay the torch on the welder • Periodically clean the torch nozzle. • Excess pile up of splatter can stop the electrode feed and cause it to coil up inside the cable. • Keep the cable as straight as possible while welding to prevent binding the electrode • Keep eyes shielded after the weld is completed. • Small pieces of slag explode from the weld as it cools. MIG WELDER
Wear eye protection • Use only sharp drills • Avoid wearing loose clothing • Remove chuck key before drilling • Keep a firm grip on the drill. Be alert to the possibility of the bit catching and throwing you off balance. • Do not lock the switch in the “ON” position while the brill is being held with the hands PORTABLE DRILLS
Use less pressure when breaking through the stock • Do not use bits larger than specified by the chuck size. This will cause overloading of the drill motor. • Be sure that stock being drilled is securely fastened before drilling • Use a center punch before starting to drill • Do not let drill bit spin in hole without cutting PORTABLE DRILLS
Wear eye protection • See that other workers are out of range or are wearing eye protection • Do not lay the grinder down until it comes to a complete stop • Make sure you are balanced and have good footing PORTABLE DISC GRINDER
Hold the grinder firmly with both hands at all times • Check the location of the power cord at all times to avoid cutting it • Check for cracked or glazed grinding wheels frequently • Use the left-hand portion of the disc so the particles will fly away from you PORTABLE DISC GRINDER
Wear eye protection - wires from the wheel could lodge in your eye • Do not wear gloves, rings or loose-fitting clothing • Hold work at or below the center of the wheel. Any object caught by the wheel will then be thrown down. • Use pliers to hold small objects to be brushed • Do not use excessive pressure POWER WIRE BRUSH
Wear eye protection - wires from the wheel could lodge in your eye • Do not wear gloves, rings or loose-fitting clothing • Hold work at or below the center of the wheel. Any object caught by the wheel will then be thrown down. • Use pliers to hold small objects to be brushed • Do not use excessive pressure POWER WIRE BRUSH
Every time I catch you without safety glasses • You owe_______ and loose ______points • Every time you catch me without safety glasses • I owe the class _________ • Lets make safety an attitude! Lets make a deal ?!?!