Download
1 / 10
120 likes | 319 Vues
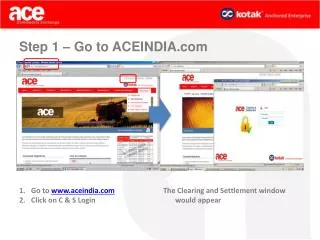
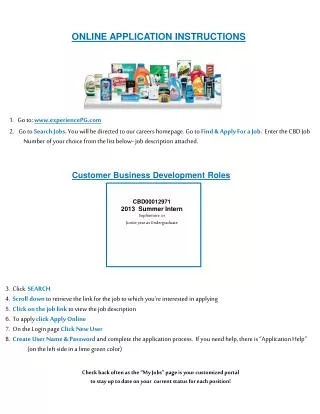
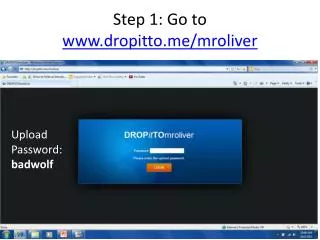
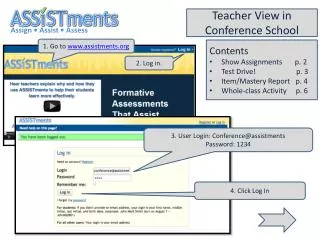
Teacher View in Conference School. Assign • Assist • Assess. 1. Go to www.assistments.org. Contents Show Assignments p. 2 Test Drive! p. 3 Item/Mastery Report p. 4 Whole-class Activity p. 6. 2. Log in. 3. User Login: Conference@assistments

E N D
Teacher View in Conference School Assign • Assist • Assess 1. Go to www.assistments.org • Contents • Show Assignments p. 2 • Test Drive! p. 3 • Item/Mastery Report p. 4 • Whole-class Activity p. 6 2. Log in. 3. User Login: Conference@assistments Password: 1234 4. Click Log In
5. This is the teacher view of the class. Click on Assignments Assign • Assist • Assess 6. These are the folders for the problems sets done by students enrolled in “NEASP Conference”
7. All current assignments are listed. Assign • Assist • Assess 8. The assignments titled in black ink are “problem sets”. 9. Those titled in red ink are “skill builders”. 10. If Set Dates is highlighted, click it.
11. Click “Test Drive!” on a “problem set” assignment (black ink). Assign • Assist • Assess 12. You can experience the problems from the perspective of the student using “Test Drive”
13. Click “Test Drive!” on a “problem set” assignment (black ink). Assign • Assist • Assess 14. You can see the whole problem set using “Print” 15. In Print you can get different views of the problem set. These views are only for teachers (they can be printed for students but they do not affect the problem set in student view.)
16. Click “Reports” on a “problem set” assignment . Assign • Assist • Assess 17. Reports are on the Assess tab. 18. The settings for this report are Class, Section, and Assignment. 19. The default report is “Item Report” for regular problem sets and “Mastery Report” for Skill Builders.
20. Each column in the Item Report is for a problem. At the very top are the problem numbers. Clicking on these reveals the problem. Assign • Assist • Assess 21. Open circle means “Not started”. 22. Half circle means seen but not submitted. 23. Half circle is partially done, percent is average of what was done. 24. Common Wrong Answers are given. The percent is of the students who got the problem wrong. 25. Green check means answered correctly. Answer submitted is shown below. 26. Red check means incorrect. Below is the incorrect answer 27. A red check with a yellow fill means all the hints were used (bottomed out).
28. If you click Anonymize atop the left column, all the names are x’s. Assign • Assist • Assess 29. The class average is at the top. (# correct/# of problems). 30. Teaches can assign problems in response to the data. For example give an enrichment activity to all students with 90 or above. 31. Individual student averages. 32. Suggestion: Preview the Item/Mastery Report with each class. Have students indicate which problems need a whole-class review.
33. Now for Skill Builders Click “Reports” on a Skill Builder set (will always be red). Assign • Assist • Assess 34. Reports are on the Assess tab. 35. The settings for this report are Class, Section, and Assignment. 36. The default report is “Item Report” for regular problem sets and “Mastery Report” for Skill Builders.
37. Students may take more than one day to master. Most skill builders make them stop after 10 problems. Assign • Assist • Assess 38.You can see which students have reached mastery by looking for the green check. 39. Monitor the amount of time a student took to reach mastery. 40. Click on the astrix, you will see all the actions the student made. This works on both item and mastery reports. 40. Students will take different numbers of problems to reach mastery. In this case the minimum was 3. Find your own work from when you were a student.