Download

1 / 19
190 likes | 212 Vues
Learn about the process of real-time human skeleton tracking with Kinect, including body part segmentation and joint position tracking. Explore the Kinect for Windows SDK and its APIs for easy access to skeleton joints.

E N D
EEC-492/592Kinect Application Development Lecture 8 Wenbing Zhao wenbing@ieee.org
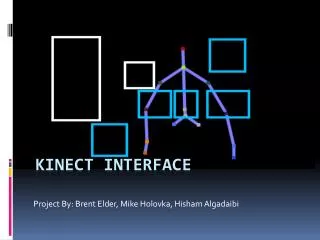
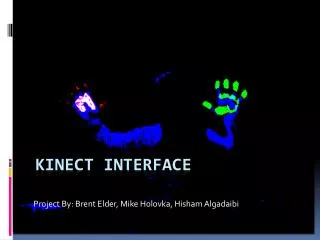
Outline Human skeleton tracking
Skeleton Tracking • Real-Time Human Pose Recognition in Parts from Single Depth Images, by J. Shotton et al at Microsoft Research Cambridge & Xbox incubation • http://research.microsoft.com/apps/pubs/default.aspx?id=145347 • Real-time human pose recognition is difficult and challenging because of the different body poses, sizes, dresses, heights and so on • Kinect uses a rendering pipeline where it matches the incoming data (raw depth data from Kinect) with sample trained data • The machine learned data is collected from the base characters with different types of poses, hair types, and clothing, and in different rotations and views • The machine learned data is labeled with individual body parts and matched with the incoming depth data to identify which part of the body it belongs to • The rendering pipeline processes the data in several steps to track human body parts from depth data
The Rendering Pipeline Processes • From depth image, we can easily identify the human body object • In the absence of any other logic, the sensor will not know if this is a human body or something else • To start recognizing a human body, we match each individual pixel of incoming depth data with the data the machine has learned • The data each individual machine has learned is labeled and has some associated values to match with incoming data • matching is based on the probability that the incoming data matches with the data the machine has learned
The Rendering Pipeline Processes • The next step is to label the body parts by creating segments • Kinect uses a trained tree structure (known as a decision tree) to match the data for a specific type of human body • Eventually, every single pixel data passes through this tree to match with body parts • Once the different body parts are identified, the sensor positions the joint points with the highest probable matched data • With identified joint points and the movement of those joints, the sensor can track the movement of the complete body
The Rendering Pipeline Processes • The joint positions are measured by three coordinates (x,y,z) • X and y define the position of the joint • Y represents the distance from the sensor • To get the proper coordinates, the sensor calculates the three views of the same image: front, left, and top views => define 3D body proposal
Skeleton Tracking • The Kinect for Windows SDK provides us with a set of APIs that allow easy access to the skeleton joints • The SDK supports the tracking of up to 20 joint points • Tracking state: Tracked, Not Tracked, or Position Only • Tracking modes: default and seated • Default mode: detects the user based on the distance of the subject from the background • Seated mode: uses movement to detect the user and distinguish him or her from the background, such as a couch or chair
Skeleton Tracking • Kinect can fully track up to two users • It can detect up to 6 users (4 of them with position only)
Skeleton Tracking • Seated skeleton: up to 10 joints • The seated pipeline provides a different segmentation mask than the default pipeline: • Continuity of the segmentation mask is not guaranteed outside of the arms, head, and shoulder areas • The seated segmentation mask doesn't correspond exactly to the player outline like the standing (full-body) mask does • The seated pipeline environment has less data, with more noise and variability than the standing environment • The seated mode uses more resources than the default pipeline and yields a lower throughput (in frames per second) on the same scene kinect.SkeletonStream.TrackingMode = SkeletonTrackingMode.Seated;
Capturing and Processing Sekelton Data • Enable the skeleton stream channel with the type of depth image format • Attach the event handler to the skeleton stream channel • Process the incoming skeleton frames • Render a joint on UI this.sensor = KinectSensor.KinectSensors[0]; this.sensor.SkeletonStream.Enable(); this.sensor.SkeletonFrameReady += skeletonFrameReady; void skeletonFrameReady(object sender, SkeletonFrameReadyEventArgs e) { }
Processing Skeleton Data void skeletonFrameReady(object sender, SkeletonFrameReadyEventArgs e) { using (SkeletonFrame skeletonFrame = e.OpenSkeletonFrame()) { if (skeletonFrame == null) { return; } skeletonFrame.CopySkeletonDataTo(totalSkeleton); Skeleton firstSkeleton = (from trackskeleton in totalSkeleton where trackskeleton.TrackingState == SkeletonTrackingState.Tracked select trackskeleton).FirstOrDefault(); if (firstSkeleton == null) { return; } if (firstSkeleton.Joints[JointType.HandRight].TrackingState == JointTrackingState.Tracked) { this.MapJointsWithUIElement(firstSkeleton); } } } Skeleton[] totalSkeleton = new Skeleton[6];
Render the Right-Hand Joint on UI We have to map the coordinate from the skeleton space to regular image space
Render the Right-Hand Joint on UI private void MapJointsWithUIElement(Skeleton skeleton) { Point mappedPoint = ScalePosition(skeleton.Joints[JointType.HandRight].Position); Canvas.SetLeft(righthand, mappedPoint.X); Canvas.SetTop(righthand, mappedPoint.Y); } • depthPoint will return the X and Y points corresponding to the skeleton joint point private Point ScalePosition(SkeletonPoint skeletonPoint) { DepthImagePoint depthPoint = this.sensor.CoordinateMapper. MapSkeletonPointToDepthPoint(skeletonPoint, DepthImageFormat. Resolution640x480Fps30); return new Point(depthPoint.X, depthPoint.Y); }
Build TrackingHand App • Create a new C# WPF project with name TrackingHand • Add Microsoft.Kinect reference • Design GUI • Added WindowLoaded() method in xaml file • Adding code
GUI Design • Canvas control, then add Ellipse control in Canvas
Adding Code KinectSensor sensor; Skeleton[] totalSkeleton = new Skeleton[6]; • Add member variables: • WindowLoade method (WindowClosing() same as before): private void WindowLoaded(object sender, RoutedEventArgs e) { this.sensor = KinectSensor.KinectSensors[0]; this.sensor.SkeletonStream.TrackingMode = SkeletonTrackingMode.Seated; this.sensor.SkeletonStream.Enable(); this.sensor.SkeletonFrameReady += skeletonFrameReady; // start the sensor. this.sensor.Start(); }
Adding Code void skeletonFrameReady(object sender, SkeletonFrameReadyEventArgs e) { using (SkeletonFrame skeletonFrame = e.OpenSkeletonFrame()) { if (skeletonFrame == null) { return; } skeletonFrame.CopySkeletonDataTo(totalSkeleton); Skeleton firstSkeleton = (from trackskeleton in totalSkeleton where trackskeleton.TrackingState == SkeletonTrackingState.Tracked select trackskeleton).FirstOrDefault(); if (firstSkeleton == null) { return; } if (firstSkeleton.Joints[JointType.HandRight].TrackingState == JointTrackingState.Tracked) { this.MapJointsWithUIElement(firstSkeleton); } } } • Event handler for skeleton frames:
Adding Code private void MapJointsWithUIElement(Skeleton skeleton) { Point mappedPoint = ScalePosition(skeleton.Joints[JointType.HandRight].Position); Canvas.SetLeft(righthand, mappedPoint.X); Canvas.SetTop(righthand, mappedPoint.Y); //this.textBox1.Text = "x="+mappedPoint.X+", y="+mappedPoint.Y; } private Point ScalePosition(SkeletonPoint skeletonPoint) { DepthImagePoint depthPoint = this.sensor.CoordinateMapper. MapSkeletonPointToDepthPoint(skeletonPoint, DepthImageFormat. Resolution640x480Fps30); return new Point(depthPoint.X, depthPoint.Y); } • For UI display
Challenge Task • For advanced students, please modify the project to make it a drawing app • Shows all traces of the hand movement • Add button to clear traces to make a new drawing • Add a small palette chooser for change the color of the drawing point (an Ellipse) EEC492/693/793 - iPhone Application Development