ImageJ Tutorial
ImageJ Tutorial. Outline. Introduction to ImageJ Install ImageJ How To Use ImageJ and Examples Hello ImageJ —— The first plugin Programming Tricks Test data. Introduction to ImageJ. What is ImageJ?

ImageJ Tutorial
E N D
Presentation Transcript
Outline • Introduction to ImageJ • Install ImageJ • How To Use ImageJ and Examples • Hello ImageJ——The first plugin • Programming Tricks • Test data
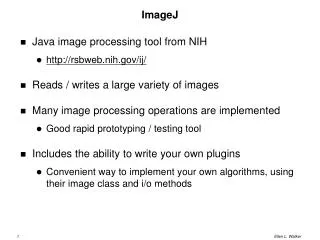
Introduction to ImageJ What is ImageJ? ImageJ is a public domain, Java-based image processing program developed at the National Institutes of Health. ImageJ was designed with an open architecture that provides extensibility via Java plugins and recordable macros.
Introduction to ImageJ Who is using ImageJ? The first ImageJ was released in 1997 for medical image processing use in NIH (National Institutes of Health). Image from http://en.wikipedia.org/wiki/National_Institutes_of_Health
Introduction to ImageJ Who is using ImageJ? Now it is widely used by physicist, biologist, medical scientist, neurologist etc. Image from http://wiki.imagej.net/ http://en.wikipedia.org/wiki/ImageJ
Introduction to ImageJ Why do they use ImageJ? There are so many reasons: • It is free • It runs everywhere • User Community • Macros • Plugins • Toolkit • Speed • Data Types • File Formats • Image display • Selections • Image Enhancement referent http://rsbweb.nih.gov/ij/features.html • Geometric Operations • Analysis • Editing • Color Processing • Stacks
Introduction to ImageJ What does ImageJ do? IT IS UP TO YOU
Install ImageJ Fiji can be Downloaded from: http://fiji.sc/Downloads If you don’t have Java environment you’ll need to download it from http://www.oracle.com/technetwork/java/javase/downloads/jdk7-downloads-1880260.html To setup Java environment please follow Section 1 of this tutorial http://javapapo.blogspot.com/2013/03/setup-your-java-development-environment.html
Install ImageJ If you don’t have Java developing tool Eclipse on your computer you can download it from http://www.eclipse.org/downloads/ If you are not familiar with Java, you may look at http://www.tutorialspoint.com/java/
Install ImageJ To install ImageJ or Fiji, just simply extract the package, and congrats you are done
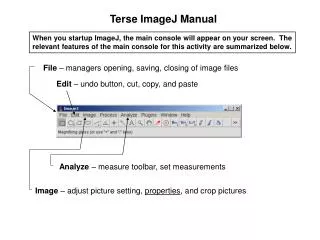
How to use ImageJ For detailed tutorial please visit http://rsbweb.nih.gov/ij/docs/guide/user-guide.pdf Or the webpage version http://rsb.info.nih.gov/ij/docs/guide/146.html Writing ImageJ PlugIns – A Tutorial http://rsbweb.nih.gov/ij/docs/pdfs/tutorial10.pdf
How to use ImageJ To open sample data to play with File->Open Samples To open a single image File->Open or just press key o To open a set of images in a folder File->Import->ImageSequence
How to use ImageJ When Image is too big to process Image -> Scale -> adjust the size
How to use ImageJ Some Definitions -- Stack vs Visual Stack ImageJ can display multiple spatially or temporally related images in a single window. These image sets are called stacks. The images that make up a stack are called slices. Virtual stacks are disk resident (as opposed to RAM resident) and are the only way to load image sequences that do not fit in RAM. Read only.
How to use ImageJ Example: Look the stack from the other side Image->Stack->Reslice->Choose a direction
How to use ImageJ Mysteries in Tool kits Left click – choose a toolkit. Right click – check toolkit options. Double click – check toolkit settings. Show different toolkit set.
How to use ImageJ Example: Color inner structures -> Overlay Brush -> Double Click -> Change settings
How to use ImageJ Sometimes Message shows up when Image Type doesn’t fit In case above, Image->Type->Choose the type you want In this case, Image->Process ->Binary -> Make Binary
How to use ImageJ Preprocesses, Blurs and Denoise Process -> Filters -> Choose a Filter Process -> Noise ->Despeckle
How to use ImageJ Binary process, some useful tools
Hello ImageJ——The first plugin Assume you already have Java environment and have eclipse installed n your computer
Hello ImageJ——The first plugin Step 1, create a plain java project
Hello ImageJ——The first plugin Step 2, create a new class better with main method
Hello ImageJ——The first plugin Step 3, add Fiji jar Right click on the project,
Hello ImageJ——The first plugin Step 3, add Fiji jar
Hello ImageJ——The first plugin Step 3, add Fiji jar Under the path of your ImageJ, inside ../jars/ folder select the jar with version number
Hello ImageJ——The first plugin Step 3, add Fiji jar If previous steps succeed, this will show up, then import without thinking.
Hello ImageJ——The first plugin Step 4, test your Hello ImageJ Run the code in previous slide, nothing impressive happened except the regular console output. You need add two more lines to your main method in order to make ImageJ run String [] ij_args = { "-Dplugins.dir=/Users/erwin/Desktop/fiji_git/fiji/plugins", "-Dmacros.dir=/Users/erwin/Desktop/fiji_git/fiji/macros" }; • ij.ImageJ.main(ij_args);
Hello ImageJ——The first plugin Step 4, test your Hello ImageJ These two will pop up when successes
Hello ImageJ——The first plugin Step 5, pack up the jar First you need to create your plugins.config The content of it should be like: Under Menu Plugin Name Location of Entrance
Hello ImageJ——The first plugin Step 5, pack up the jar Second right click your project, and click Export
Hello ImageJ——The first plugin Step 5, pack up the jar Select Jar file, then Next>
Hello ImageJ——The first plugin Step 5, pack up the jar Browse your export destination, and name the package. The package name mustcontains a underscore “_”, Then Finish
Hello ImageJ——The first plugin Step 6 install the new plugin Plugins -> Install -> Select your plugin OR Drag and drop your plugin to the ImageJ UI When the plugin is successfully installed. It will be shown in the plugin list
Programming Tricks With our first plugin installed, when we execute the plugin nothing happened. Why? We need our class implements PlugInFilter And override the run method
Programming Tricks After each alteration, we need to repeat the steps of making jar and install the plugin. Or we can test it directly like this.
Programming Tricks PlugInFilterclassis an interface has to be implemented by plugins, that require an image as input PlugInClass is an interface has to be implemented by plugins, that do not require an image as input
Programming Tricks And now we’ll start to have problem like this. This is because after we implemented PlugInFilterclass, a int setup(java.lang.Stringarg, ImagePlus imp) method is also overridden. It is for input image type check.
Programming Tricks You do not have to care for the argument imp – this is handled by ImageJ and the currently active image is passed. The setup method returns a flag word that represents the filter’s capabilities (i.e. which types of images it can handle). The following capability flags are defined in PlugInFilter: static int DOES_16 The plugin filter handles 16 bit grayscale images. static int DOES_32 The plugin filter handles 32 bit floating point grayscale images. static int DOES_8C The plugin filter handles 8 bit color images. static int DOES_8G The plugin filter handles 8 bit grayscale images. static int DOES_ALL The plugin filter handles all types of images. static int DOES_RGB The plugin filter handles RGB images. static int DOES_STACKS The plugin filter supports stacks, ImageJ will call it for each slice in a stack. static int DONE If the setup method returns DONE the run method will not be called. static int NO_CHANGES The plugin filter does not change the pixel data. static int NO_IMAGE_REQUIRED The plugin filter does not require an image to be open.
Programming Tricks static int NO_UNDO The plugin filter does not require undo. static int ROI_REQUIRED The plugin filter requires a region of interest (ROI). Static int STACK_REQUIRED The plugin filter requires a stack. static int SUPPORTS_MASKING Plugin filters always work on the bounding rectangle of the ROI. If this flag is set and there is a non-rectangular ROI, ImageJ will restore the pixels that are inside the bounding rectangle but outside the ROI.
Programming Tricks Here is a example of setup method Then export and install the plugin again. And here you go
Programming Tricks Do more testing No active image when we test the plugin in eclipse, so we need to load the image into memory by code. Those part has been added to the new plugin and you can download the template project from: http://www.cs.kent.edu/~xchang/plugin.zip
Programming Tricks Get pixels, and better getPixels Two ways to get and set color from image Way 1: int color = Imp.getStack().getProcessor(i+1).getPixel(x,y); Way 2 : byte[] pixels = (byte[]) imp.getStack().getPixels(i+1); byte color = pixels (y*width+x);
Programming Tricks RGB vs Greyscale We get greyscale color in byte type, and get RGB color in inttype. How to get color value: int red = (int)(pixels[i] & 0xff0000)>>16; int green = (int)(pixels[i] & 0x00ff00)>>8; int blue = (int)(pixels[i] & 0x0000ff); How to put it back: pixels[i] = ((red & 0xff) << 16) + ((green & 0xff) << 8) + (blue & 0xff);
Programming Tricks Call existing functions Google ImageJ API and find out Or Call macro in plugin
Programming Tricks When you don’t have enough memory Open run configurations
Programming Tricks Go to Arguments tab, and put the VM memory usage arguments –Xms256m –Xmx5000m
Test Data This data can be get from www.cs.kent.edu/~xchang/all-bak.zip
Download and Tutorial Links Fiji can be Downloaded from: http://fiji.sc/Downloads If you don’t have Java environment you’ll need to download it from http://www.oracle.com/technetwork/java/javase/downloads/jdk7-downloads-1880260.html To setup Java environment please follow Section 1 of this tutorial http://javapapo.blogspot.com/2013/03/setup-your-java-development-environment.html If you don’t have Java developing tool Eclipse on your computer you can download it from http://www.eclipse.org/downloads/ If you are not familiar with Java, you may look at http://www.tutorialspoint.com/java/ For detailed tutorial please visit http://rsbweb.nih.gov/ij/docs/guide/user-guide.pdf Or the webpage version http://rsb.info.nih.gov/ij/docs/guide/146.html Writing ImageJ PlugIns – A Tutorial http://rsbweb.nih.gov/ij/docs/pdfs/tutorial10.pdf Project Template http://www.cs.kent.edu/~xchang/plugin.zip This data can be get from www.cs.kent.edu/~xchang/all-bak.zip