How to Edit Your Teacher Website's Home Page Easily
This guide provides a step-by-step process for teachers to edit their Home Page using the Basic Teacher Website. It covers how to access the website builder, edit the page content, and add new pages with navigation links. Teachers will learn to set page titles, manage headers, create scrolling messages, and insert images and tables. Additionally, the guide explains how to manage the navigation sidebar and ensure that new pages are properly linked for easy access.

How to Edit Your Teacher Website's Home Page Easily
E N D
Presentation Transcript
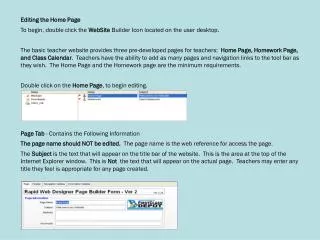
Editing the Home Page To begin, double click the WebSite Builder Icon located on the user desktop. The basic teacher website provides three pre-developed pages for teachers: Home Page, Homework Page, and Class Calendar. Teachers have the ability to add as many pages and navigation links to the tool bar as they wish. The Home Page and the Homework page are the minimum requirements. Double click on the Home Page, to begin editing. Page Tab - Contains the Following Information The page name should NOT be edited. The page name is the web reference for access the page. The Subject is the text that will appear on the title bar of the website. This is the area at the top of the Internet Explorer window. This is Not the text that will appear on the actual page. Teachers may enter any title they feel is appropriate for any page created.
The Header Tab - Contains the Title of the Page and Any Sub-Title the teacher wishes to display on the page. In addition to just the Title and SubTitle portions of the Header, teachers may also choose the Scrolling Message Tab under the header section to type a scrolling message. All scrolling messages will appear at the top of the screen. Each page may contain 2 scrolling messages. To enter the Title, Click in the Title Text Box and enter the Title of the page. This title will appear in the Header of the page. After Saving the Page, this information will be displayed online as indicated below
Navigation Side Bar Tab The Navigation Side Bar tab contains the links that are provided with the site for the website. These links are located on the left side of the screen for navigation. With the basic teacher site, there are four links: Home Page, Class Homework, Class Calendar and Downloads. The Home Page is the First Page that parents/students will see when they visit your site. The Class Homework page can provide any information the teacher deems is necessary for students or parents. The Class Calendar can be edited to provide specific due dates or class events that you want students/parents to be able to review. The Downloads area is a folder on the desktop that teachers can drop files into and a link will automatically be created on the website to download and view the documents. Teachers can provide class PowerPoint presentations, PDF documents, homework files, etc. in this folder. Although these basic navigational items are provided, teachers can add additional pages to the site, and add the navigation to the pages utilizing the Navigation Side Bar Tab. Adding Navigation 1.Click the Add New Row button 2.Enter the Text to be visible on the Page in the Display Text field 3.Enter the name of the page.
Editing Page Content The page content is edited using the Word Processing Capabilities within the program. Tools similar to those in MS word are provided, such as the alignment, font, and font size. To edit the text on the page, click in the text area, and type the desired content. Adding an Image 1. Click the Insert drop down options. 2. Choose Image/File 3. Locate the image on the computer. 4. Click Open. 5. The image will appear on the page. 6. With the image selected, utilize the Menu bar options to edit the placement, size or format of the picture.
Adding a Table 1. Click on the Insert drop down Options 2. Choose Table 3. Using the Table dialogue box, select the number of rows, number of columns, the alignment, and the width of the table. 4. Click OK 5. The table will appear on the page. 6. To make additional edits to the Table, utilize the Format and Table options. 7. When all page edits have been completed, click the Save and Close button at the top of the page. 8. After clicking Save and Close, the page will be visible on the actual website. Anytime a page is saved, the content is immediately visible online.
Creating a New Page In the event that the user wants to create additional pages, other than the basic site provided, the user must complete two tasks: 1. Create the New Page 2. Add the New Page to the Navigation of Each already existing page. After creating a new page, the navigation to the page must be added to all existing pages. It is best to add the new page to the navigation of the other existing pages PRIOR to creating the New Page. To create the New Page, the user should make a Copy of an existing page so that the navigation of the page may be duplicated. If a user chooses to create a New Page rather than a copy, the user will have to re-create the navigation on the Navigation Bar Tab. 3. Click once on the Home Page to select the page. 4. Click the Copy Current Page button from the Menu Bar. 5. The copied page will open automatically, enter the name of the page in the Page Nametext box. (the page name provided here is the Page Name that should be provided on the Navigation Bar. After enter the page name, the user can edit the remainder of the information according to the previous instructions in this tutorial. When copying a page, the Page Name is critical. Users must ensure that unique names are provided to each page created.