Download
1 / 3
30 likes | 177 Vues
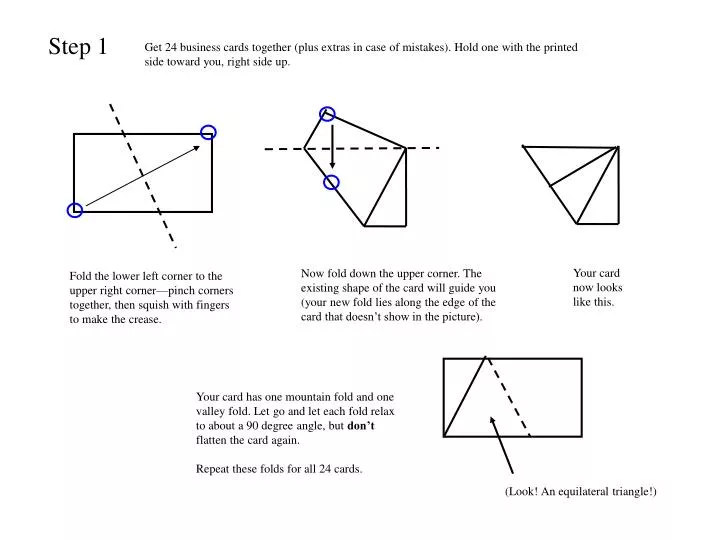
Step 1. Get 24 business cards together (plus extras in case of mistakes). Hold one with the printed side toward you, right side up. Your card now looks like this.

E N D
Step 1 Get 24 business cards together (plus extras in case of mistakes). Hold one with the printed side toward you, right side up. Your card now looks like this. Now fold down the upper corner. The existing shape of the card will guide you (your new fold lies along the edge of the card that doesn’t show in the picture). Fold the lower left corner to the upper right corner—pinch corners together, then squish with fingers to make the crease. Your card has one mountain fold and one valley fold. Let go and let each fold relax to about a 90 degree angle, but don’t flatten the card again. Repeat these folds for all 24 cards. (Look! An equilateral triangle!)
Step 2 Hold a card in your left hand, gripping it by its equilateral triangle. Now take another card and put the part shown in red on the 2nd card over the part labeled in red on the first card. Fold the small triangular flap over the first card. Pinch to keep the cards together. Transfer this pinch to your left hand. Then put a third card over your second card in the same way and pinch again. Hold all this however you can and add a fourth card, which wraps over the 3rd card and is itself wrapped over by the first card (got it?). The unit you get looks like this from the top. The triangular flaps are all folded down a bit to keep the unit together—otherwise the view from above would be a perfect square. Underneath, the parts of the cards you can’t see are making a spiral shape that lets the unit sit flat on the table. Use your 24 folded cards to make 6 of these units.
Step 3: just do it Study the picture—see how three of the units from Step 2 are clearly visible, and the triangular flaps weave together to make the 8 outer triangles of the cuboctahedron shape? This shape is not as complicated as it looks--it’s just a cube with all 8 corners cut off. Your six units will all be at right angles to one another as if they were the six faces of that cube. When joining two units, the picture below left shows the two line segments that have to come together and where you can begin tucking flaps under one another. I’ve shown the units from above, although the joining is easier with both units upside-down. (Note: As you look at the units’ undersides, there is a stronger way and a weaker way to put the units together, depending on whether you simply let them rest next to each other or push the cards into slots formed by the units’ structure. The stronger way will give you a stronger final product, but you probably won’t be able to do it for all unit-to-unit connections.) As you go along, keep cupping the structure in one hand while adding new units with the other. Interweave the small triangular flaps at every opportunity to keep it strong. You will have to disassemble the sixth unit and put the cards in individually, and putting in the final card will require loosening of a large part of the structure. tuck under tuck under