Soil Testing Methods
Soil Testing Methods. Chapter 8. Three approaches. Observations in the field On‑site measurements Laboratory measurements. Field Observations. Field observations of properties which can be observed after digging a soil pit

Soil Testing Methods
E N D
Presentation Transcript
Soil Testing Methods Chapter 8
Three approaches • Observations in the field • On‑site measurements • Laboratory measurements Soil Analysis Ch 8
Field Observations • Field observations of properties which can be observed after digging a soil pit • Semi‑quantitative assessments of properties rather than direct measurements. Soil Analysis Ch 8
Field Measurements • On‑site measurements using equipment inserted into soil, without significant disturbance of the soil. • This approach applies particularly to soil water studies. Soil Analysis Ch 8
Laboratory Analysis • Measurements made in the laboratory on soil samples taken from the field. • Sub-sampling down to an analytical sample also occurs Soil Analysis Ch 8
Soil Survey Reports • what kinds of soil exist in an area • described in terms of location, profile characteristics, relationship to each other, suitability for various uses, and needs for particular kinds of management • two major parts in a soil survey report: • the soil map • the narrative Soil Analysis Ch 8
SALIS • NSW soil survey database • Soil And Land Information Service • run by Dept of Natural Resources • http://www.dnr.nsw.gov.au/soils/about_salis.shtml Soil Analysis Ch 8
Field Analysis of Soils How can we Analyse Soil in the Field?
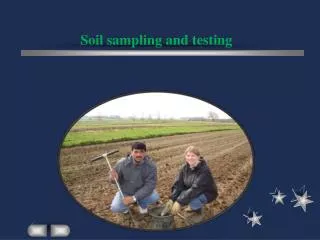
Field investigation • soil pits • expose the soil profile and horizons • allow field testing of parameters that would be destroyed by cores • in-situ testing devices • semi-quantitative assessments • field data minimises sampling error • does not guarantee reliable or even consistent data • soils have very poor homogeneity Soil Analysis Ch 8
Soil Pit from www.drm.gov.au Soil Analysis Ch 8
Choosing Sites for Soil Pits Avoid • areas close to gateways, paths and tracks • headlands of arable fields (the outer 10 m) • sites where straw or fertiliser have been stored • sites used for localised burning of crop residues or hedge trimmings • old field boundaries where a hedge or bank has been removed and the land levelled Soil Analysis Ch 8
Choosing Sites for Soil Pits • soil varies spatially (from one place to another) • some properties vary in time • eg nutrient levels, moisture • others are more permanent • horizon depth, texture, stone content and ion exchange capacity Soil Analysis Ch 8
How do we Sample Soil? Is it just digging holes?
Sampling questions • How many samples do I take? • Do we composite lots of sub samples? • How deep do we take the samples? • Do we replicate the sampling? • What quality control do we need? • What tools do I need? • How do we transport, store and prepare the samples? Soil Analysis Ch 8
Information we need to know • Why are we analysing the soil? • Surveys, chemical analysis etc. • How large is the area of interest? • Large areas require lots of sampling • Do we now the soil profile at all? • If we don’t, how deep do we sample? • What are we analysing the soil for? • Physical, chemical or biological parameters Soil Analysis Ch 8
Amount of sample • depends upon; • Time constraints • Topography • Cost factors • Reasons for sampling • There are no specific guidelines Soil Analysis Ch 8
Soil Sampling • undisturbed stratification: • remove a core with all horizon information retained, eg with auger • disturbed stratification • no attempt to keep the vertical connection between horizons, eg with a shovel Soil Analysis Ch 8
Soil Sampling • How many samples do we take? • At least 20 single samples per 10 000m2 must be taken with an earth boring tool (or spade) and combined to a mixed sample. • To what depth do we sample? • The usual sampling depth is up to 20 cm in arable land or 10cm in pasture. Undisturbed soil samples are obtained with a cutting cylinder with minimum capacity of 100cm3 . Soil Analysis Ch 8
test lot cross line diagonal line random How do we sample? Soil Analysis Ch 8
Sampling using Augers • pressed and rotated into the soil to take samples from depth increments of between 15 and 20cm. • samples are 'disturbed' to varying degrees • observations that can be made on the samples will be restricted • colour, texture, stones, roots and horizon depth can be recorded • soil structure cannot • special coring equipment is required to obtain 'undisturbed' samples Soil Analysis Ch 8
Sampling for lab testing • normal sampling depth for horticultural and tree crops is 0-15 cm • deep sampling down to 60-100 cm may be necessary to better assess soil salinity, acidity, S, and mineral N status • sampling depth must be recorded • protocols relevant to important crop and soil tests should be followed • usually involves making a composite from around 15 to 30 sub-samples from the area in question Soil Analysis Ch 8
Transportation, preparation and storage of samples Now that you have your soil samples, what do you do with them?
Laboratory Preparation of Samples • should be kept cool or cold between during transport • may be air-dried remote from the laboratory (max. 40C) when moisture content is not required • breaking up any large cores or peds on a clean surface • remove rocks by hand or sieving • retain a representative portion in a sealed polyethylene bag or 'moisture container' for moisture determination • sample size reduction: coning and quartering or riffler Soil Analysis Ch 8
Laboratory Preparation of Samples Soil Analysis Ch 8
Laboratory Preparation of Samples • Next spread the soil samples on drying trays (if applicable) and air-dry at up to 40C. • When the soil is thoroughly air-dry, mix, roll, and/or grind. • Retain the <2mm fraction, preferably in an air-tight plastic or inert container, for subsequent laboratory analyses. Soil Analysis Ch 8
Laboratory Preparation of Samples • When required, determine the weight percentage (oven-dry basis) of the residual >2-20 mm size fraction. • When fine grinding is specified, take a representative sub-sample (usually around 30g) from the <2 mm portion. • Pass the entire sub-sample through the required mill and store in a small air-tight container. Soil Analysis Ch 8
Coning & quartering Soil Analysis Ch 8
Riffling Soil Analysis Ch 8