Google Calendar (GCal)
Google Calendar (GCal). English. Course Objectives. Upon completion of this course, you will be able to: Navigate the GCal interface Search your calendar Create an event Populate event details Use GCal to set up a large meeting Add other people’s calendars to your calendar view

Google Calendar (GCal)
E N D
Presentation Transcript
Google Calendar (GCal) English
Course Objectives Upon completion of this course, you will be able to: • Navigate the GCal interface • Search your calendar • Create an event • Populate event details • Use GCal to set up a large meeting • Add other people’s calendars to your calendar view • Use Settings to customize GCal for your needs • Create repeating events • Print your calendar
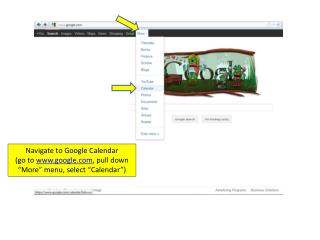
GCal Interface • Search • Event Area • View Options • Day View • Week View • Month View • 4 Days View • Agenda View • All-Day Event Area • Small Monthly Calendar • My Calendars
GCal Interface • Search • Event Area • View Options • Day View • Week View • Month View • 4 Days View • Agenda View • All-Day Event Area • Small Monthly Calendar • My Calendars
GCal Interface • Search • Event Area • View Options • Day View • Week View • Month View • 4 Days View • Agenda View • All-Day Event Area • Small Monthly Calendar • My Calendars
Search Your Calendar • Searching in GCal is powerful yet simple - click the search field • Type your search term and then click the Search My Calendars button • GCal will display the results that matched your search
Advanced Search Options • To search more effectively, click the Show Search Options link • The Search Options dialog box will display with several options: • What • Who • Where • Which Calendars • Doesn’t have • Date from: /to: • When finished, click Search or Hide Search Options
GCal Interface • Search • Event Area • View Options • Day View • Week View • Month View • 4 Days View • Agenda View • All-Day Event Area • Small Monthly Calendar • My Calendars
Print Your Calendar • To print your calendar, first select the view that you want printed • Click the Print link • The Print Preview dialog box will display, with options appropriate for the view you selected
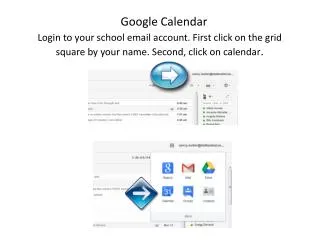
Navigate Your Calendar • To navigate dates in your calendar, use the Next and Back arrows and the Today button • Back will jump back in whichever view you’re in (last week if you’re in Week view) - Next does the same thing in the reverse direction • The Today button will display today in whichever view you’re in
Add Another Person’s Calendar • There are 3 ways to add other people’s calendars to your view - to start, click the Add link • Select Add a friend’s calendar • The first option is Friends’ Calendars • Type the friend’s email address • Select the correct auto-complete entry • Click the Add button
Add Another Person’s Calendar • If the calendar is not currently shared with you, you can send a request email • Click the Send Request button when you are finished editing the email • Click the Add by URL tab • If the calendar is published, you can enter the web address on this page to add it
Add Another Person’s Calendar • There are 3 ways to add other people’s calendars to your view - to start, click the Add link • Select Add a friend’s calendar • The first option is Friends’ Calendars • Type the friend’s email address • Select the correct auto-complete entry • Click the Add button
Create New Calendar • To create a new calendar, click the Create link under your list of calendars • The Create New Calendar dialog will display • Type the name of your new calendar • After you have entered a description and location (optional) scroll down
Add Another Person’s Calendar • If the calendar is not currently shared with you, you can send a request email • Click the Send Request button when you are finished editing the email • Click the Add by URL tab • If the calendar is published, you can enter the web address on this page to add it
Add Public Calendars • Because you are searching all public calendars, there will usually be many matching results, with the best matches first • You can also sort these by category • Or add your ZIP code to the search to filter by items in your area • When you locate what you are looking for, click the Add to Calendar button
Manage Added Calendars • To turn off the new public calendar, click the calendar name • You can turn the calendar back on by clicking the name again • To remove the public calendar completely, click the Settings link • Click the trashcan icon next to the calendar you want to remove • Click the Remove button to confirm
Create An Event • There are three ways to create events: • Click the date and the time you want to schedule the event • Use the Quick Add link • Use the Create Event link
Create An Event: Click The Date • To create an event without any other details, click the Create Event button • Your event has been created • To make changes or to delete the event, click the entry on your calendar • To move the event to a new time, simply click and drag the entry to a new time on your calendar
Create An Event: Quick Add • To create an event using the Quick Add link, simply type in the event details - include at least what and when • After you have typed your description, click the plus button or press Enter to save • Your event has been added - move or change the event the same way you would for the previous event type
Create An Event: Click The Date • To create an event without any other details, click the Create Event button • Your event has been created • To make changes or to delete the event, click the entry on your calendarNOTE: To move the event to a new time, simply click and drag the entry to a new time on your calendar
Create An Event: Create New • The last way to create an event is to click the Create Event link • The Event Details screen is displayed • What • When (Date, Time, and All day events) • Repeats • Where • Calendar • Description
Create An Event: Event Details • When you click the Create Event link, the Event Details screen is displayed • What • When (Date, Time, and All day events) • Repeats • Where • Calendar • Description
Create An Event: Event Details • When you click the Create Event link, the Event Details screen is displayed • What • When (Date, Time, and All day events) • Repeats • Where • Calendar • Description
Event Reminders • To set a reminder for an event, click the event on your calendar • Click the edit event details link • Scroll down the page and click the Reminder type drop-down menu • Select the reminder type you prefer • Click the time drop-down menu and select when you want to be reminded • Click the Add a reminder link coworker@salvair.com coworker2@salvair.com coworker3@salvair.com coworker4@salvair.com coworker5@salvair.com coworker6@salvair.com supervisor@salvair.com
Event Reminders • To set a reminder for an event, click the event on your calendar • Click the edit event details link • Scroll down the page and click the Reminder type drop-down menu • Select the reminder type you prefer • Click the time drop-down menu and select when you want to be reminded • Click the Add a reminder link
Large Meetings • To invite a Group, first click the Choose from contacts link • Click the Most Contacted drop-down arrow • Click the name of the Group • Click the Select: All link • Click the Done button
Large Meetings • Scroll down the screen for more options • Uncheck the Guests can invite others option if you don’t want attendees to be able to forward the meeting invite to other people • Check the Guests can invite others option if you would like the attendees to be able to forward the invite • Click the Save button
Large Meetings • After you have added the Group, uncheck the All day option to find a time • Click the Check guest and resource availability link • The Find a time dialog box will appear, double-check that your time will work • Scroll down • Click the conference room you would like to schedule • Click the Save Changes button
Custom Repeating Events • Now click the Repeat every: drop-down menu • Select 2, for every other week • Your event will now repeat every other Thursday - to add other days, click the checkbox for the day • To remove a day, uncheck it • If you don’t have an end date, leave the Ends: field at Never and click the Save button • To learn how to create a custom repeating event, first create an event by clicking on the date and time • Type the name of the event in the What field • Click the edit event details link • Click the Repeats drop-down menu • For an event that repeats every other week, select Weekly
Turn Off Declined Events • These events were actually declined, but they are still showing on the calendar by default - to turn this setting off, click the Settings link • Scroll to the bottom of the Settings page • Select No for Show events you have declined • Click the Save button
Settings • In General Settings you can find the following: • Language, country, & timezone • Date format, time format, and week format options • Default and custom view options • Current time and location • Local weather display options • Declined events display options • Invitation preferences • Change Password
Settings • In Calendar Settings you can find the following options: • Links to settings specific to each calendar • Sharing options • Notifications • Hide and Delete • Create and Add calendar buttons
Course Objectives Upon completion of this course, you will be able to: • Navigate the GCal interface • Search your calendar • Create an event • Populate event details • Use GCal to set up a large meeting • Add other peoples’ calendars to your calendar view • Use Settings to customize GCal for your needs • Create repeating events • Print your calendar